Configuration guide: Connectivity assisted troubleshooting

The configuration options on this page are only accessible to administrators.

Refer to the Usage guide: Connectivity assisted troubleshooting to use library content as a standard user.

Prerequisites

This library pack contains content from the following required expansion products:

Some of these products offer default access to their respective content and can still be used without expansion products.

Refer to the Nexthink Infinity thresholds and limits overview documentation for more information about default thresholds for expansion products.

Included content and dependencies

This library pack contains the following content and dependencies:

Content type
Name
Description

Workflow

Connectivity assisted troubleshooting

A workflow to provide information gathering and ITSM ticket updates for L1 agents, in addition to guided troubleshooting for the employee.

Remote action

Get Wi-Fi signal strength

Retrieves Wi-Fi signal quality, strength and channel, as well as whether the device is connected to a corporate network or not.

Remote action

Get Wi-Fi information

Get information about Wi-Fi connection on the device including band, channel, and SSID/BSSID.

Remote action

Get network speed

Gets information about the speed of the network by measuring the RTT of an external URL and a business URL.

Configuring "Connectivity assisted troubleshooting pack"

Adapt these suggested configuration steps to edit and customize content according to your organizational needs.

Follow these steps to install and configure content:

Step 1 - Configure remote action(s)

Favor the use of numbered steps. Bold words/terms that appear in the Nexthink UI.

  1. From the main menu, navigate to the Remote Actions > Manage remote action page.

  2. Review and edit your remote actions.

Nexthink recommends the following configurations for these remote actions:

Name
Trigger schedule
Parameters to edit

Get Wi-Fi signal strength

API trigger should be enabled so that it can be triggered from the Workflow

The following parameters must be configured:

  • CorporateNetworks

  • AcceptableSignalQuality

Get Wi-Fi information

API trigger should be enabled so that it can be triggered from the Workflow

None

Get network speed

API trigger should be enabled so that it can be triggered from the Workflow

The following parameters must be configured:

  • ExternalURL

  • WebRTTThreshold

  • BusinessURL

  • BusinessWebRTTThreshold

Step 2 - Configure Microsoft Teams communication channel

This workflow uses Microsoft Teams messages as the communication channel with end users, which is called a Message thinklet. To learn more about the Message thinklet, see the documentation.

For the Message thinklets to work correctly in this workflow, please complete the configuration steps described on this documentation page.

Step 3 - Set up a registered Microsoft Entra ID app and configure Microsoft Graph API connector credentials

Refer to the following documentation page to register the Microsoft Entra ID application and configure the appropriate connector credentials in Nexthink: Entra ID integration for workflows.

For this workflow, the registered Entra ID application must be granted the following permissions:

Permission type
Least priviledged permissions

Application or Delegated

User.Read.All

Directory.Read.All

Mail.Send

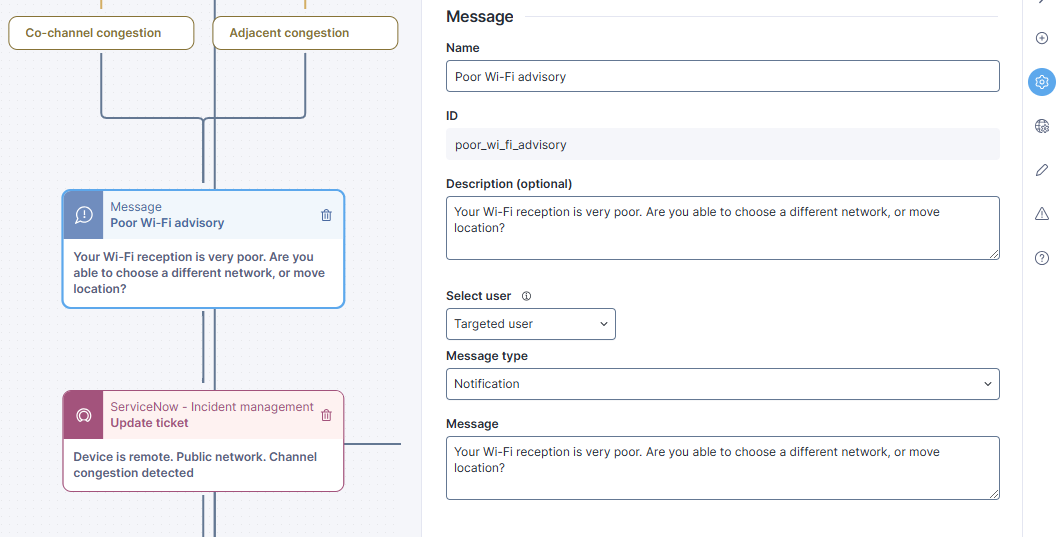
This workflow has been tested using the Application permission type. Different environments require different permissions. You should assign permissions according to your environment and know the risks involved.

Refer to the Graph REST API documentation from Microsoft for more information.

Step 4 - Edit MS Teams messages in the workflow

This workflow utilizes the Nexthink MS Teams application to send messages directly to the employee at various points in the process. This method fits in with employees work habits easily, and is quicker and less intrusive than the use of campaigns. Unlike campaigns, the wording and syntax of these messages is configured directly in the workflow. Nexthink recommends that these messages are reviewed for accuracy, and edited in line with corporate communication guidelines.

  1. From the workflow, click on any 'Message' thinklet. The Flow sidebar will load with the thinklet details.

  2. Review and edit the wording of the message. Save the changes when done.

Step 5 - Configure ITSM API connector credentials

The configuration of connector credentials is essential for enabling API calls.

  1. From the main menu, navigate to the Administration > Connector credentials page.

  2. Choose the HTTPS option from the Protocol drop-down.

  3. Paste the root https:// of the ITSM into the URL address field.

  4. Choose the Basic option from the Authorization drop-down.

  5. Enter a Username and Password to connect to the third-party tool.

  6. Save the credential.

After configuring the connector credential for the ITSM API:

  1. From the specific workflow, fill in each Service/API thinklet dropdown field for Credentials.

    • When the workflow is installed or copied from the Library, this field will be blank as it is a local setup of each environment and is not included in the Library.

Step 6 - Configure global parameters in the workflow

There is one global parameter in this workflow:

  • Incident number- the user friendly reference for an ITSM ticket created before running the workflow.

Before running the workflow, a ticket should be logged in ITSM for network connectivity issues. The ticket reference, the Incident number for ServiceNow, can then be added to the workflow as a global parameter.

The first step in the workflow is to use this Incident number to determine the sys_idof the ticket that was raised. This sys_id will then be used as the workflow progresses and work notes are appended to the ITSM ticket if problems are discovered, and whether or not they are fixed automatically.


RELATED TOPICS

Last updated

Was this helpful?