> For the complete documentation index, see [llms.txt](https://docs.nexthink.com/platform/llms.txt). Markdown versions of documentation pages are available by appending `.md` to page URLs; this page is available as [Markdown](https://docs.nexthink.com/platform/~/changes/Sh4xqs4GDClkDKT9Hvux/integrations/inbound-connectors/connector-for-citrix-virtual-apps-and-desktops.md).
# Connector for Citrix Virtual Apps and Desktops
{% hint style="warning" %}
This documentation references external sources. Nexthink does not have control over the accuracy of third-party documentation, nor any external updates or changes that might create inconsistencies with the information presented on this page. Please report any errors or inconsistencies to [Nexthink Support](https://support.nexthink.com/).
{% endhint %}
Nexthink Connector for Citrix Virtual Apps and Desktops (CVAD) retrieves important information about your Citrix environments, most notably the name of the Desktop Delivery Group to which the virtual machines belong. The connector ships with an accompanying live dashboard that you can download in a form of a library pack. Refer to the [Desktop Virtualization Optimization](/platform/~/changes/Sh4xqs4GDClkDKT9Hvux/library-packs/desktop-virtualization/desktop-virtualization-optimization.md) documentation for more details.
This installation guide aims to help you install the connector for CVAD securely. Your security team should review the installation steps described in this document and adjust them to meet your organization’s security policy.
{% hint style="info" %}
Nexthink Connector for CVAD and Nexthink Collector work together to provide additional information about CVAD environments. This means that in addition to installing the Nexthink Connector for CVAD, you must also install Nexthink Collector on all virtual devices in your Citrix environment.
{% endhint %}
## Device fields
The connector for Citrix Virtual Apps and Desktops (CVAD) imports the following device virtualization fields.
| **Nexthink Field** | **Description** |
| -------------------------------- | ------------------------------------------------------------------------------------------------------------- |
| Virtualization desktop pool name | Hardware characteristics of the associated virtual machines. |
| Virtualization desktop pool type |
Type of the desktop pool. Possible values are:
shared
personal
pooled
|
| Virtualization hypervisor name | Hardware virtualization system which is being used. |
| Environment name | Name of the connector instance which enriches the virtual device. |
| Desktop broker | Name of the desktop virtualization product used. In this case, `citrix_cvad` |
| Disk image | Name of the disk image used to deploy the virtual machine. |
## Nexthink connector server
To limit the risk of disrupting the Citrix Desktop Delivery Controller (DDC), we recommend installing the Nexthink Connector for CVAD on a separate server.
### Prerequisites
* Installed Windows PowerShell 5.1
* Execution policy set to **bypass**.
* Required PowerShell modules:
* [Logging 4.8.5 ](https://www.powershellgallery.com/packages/Logging/4.8.5)
* [CredentialManager 2.0](https://www.powershellgallery.com/packages/CredentialManager/2.0)
* Installed Citrix Powershell SDK 2203 LTSR or newer. Refer to the [SDKs and APIs for Citrix Virtual Apps and Desktops 7 2203 LTSR](https://docs.citrix.com/en-us/citrix-virtual-apps-desktops/2203-ltsr/sdk-api.md#citrix-virtual-apps-and-desktops-sdk) documentation for the installation procedure using Citrix Studio.
* Joined domain.
* [Downloaded Nexthink Connector for CVAD](https://download.nexthink.com/integrations/Citrix+OnPrem+Connector/1.5.0/CitrixConnector-1.5.0.zip).
### Networking
The Nexthink Connector for CVAD needs to connect to a Citrix Desktop Delivery controller, Citrix Director and the Nexthink API.
* The Nexthink connector communicates with the Nexthink cloud over TCP port 443.
* Communication between the Nexthink connector server and the Citrix Director uses TCP port 443.
* The connection to the Citrix DDC depends on the Citrix PowerShell SDK and follows your PowerShell configuration. By default, PowerShell communicates over TCP ports 5985 and 5986.
### Service account for scheduled tasks
The Nexthink Connector for CVAD will run as a scheduled task, one per CVAD environment, and needs to be able to access the Citrix APIs. To limit security concerns, we recommend using a local user account on the Nexthink connector server or a regular domain user account without any special privileges at the domain level.
The following guide uses a local account on the Nexthink connector server.
1. Log on as an administrator to the server that will run the Nexthink Connector for CVAD.
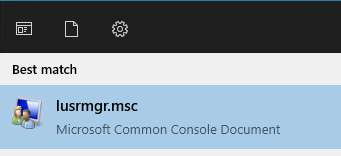
2. Launch the local users and groups console by running the command `lusrmgr.msc` from the start menu.
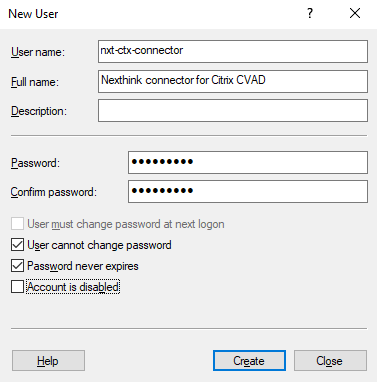
3. Right-click on the **Users** folder in the **Local Users and Groups (Local)** directory and select **New user…**
4. Create a user account according to your organization's naming conventions. Make a note of the **User name** and **Password** as you will need these later when creating a scheduled task.
To safeguard the functionality of the connector, select the following options:
1. **User cannot change password**
2. **Password never expires**
5. Click **Create**.
6. Next, open the local group policy editor by executing `gpedit` from the start menu.
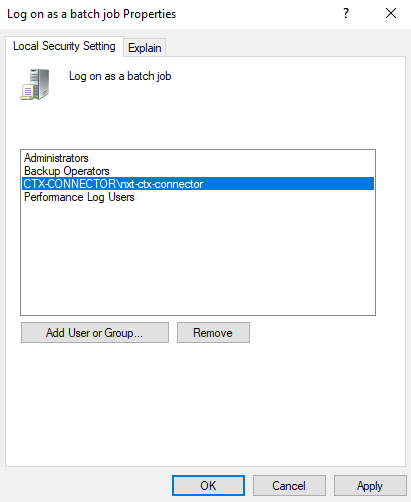
7. Navigate to the Computer Configuration > Windows Settings > Security Settings> Local Policies > **User Rights Assignment** and look for the policy called **Log on as a batch Job**.
8. Open the policy and click on **Add User or Group** to add the previously created user to the list.
### Installing the connector
1. [Download the Nexthink Connector for CVAD](https://download.nexthink.com/integrations/Citrix+OnPrem+Connector/1.5.0/CitrixConnector-1.5.0.zip).
2. Extract the zip file to a folder on your system. We suggest placing it in **C:\program files\Nexthink\Connectors\Citrix**
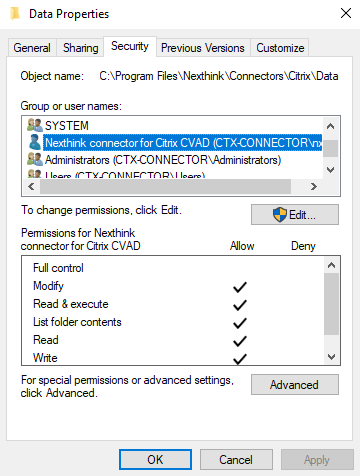
3. Apply **Modify** permissions for the **Logs** folder for the user account you created earlier.
### Nexthink Enrichment API credentials
The connector for CVAD needs appropriate credentials in order to connect to the Nexthink Enrichment API. Nexthink stores the credentials safely in the credential store of the local user account you created earlier.
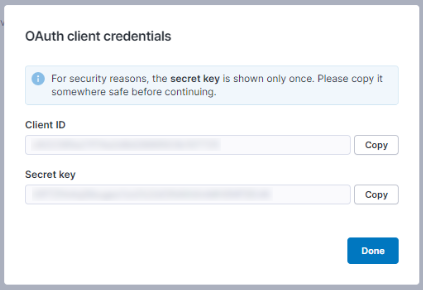
1. Refer to the [API credentials](https://developer.nexthink.com/docs/api/api-credentials) documentation for step-by-step guidance. When you save the API credentials, a new window containing the Client ID and the Secret key appears. Make a note of the information as it will not be accessible once you close the window.
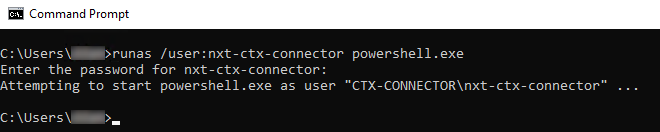
2. On the server that will be running the Nexthink Connector for CVAD, open PowerShell under the credentials of the local user you created earlier using the `runas` command on the command line: `runas /user:nxt-ctx-connector powershell.exe`
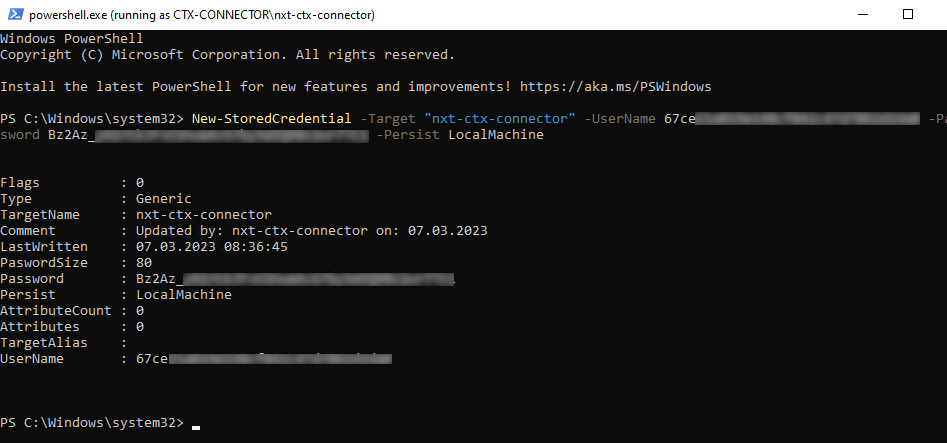
3. In the newly opened PowerShell window, add the API credentials you just created in the Nexthink web interface by writing the following command:\
`New-StoredCredential -Target "nxt-ctx-connector" -UserName -Password -Persist LocalMachine`
4. Replace the `` and `` with the values you noted down when creating the API credentials.
Make a note of the `TargetName` you used as you will need this value for the configuration file.
### Updating the configuration file
For the configuration file update, you need the URL of your Nexthink Cloud API instance. The URL pattern looks like this: `instance.api.region.nexthink.cloud`. See the steps listed below for more details.
{% hint style="info" %}
If you do not know your region, reach out to your Nexthink representative to obtain this information.
{% endhint %}
1. Locate the folder where you unzipped the connector for CVAD.
2. Navigate to the **Config** folder and open the `config.json` file using a text editor.
3. Scroll to the `"NexthinkAPI"` section.
```json
{
"_Info": "This is the JSON based configuration for Citrix Virtual Apps and Desktops connector",
"Info": {
"Project": "copla-citrix-onprem-connector",
"ConfigVersion": "1.1.0"
},
"Logging": {
"LogRetentionDays": 7,
"LogLevel": "INFO"
},
"CitrixEnvironments": [
{
"Name": "",
"CitrixControllerFQDN": "",
"CitrixDirectorFQDN": "",
"WindowsCredentialEntry": ""
},
{
"Name": "",
"CitrixControllerFQDN": "",
"CitrixDirectorFQDN": "",
"WindowsCredentialEntry": ""
}
],
"NexthinkAPI": {
"HostFQDN": "",
"WindowsCredentialEntry": "",
"RequestBatchSize": "1000"
}
}
```
4. Change the following values under the `"NexthinkAPI"` section:
* Replace the `"HostFQDN"` value with the URL of your Nexthink cloud API instance using the format `instance.api.region.nexthink.cloud` where `instance` and `region` are placeholders.
* Replace `instance` with the name of the instance
* Replace `region` with the name of one of the following regions:
* `us` for the United States
* `eu` for the European Union
* `pac` for Asia-Pacific
* `meta` for the Middle East, Turkey and Africa
* If needed, you can refer to this URL example:`gwy-eu-west-3-fuji-rest.api.eu.nexthink.cloud`
* Replace the `“WindowsCredentialEntry"` with the *TargetName* of the credentials you noted down from the PowerShell window earlier, for example:\
`"WindowsCredentialEntry": "nxt-citrix-credentials",`
## Setting up a connection to the CVAD farm
The previous section described the basic configuration of the Nexthink Connector for CVAD. This section will help you set up a connection to a CVAD environment. Repeat the procedures in this section for every CVAD environment you need to connect to.
### Citrix Desktop Delivery Controller (DDC)
Nexthink Connector for CVAD connects to the Citrix DDC to retrieve data from the Citrix Monitoring API provided by the Citrix Director and the Citrix PowerShell SDK. You need the Citrix DDC name to properly configure the connector.
Make sure the Citrix Director is installed on the DDC and make a note of the fully qualified domain name (FQDN) of the Citrix DDC.
### Creating a read-only Citrix administrator
The Nexthink Connector for CVAD needs read-only access to the Citrix Director API and the Citrix PowerShell SDK. In order to do this, create a domain user account without any special privileges and make a note of the username and password.
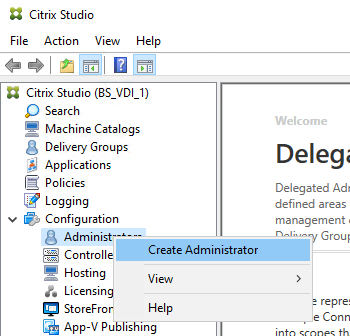
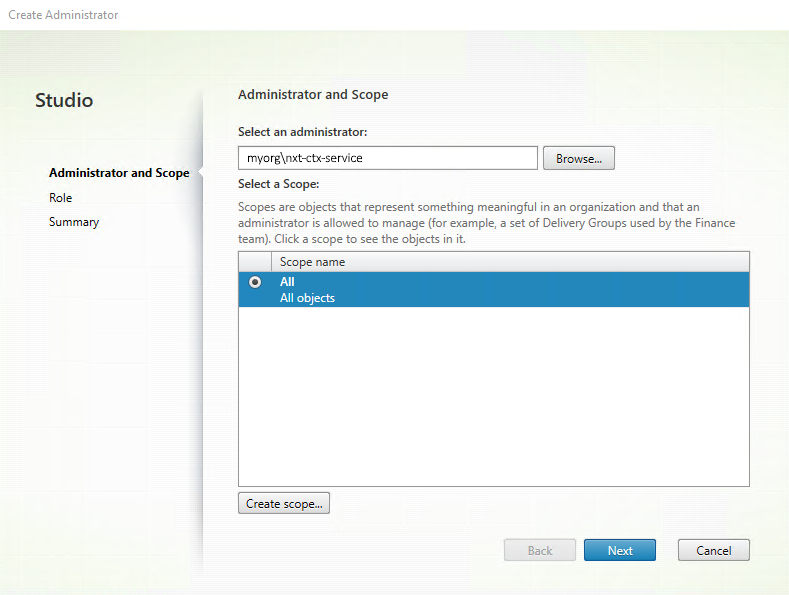
1. Launch the Citrix Studio console and start the administrator creation wizard from **Configuration > Administration.**
2. Right-click on **Administration** and select **Create Administrator.**
3. Click the **Browse…** button and select the service account that you previously created.
* Set the scope to **All** and click **Next** to continue
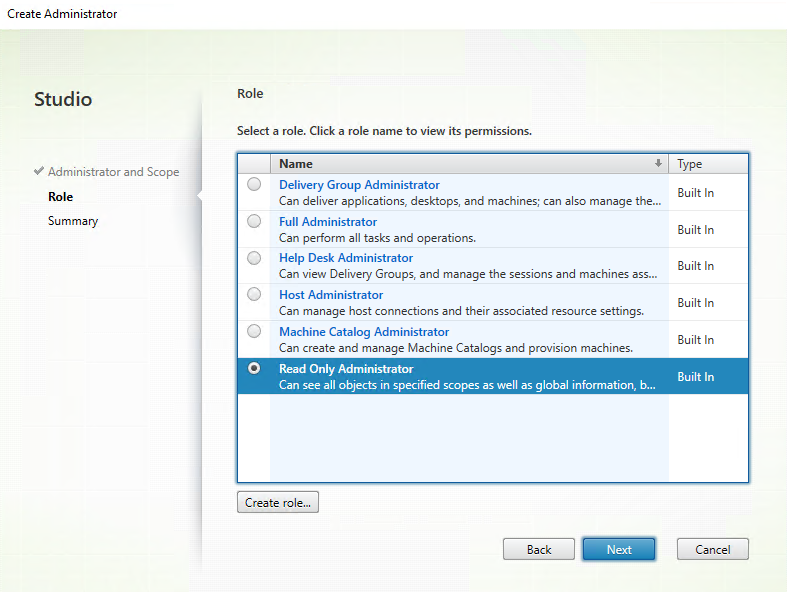
4. Select the **Read Only Administrator** role and click **Next** to continue.
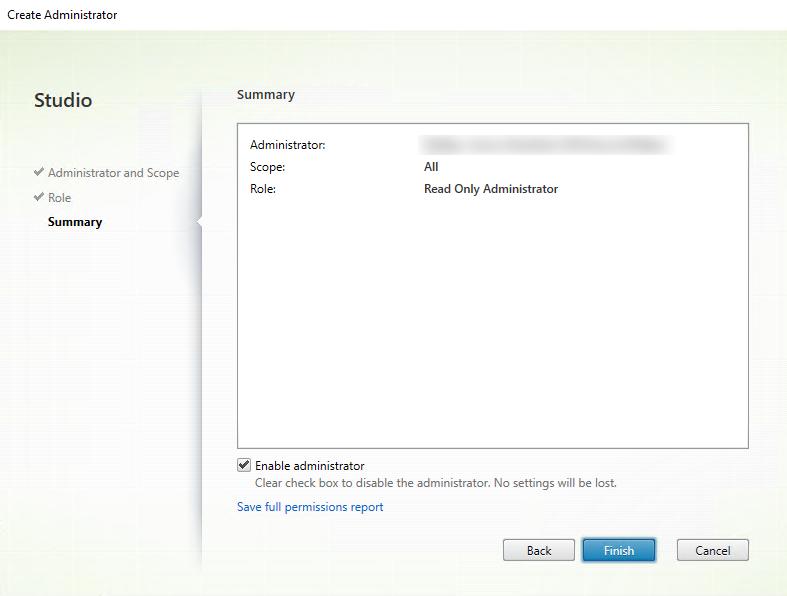
5. Select **Enable administrator** and click **Finish**.
### Setting up stored credentials
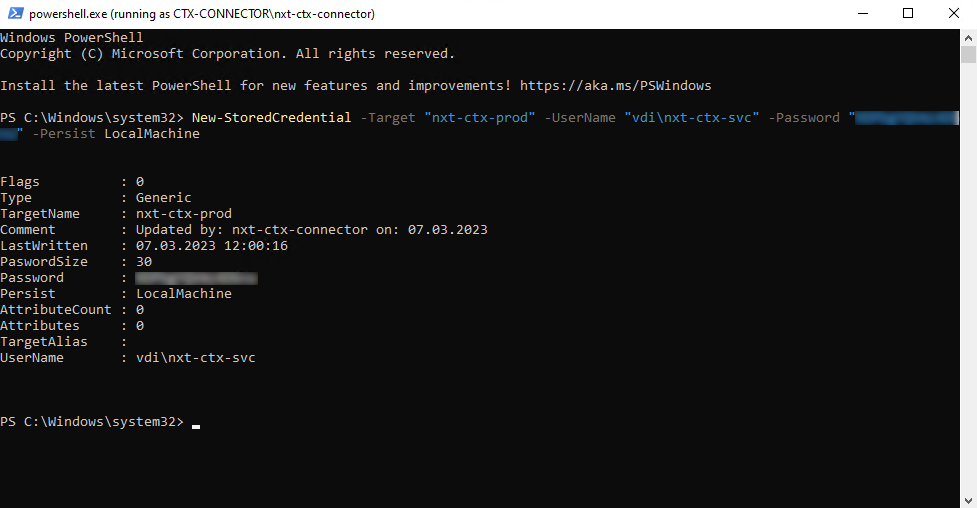
1. On the server that will be running the Nexthink Connector for CVAD, open PowerShell under the credentials of the local user you created earlier using the `runas` command on the command line: `runas /user:nxt-ctx-connector powershell.exe`
2. In the newly opened PowerShell window, add the API credentials you just created in the Nexthink web interface by writing the following command:\
`New-StoredCredential -Target "nxt-ctx-prod" -UserName -Password -Persist LocalMachine`
Replace the `` and `` with the values you noted down when creating a domain user account with a read-only Citrix administrator.
Make a note of the `TargetName` you used as you will need this value for the configuration file.
### Updating the configuration file
Each CVAD environment has its own section in the configuration file. The configuration file that comes with the connector contains an example of how to configure multiple environments. If needed, create a copy of the original `config.json` file for future reference.
1. Locate the folder where you unzipped the connector for CVAD.
2. Navigate to the **Config** folder and open the `config.json` file using a text editor.
3. Scroll to the `"CitrixEnvironments"` section and remove the second item on the list starting with `{ "Name"...` and ending with `""}`. The code should look similar to the following:
```
{
"_Info": "This is the JSON based configuration for Citrix Virtual Apps and Desktops connector",
"Info": {
"Project": "copla-citrix-onprem-connector",
"ConfigVersion": "1.1.0"
},
"Logging": {
"LogRetentionDays": 7,
"LogLevel": "INFO"
},
"CitrixEnvironments": [
{
"Name": "",
"CitrixControllerFQDN": "",
"CitrixDirectorFQDN": "",
"WindowsCredentialEntry": ""
}
],
"NexthinkAPI": {
"HostFQDN": "",
"WindowsCredentialEntry": "",
"RequestBatchSize": "1000"
}
}
```
Change the following values in the `"CitrixEnvironments"` section:
* Replace `` with the name of your environment.
* Replace `` with the name of the Citrix DDC.
* Replace `` with the name of the Citrix Director.
* Replace `` with the *TargetName* of the stored credentials you created earlier in PowerShell.
* Make a note of the identifier as you will need it later.
### Testing the connector
1. On the server that will be running the Nexthink Connector for CVAD, open PowerShell under the credentials of the local user you created earlier using the `runas` command on the command line: `runas /user:nxt-ctx-connector powershell.exe`
2. Change to the directory where you installed the connector, for example:\
`cd 'C:\Program Files\Nexthink\Connectors\Citrix\'`
3. Run the following command:\
`.\Citrix-Connector.ps1 -CitrixEnvironment "Citrix PROD"`\
Replace `"Citrix PROD"` with the name you chose for the environment.
After executing the command, the PowerShell window closes and a folder with the name you chose for the connection should appear. In the folder, you will find a log file with the result of the test.
### Setting up a scheduled task
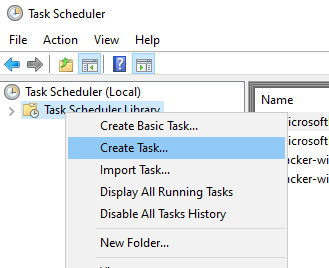
1. Open the task scheduler and select **Create task…**
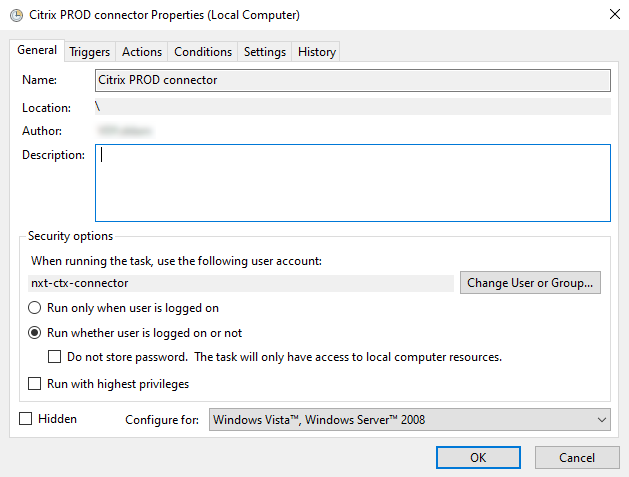
2. Name the task and change the user to the service account that you previously created in the **General** tab. Select **Run whether user is logged on or not**. Click **OK**.
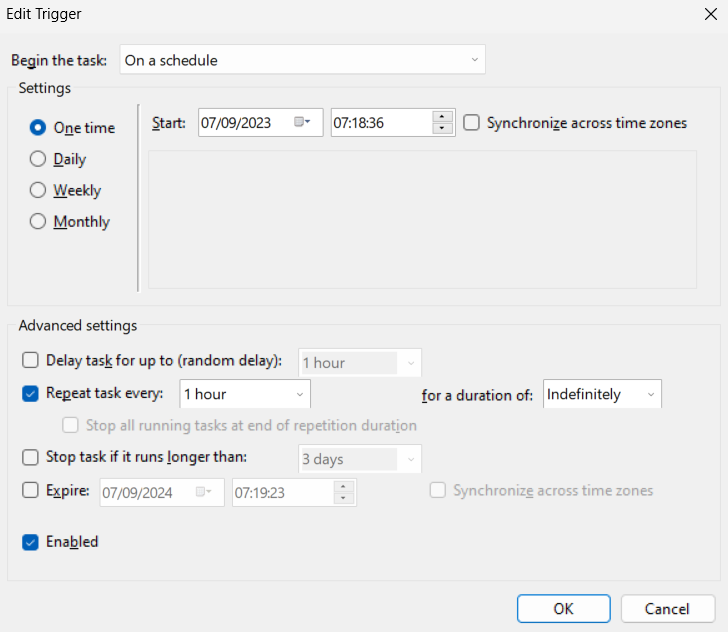
3. Switch to the **Triggers** tab.
4. Under Advanced settings, select **Repeat tasks every 1 hour**. Click **OK**.
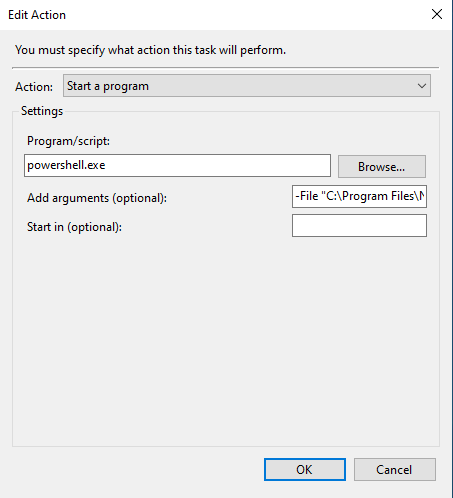
5. Switch to the **Actions** tab and create a new action.
6. Paste the full path of the `Citrix-Connector.ps1` script into the **Add arguments (optional)** field, including the environment name, for example `-File "C:\Program Files\Nexthink\Connectors\Citrix\Citrix-Connector.ps1" -CitrixEnvironment "Citrix PROD"`.\
Click **OK**.
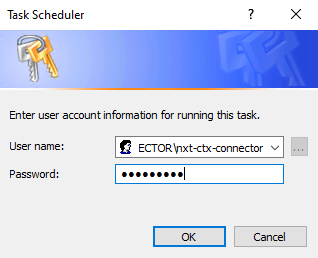
7. A window will prompt you to enter the password of the service account. Click **OK**.
***
RELATED TOPIC
* [API Credentials](https://developer.nexthink.com/docs/api/api-credentials)
---
# Agent Instructions
This documentation is published with GitBook. GitBook is the documentation platform designed so that both humans and AI agents can read, navigate, and reason over technical content effectively. Learn more at gitbook.com.
## Querying This Documentation
If you need additional information that is not directly available in this page, you can query the documentation dynamically by asking a question.
Perform an HTTP GET request on the current page URL with the `ask` query parameter, and the optional `goal` query parameter:
```
GET https://docs.nexthink.com/platform/~/changes/Sh4xqs4GDClkDKT9Hvux/integrations/inbound-connectors/connector-for-citrix-virtual-apps-and-desktops.md?ask=&goal=
```
`ask` is the immediate question: it should be specific, self-contained, and written in natural language.
`goal` is optional and describes the broader end goal you are ultimately trying to accomplish on behalf of the user. GitBook uses it to tailor the answer towards what is most useful for that goal.
The response will contain a direct answer to the question and relevant excerpts and sources from the documentation.
Use this mechanism when the answer is not explicitly present in the current page, you need clarification or additional context, or you want to retrieve related documentation sections.