> For the complete documentation index, see [llms.txt](https://docs.nexthink.com/llms.txt). Markdown versions of documentation pages are available by appending `.md` to page URLs; this page is available as [Markdown](https://docs.nexthink.com/user-guide/adopt/guide-content-development-from-in-app-adopt-editor/developing-walkthrough-guides/defining-walkthrough-action.md).
# Defining walkthrough Action
### Creating Actions
Use **Actions** to automatically perform certain actions for the employee.
{% hint style="danger" %}
Note that Adopt executes Actions on behalf of the user, in their own session. Any resulting outcomes directly affect the user.
As a security precaution, ensure that you set proper permissions for guide creation to prevent misuse of actions or outcomes that could be detrimental to users.
{% endhint %}
After [accessing Adopt Editor](/user-guide/adopt/guide-content-development-from-in-app-adopt-editor.md#accessing-specific-guide-in-adopt-editor) for Walkthroughs, from the **+** menu:
1. Select **Action** to create one.
2. When associated with an element, set one of the following **Action types**:
* **Click** interacts with the associated element. When an employee reaches this part of the Walkthrough, you can create a Click Action rather than instructing them to navigate to a different page or interact with an element.
* **Focus** switches the active focus to the associated element, provided it is a text input field, block of text, or a drop-down menu. You can create Focus Actions that bring important page elements to the employee's attention during a walkthrough.
* **Store value:** Stores the value the user inputs or selects from a field in a variable.
* **Input value:** Inputs a previously stored variable from an input field or text area.
* **Static value:** Allows you to define a hardcoded value that will not change.
* **Stored value:** Allows you to select from a list of stored, variable values.
* **Select value:** Inputs a previously stored variable from a drop-down option.
You can also preview the element value that will be stored when the step is triggered and select a variable name for later use.
{% hint style="warning" %}
When choosing **Click** as the **Action type**, you may need to choose a different **Click action method** to ensure the guide action interacts correctly with a specific page element.
{% endhint %}
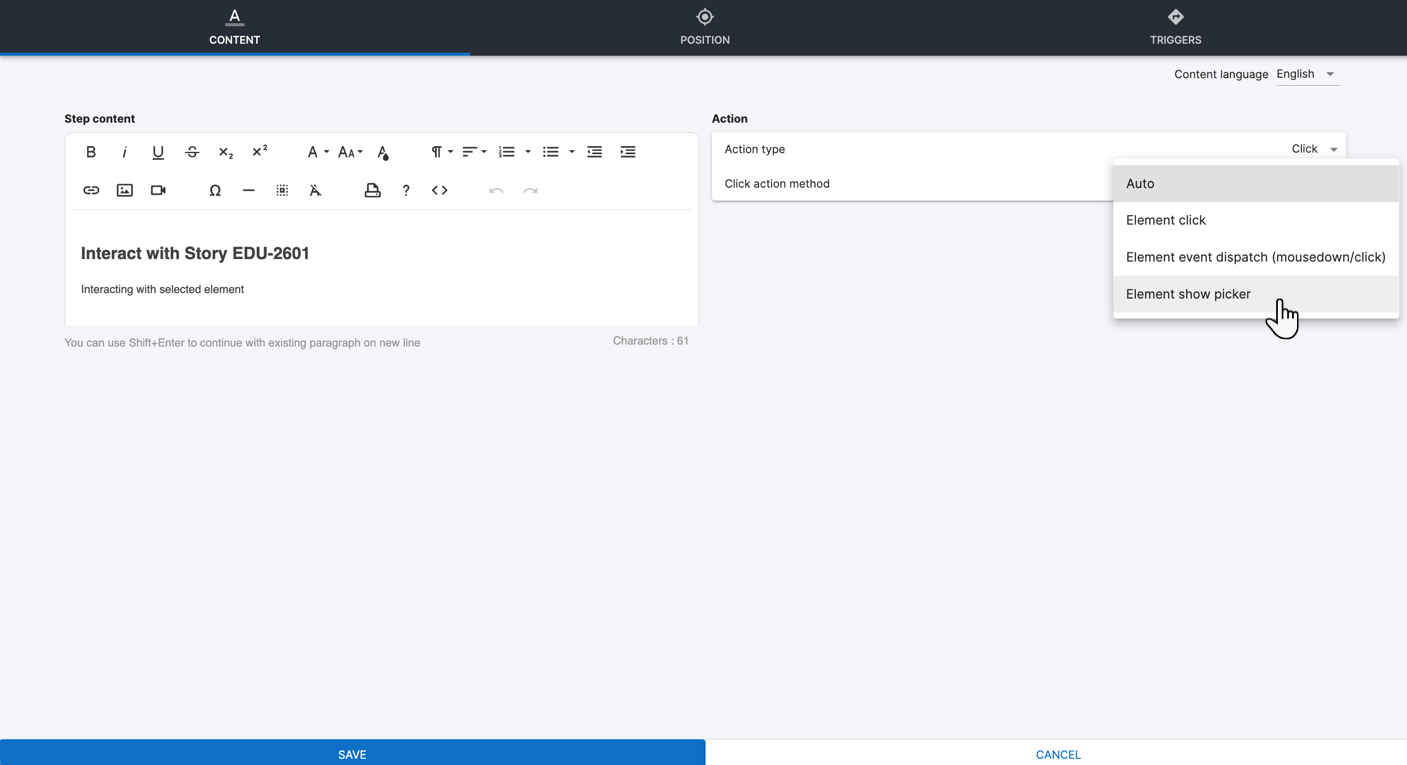
Choosing different Click action methods
When selecting **Click** as **Action type**, the system defaults to **Auto,** which relies on the best method listed below to ensure the web application records the employee's click-type action.
However, in some cases, you may need to select a specific **Click action method**:
* **Auto** click automatically uses the best strategy (from the list below) based on page element type—button, select list or others.
* **Element click** works best for buttons.
* This method uses `element.click();` .
* **Element event dispatch** works for most elements—**mousedown** & click events.
* This method triggers `element.dispatchEvent(new MouseEvent(eventName, { bubbles: true, clientX: x, clientY: y }));` .
* **Element show picker** works best for date pickers, colour pickers, select lists, etc.
* This method uses `element.showpicker();` .
---
# Agent Instructions
This documentation is published with GitBook. GitBook is the documentation platform designed so that both humans and AI agents can read, navigate, and reason over technical content effectively. Learn more at gitbook.com.
## Querying This Documentation
If you need additional information that is not directly available in this page, you can query the documentation by asking a question.
Perform an HTTP GET request on the following URL with the `ask` and `goal` query parameters:
```
GET https://docs.nexthink.com/user-guide/adopt/guide-content-development-from-in-app-adopt-editor/developing-walkthrough-guides/defining-walkthrough-action.md?ask=&goal=
```
`ask` is the immediate question: it should be specific, self-contained, and written in natural language.
`goal` is what the user is ultimately trying to achieve, the reason they need the answer. Sharing it helps GitBook give you a better, more relevant answer. A goal is most helpful when it describes the outcome the user wants rather than restating the question. For example, with `ask=how do I create an API token`, a goal like `automate deployments from our CI pipeline` lets GitBook tailor the answer to that use case.
The response will contain a direct answer to the question and relevant excerpts and sources from the documentation.
Use this mechanism when the answer is not explicitly present in the current page, you need clarification or additional context, or you want to retrieve related documentation sections.