> For the complete documentation index, see [llms.txt](https://docs.nexthink.com/platform/llms.txt). Markdown versions of documentation pages are available by appending `.md` to page URLs; this page is available as [Markdown](https://docs.nexthink.com/platform/ja/user-guide/live-dashboards/widget-types/single-metric-gauge-chart.md).
# シングルメトリックゲージチャート
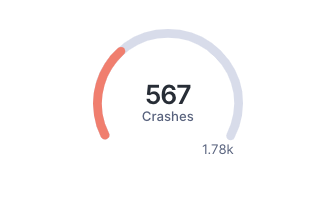
シングルメトリックゲージチャートを作成し、単一のメトリックが全体に対する比率を表示します。
## データの形状
`, `
## NQL 構造
{% hint style="info" %}
[Live Dashboards NQLの例](/platform/ja/user-guide/live-dashboards/live-dashboards-nql-examples.md#livedashboardsnqlexamples-single-metricgaugechart) のドキュメントを参照して、シングルメトリックゲージウィジェットのクエリ例を確認してください。
{% endhint %}
```
| include
| compute temp_bad_number = .count()
| summarize
= temp_bad_number.sum(),
= count()
```
## シングルメトリックゲージ用のビジュアライゼーションフィールドの設定
{% hint style="info" %}
このウィジェットに特化していない残りの設定フィールドを入力する方法を学ぶには、[Live Dashboardsの管理](/platform/ja/user-guide/live-dashboards/managing-live-dashboards.md#filling-in-widget-visualization-fields) ドキュメントを参照してください。
{% endhint %}
[ウィジェット追加](/platform/ja/user-guide/live-dashboards/managing-live-dashboards.md#adding-widgets)/[ウィジェット編集](/platform/ja/user-guide/live-dashboards/managing-live-dashboards.md#managing-widgets) のポップアップで、**シングルメトリックゲージチャート**オプションを**チャートタイプ**ドロップダウンから選択した後:
1. シングルメトリックゲージの表示名を作成するために、\*\*ラベル(オプション)\*\*フィールドを使用してください。
* テキストには特殊文字を含めることができます。**ラベル**フィールドには50文字の制限があります。
2. 例えば、指標の解釈方法、計算方法、または指標の微妙な点について説明するために、\*\*ウィジェット説明(オプション)\*\*を入力してください。
* ウィジェット説明は、ダッシュボード内のシングルメトリックゲージウィジェットの横にある情報アイコンにカーソルを合わせることで表示されます。
3. データに基づいてゲージの出力カラーを選択し、次のように定義します:
* 悪い (赤)
* 普通 (黄)
* 良い (緑)
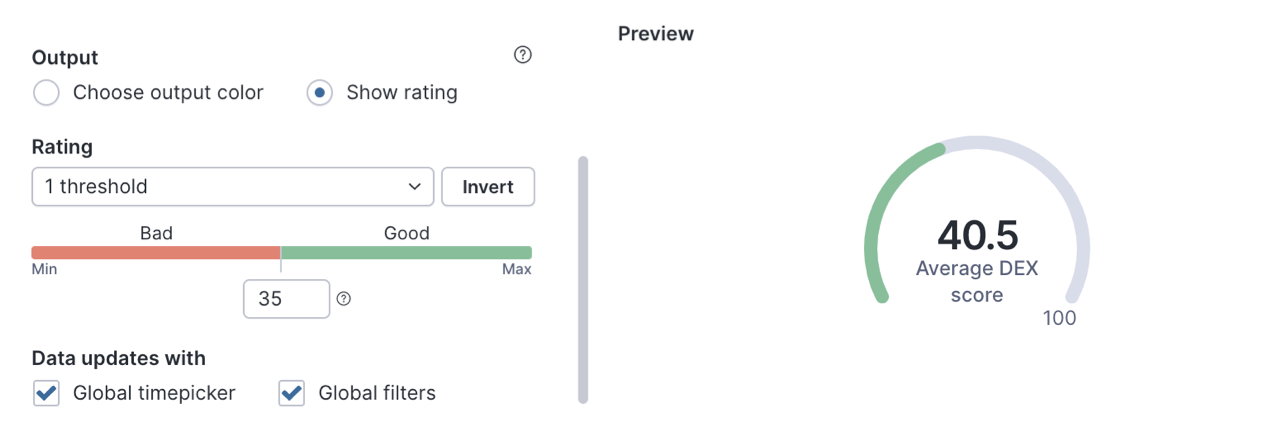
4. あるいは、定義された制限を超えた場合にゲージの色を変更するための**評価**しきい値を定めることで、問題を迅速に特定することができます。以下から選択してください:
* **1つのしきい値**: 設定されたしきい値を超えるか否かにより、シングルメトリックゲージチャートは緑または赤になります。
* システムはしきい値を >= 演算子で評価します。上記の例は次のように評価されます:
* **良い**: メトリックが < 35 の場合
* **悪い**: メトリックが >= 35 の場合
* **Invert**を選択して、良い条件と悪い条件を反転させます。反転された場合、上記の例は次のように評価されます:
* **悪い**: メトリックが < 35 の場合
* **良い**: メトリックが >= 35 の場合
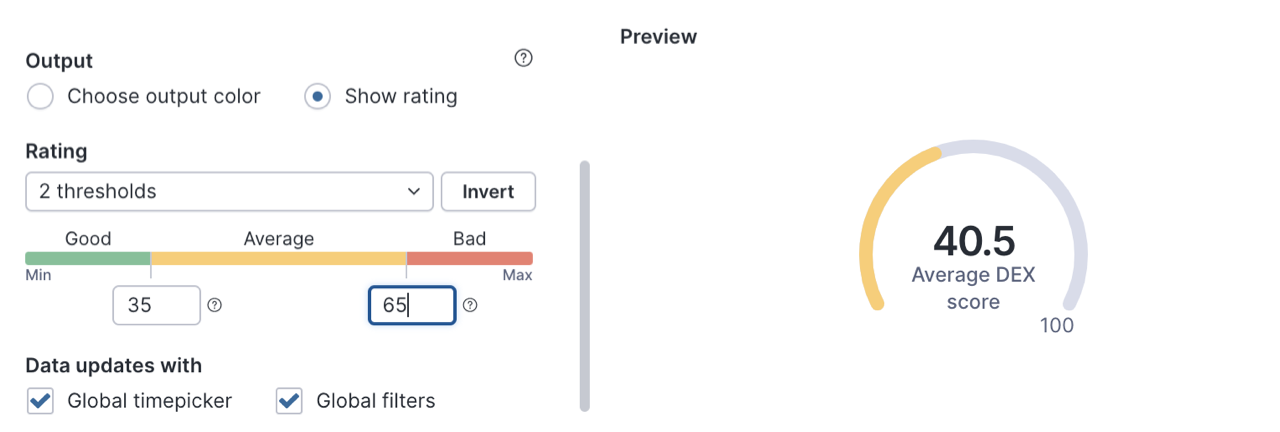
* **2つのしきい値**: 設定されたしきい値を超えるか否かにより、シングルメトリックゲージチャートは緑、黄、または赤になります。
* システムはしきい値を >= 演算子で評価します。上記の例は次のように評価されます:
* **良い**: メトリックが < 35 の場合
* **普通**: メトリックが >= 35 かつ メトリックが < 65 の場合
* **悪い**: メトリックが >= 65 の場合
* **Invert**を選択して、良い条件と悪い条件を反転させます。反転された場合、上記の例は次のように評価されます:
* **悪い**: メトリックが < 35 の場合
* **普通**: メトリックが >= 35 かつ メトリックが < 65 の場合
* **良い**: メトリックが >= 65 の場合
***
関連トピック
* [KPI](/platform/ja/user-guide/live-dashboards/widget-types/kpi.md)
* [折れ線グラフ](/platform/ja/user-guide/live-dashboards/widget-types/line-chart.md)
* [棒グラフ](/platform/ja/user-guide/live-dashboards/widget-types/bar-chart.md)
* [マルチメトリックゲージチャート](/platform/ja/user-guide/live-dashboards/widget-types/multi-metric-gauge-chart.md)
* [テーブル](/platform/ja/user-guide/live-dashboards/widget-types/table.md)
* [見出し](/platform/ja/user-guide/live-dashboards/widget-types/heading.md)
* [フィルターウィジェット](/platform/ja/user-guide/live-dashboards/widget-types/filter-widget.md)
* [タイムフレームピッカー](/platform/ja/user-guide/live-dashboards/widget-types/timeframe-picker.md)
---
# Agent Instructions
This documentation is published with GitBook. GitBook is the documentation platform designed so that both humans and AI agents can read, navigate, and reason over technical content effectively. Learn more at gitbook.com.
## Querying This Documentation
If you need additional information that is not directly available in this page, you can query the documentation by asking a question.
Perform an HTTP GET request on the following URL with the `ask` and `goal` query parameters:
```
GET https://docs.nexthink.com/platform/ja/user-guide/live-dashboards/widget-types/single-metric-gauge-chart.md?ask=&goal=
```
`ask` is the immediate question: it should be specific, self-contained, and written in natural language.
`goal` is what the user is ultimately trying to achieve, the reason they need the answer. Sharing it helps GitBook give you a better, more relevant answer. A goal is most helpful when it describes the outcome the user wants rather than restating the question. For example, with `ask=how do I create an API token`, a goal like `automate deployments from our CI pipeline` lets GitBook tailor the answer to that use case.
The response will contain a direct answer to the question and relevant excerpts and sources from the documentation.
Use this mechanism when the answer is not explicitly present in the current page, you need clarification or additional context, or you want to retrieve related documentation sections.