> For the complete documentation index, see [llms.txt](https://docs.nexthink.com/platform/llms.txt). Markdown versions of documentation pages are available by appending `.md` to page URLs; this page is available as [Markdown](https://docs.nexthink.com/platform/ja/user-guide/administration/content-management/custom-fields-management.md).

# カスタムフィールド管理

カスタムフィールドを使用すると、NQLデータモデルを追加フィールドで拡張できます。カスタムフィールドには三つのタイプがあります：

* **手動**カスタムフィールドでは、外部システムからデータをインポートして、レポート作成や分析用にインベントリオブジェクトを拡充できます。 Nexthink Webインターフェイスでオブジェクトにタグを割り当て、特定のキャンペーンユーザーを対象にしたり、変更管理用のパイロットグループを作成したりできます。
* **計算**カスタムフィールドでは、NQLクエリで定義した値を追跡でき、頻繁に実行するクエリの時間を節約できます。データモデルの要素として計算を追加すると、[Checklists](/platform/ja/user-guide/administration/content-management/checklists-management.md)など、製品のさまざまな部分で結果を利用しやすくなります。
* **ルールベースのカスタムフィールド**では、NQLクエリとして表現された事前定義済みの基準に従って、オブジェクトを自動的に分類できます。最も関連性の高い軸に従ってデータセットを分類し、Investigationsで保守とアクセスが容易な、頻繁に使用するフィルターを設定できます。

カスタムフィールド名には`#`文字が接頭辞として付くため、NQLクエリ内で識別できます。

{% hint style="info" %}
Nexthinkプラットフォームでは、タイプごとにカスタムフィールドの数が制限されています：

手動カスタムフィールドは最大100個。

計算カスタムフィールドは最大200個。

ルールベースのカスタムフィールドは最大200個。

詳細については、[Nexthink Infinityの閾値と制限の概要](https://edocs.nexthink.com/nexthink-infinity/infinity-specifications/nexthink-infinity-default-thresholds-overview)ドキュメントを参照してください。
{% endhint %}

***

### Libraryからインストールされたカスタムフィールド

Nexthinkは、Nexthink Libraryから手動でインストールできる、一連の事前構成済みカスタムフィールドを提供します。事前定義済みカスタムフィールドをインストール、管理、更新するには、Nexthinkインスタンス内のNexthink Libraryモジュールに移動します。

詳細については、[Nexthink Library](https://docs.nexthink.com/platform/ja/user-guide/nexthink-library)ドキュメントを参照してください。

### 新しいカスタムフィールド

カスタムトレンドをゼロから作成すると、ニーズとユースケースに応じて必要なデータを表示できます。このページの[新しいカスタムフィールドの作成](#customfieldsmanagement-creatinganewcustomfieldaddfield)セクションを参照してください。

***

## カスタムフィールドへのアクセス <a href="#customfieldsmanagement-accessingcustomfieldsaccesscs" id="customfieldsmanagement-accessingcustomfieldsaccesscs"></a>

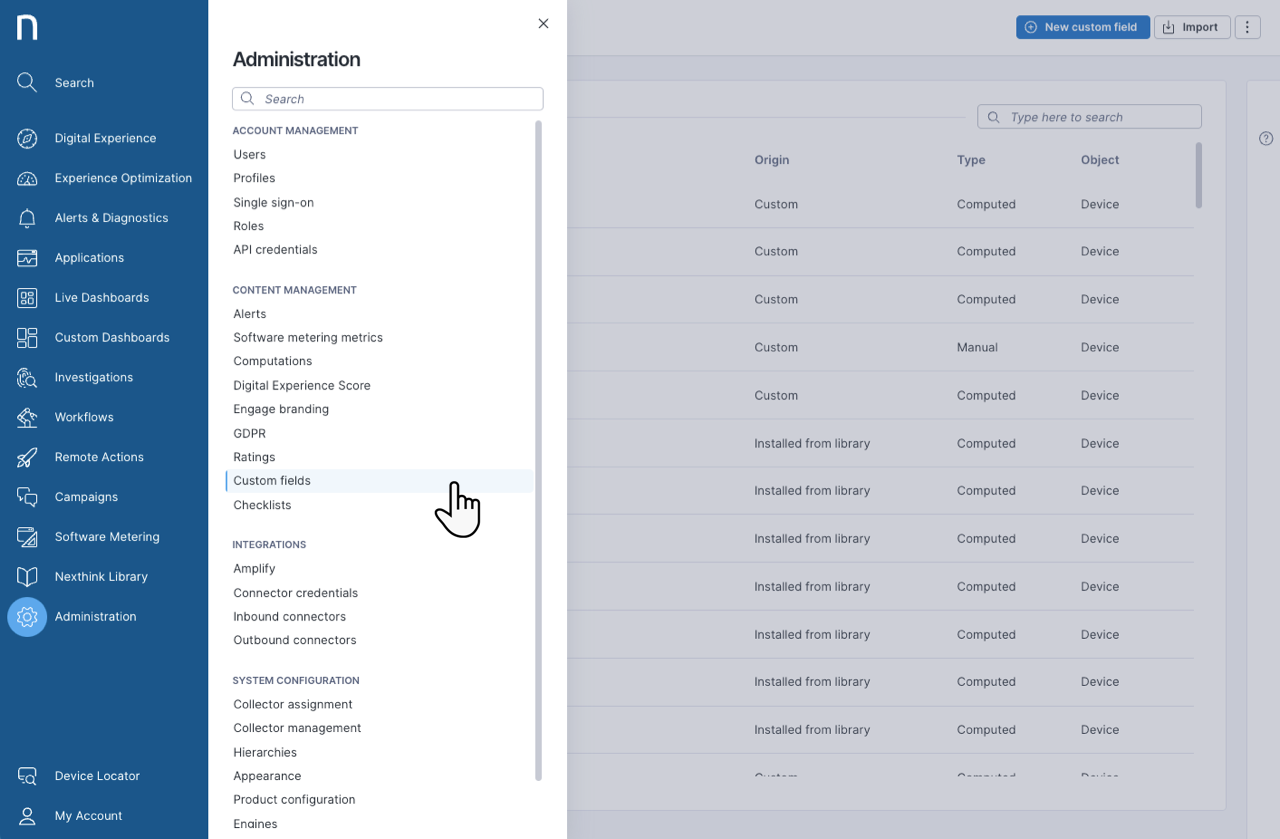
* メインメニューから**Administration**を選択します。
* ナビゲーションパネルのContent Managementセクションで、**Custom fields**をクリックします。

メニュー項目が表示されない場合は、ロールに適切な[権限](#customfieldsmanagement-permissionspermissions)があることを確認してください。

<figure><img src="https://3549141153-files.gitbook.io/~/files/v0/b/gitbook-x-prod.appspot.com/o/spaces%2FeLm8O7QKZDn6z806e7Sv%2Fuploads%2Fgit-blob-25484601f0953bba6a6d66dce79b876112ea9d62%2Fcustomfields-1698746776.png?alt=media" alt="" width="760"><figcaption></figcaption></figure>

***

## カスタムフィールドの管理 <a href="#customfieldsmanagement-managingcustomfields" id="customfieldsmanagement-managingcustomfields"></a>

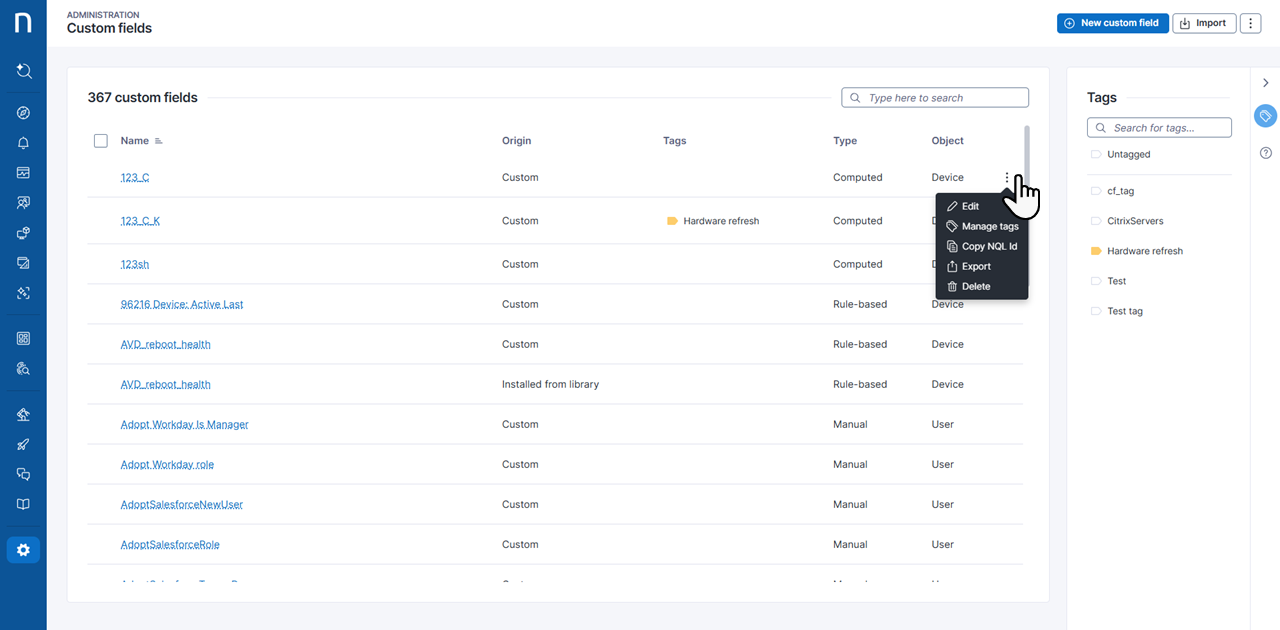
**Custom fields administration**ページには、すべてのカスタムフィールドが表形式で一覧表示されます。

<figure><img src="https://3549141153-files.gitbook.io/~/files/v0/b/gitbook-x-prod.appspot.com/o/spaces%2FeLm8O7QKZDn6z806e7Sv%2Fuploads%2Fgit-blob-44d87f1897ddd283cea2a7c533970a942b9e15af%2Fcustom_fields.png?alt=media" alt=""><figcaption></figcaption></figure>

* 各カスタムフィールドにカーソルを合わせると、表の右側にアクションメニューが表示されます。アクションメニューのオプションは次のとおりです：
  * **Edit**：カスタムフィールドを設定します。
  * \*\*タグを管理：\*\*カスタムフィールドに[複数のタグを追加](#customfieldsmanagement-creatinganewcustomfieldaddfield)します。
  * **Delete**：カスタムフィールドを削除します。
  * **Export**：カスタムフィールドをJSONファイル形式でエクスポートし、Nexthinkクラウドインスタンスの他のインスタンスと共有します。
  * **Copy NQL ID**：カスタムフィールドから情報を取得するNQLクエリを記述するときに、NQL IDを使用します。

<figure><img src="https://3549141153-files.gitbook.io/~/files/v0/b/gitbook-x-prod.appspot.com/o/spaces%2FeLm8O7QKZDn6z806e7Sv%2Fuploads%2Fgit-blob-846a029f480d46078b64cc73283353799f887e4a%2Fcustomfields-1697644325.png?alt=media" alt="" width="760"><figcaption></figcaption></figure>

* ページの右上には、さまざまなタスクを実行するための三つのボタンがあります：
  * **New custom field**ボタンをクリックして、カスタムフィールドを追加および設定します。詳細については、[新しいカスタムフィールドの作成](#customfieldsmanagement-creatinganewcustomfieldaddfield)セクションを参照してください。
  * **Import**ボタンをクリックして、JSONファイル形式のカスタムフィールドをインポートします。
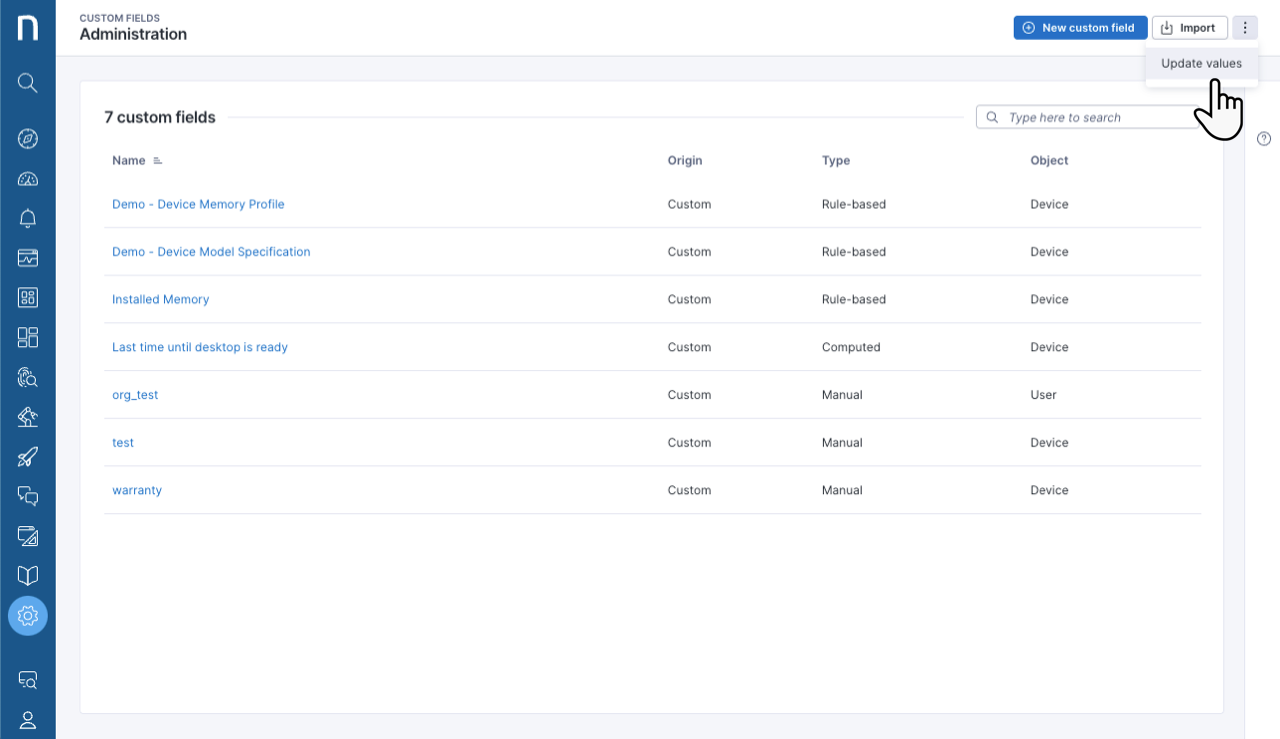
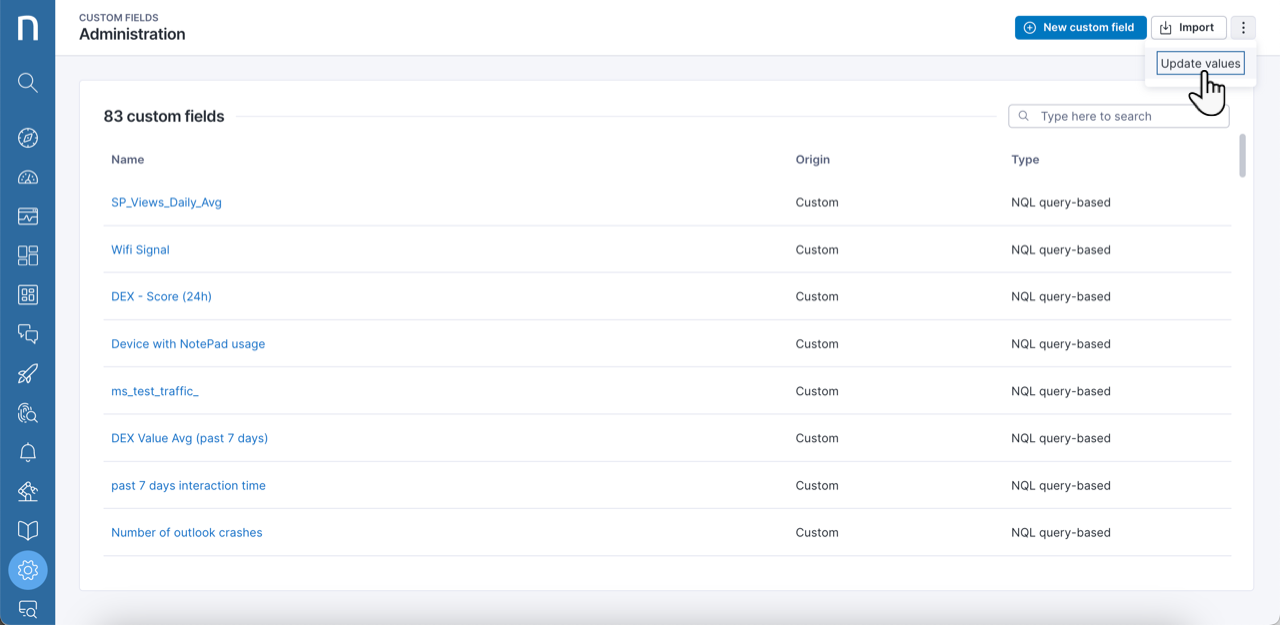
  * ページ右上のアクションメニューをクリックし、**Update values**を選択します。詳細については、[CSVファイルをインポートしてカスタムフィールドを更新する](#customfieldsmanagement-updatingcustomfieldsbyimportingacsvfileimportcsv)セクションを参照してください。

### カスタムフィールドリストのフィルタリング

リスト上部のフィルターを使用して、作業対象のカスタムフィールドに絞り込みます。フィルター条件:

* **作成元**: カスタムフィールドの作成方法。
* **タグ**: カスタムフィールドに割り当てられたタグ。
* **タイプ**: カスタムフィールドのタイプ。
* **オブジェクト**: カスタムフィールドが適用されるオブジェクト。

詳細については、[フィルタリング機能](/platform/ja/getting-started/navigating-the-web-interface.md#navigatingthewebinterface-filteringcapabilities)を参照してください。

### カスタムフィールドへのタグの追加 <a href="#customfieldsmanagement-creatinganewcustomfieldaddfield" id="customfieldsmanagement-creatinganewcustomfieldaddfield"></a>

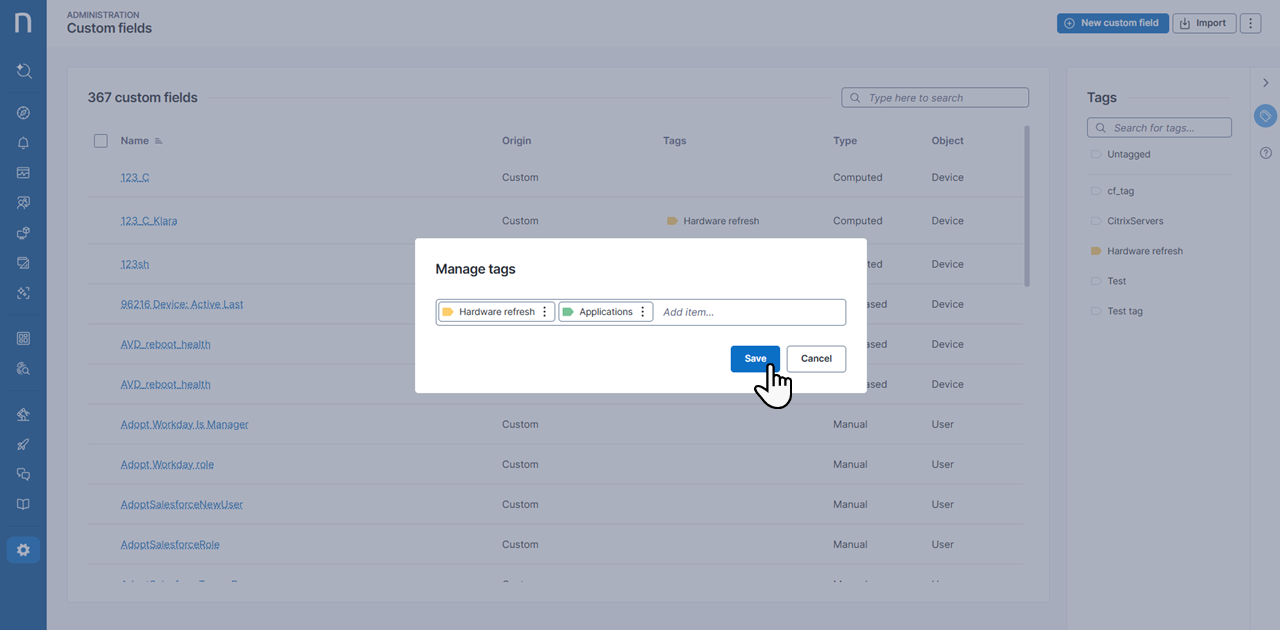
カスタムフィールドを検索およびインデックス登録しやすくするために、タグを作成または再利用できます。任意のカスタムフィールドのアクションメニューから：

* **Manage tags**を選択します。
* 新しいタグまたは既存のタグの名前を入力します。コンテキストメニューに一致するタグのリストが表示されます。一致するものがない場合、システムは新しいタグを作成します。
* 必要に応じて、タグをさらに追加するか、特定の色を指定します。
* タグを**Save**します。

<figure><img src="https://3549141153-files.gitbook.io/~/files/v0/b/gitbook-x-prod.appspot.com/o/spaces%2FeLm8O7QKZDn6z806e7Sv%2Fuploads%2Fgit-blob-31cd9dd9752472e2ab6104421cc032bf64a8c400%2Fcustom_fields_tags.png?alt=media" alt=""><figcaption></figcaption></figure>

ダッシュボードの最も右側にある**Tags**メニューでは、名前を入力してタグを検索するか、現在カスタムフィールドに割り当てられているすべてのタグのリストからタグをクリックできます。

***

## 新しいカスタムフィールドの作成 <a href="#customfieldsmanagement-creatinganewcustomfieldaddfield" id="customfieldsmanagement-creatinganewcustomfieldaddfield"></a>

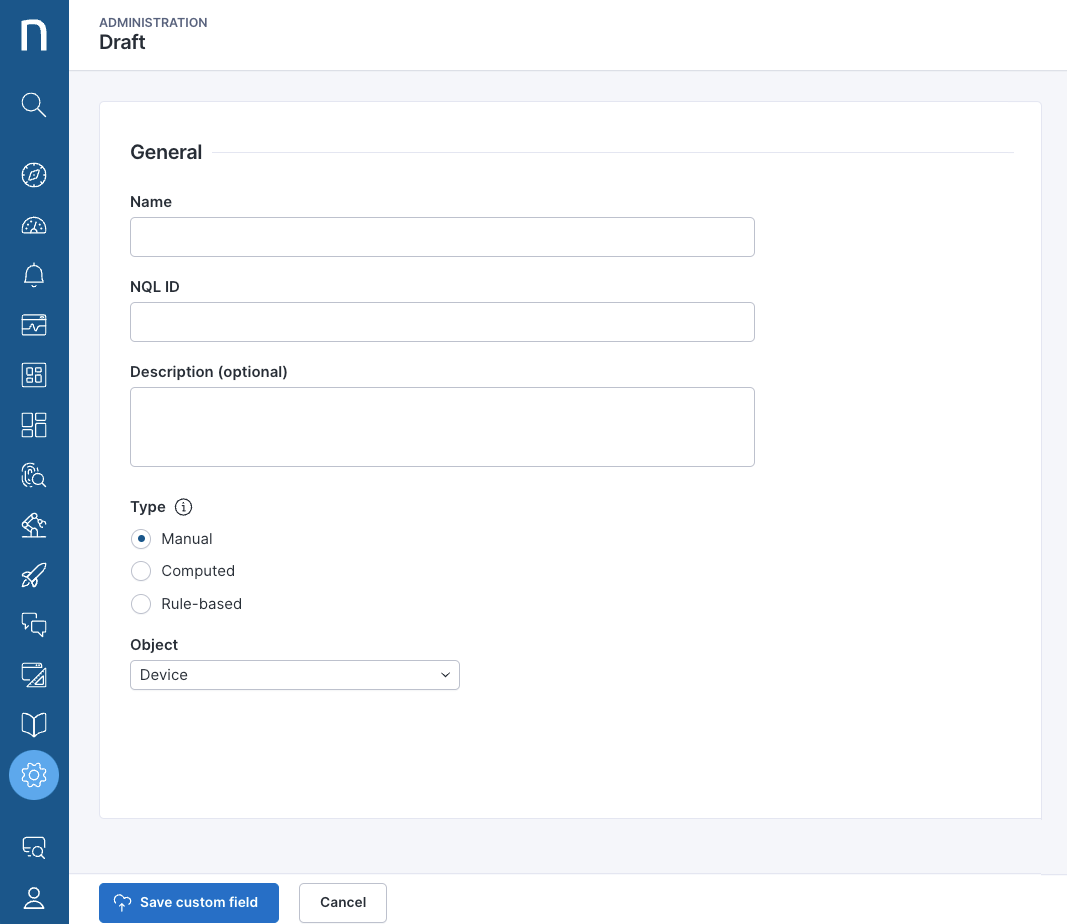
**New custom field**ボタンをクリックして、カスタムフィールドを追加および設定します。 **Draft**ページが開きます。

<figure><img src="https://3549141153-files.gitbook.io/~/files/v0/b/gitbook-x-prod.appspot.com/o/spaces%2FeLm8O7QKZDn6z806e7Sv%2Fuploads%2Fgit-blob-29c493a3de9939986248f703e084a800907120b6%2Fcustomfields-1698746356.png?alt=media" alt="" width="563"><figcaption></figcaption></figure>

以下の表に従って、**General**のフィールドに入力します：

| フィールド          | 説明                                                                                                           |
| -------------- | ------------------------------------------------------------------------------------------------------------ |
| **名前**         | Investigationsページに表示される名前です。                                                                                 |
| **NQL ID**     | システムは、クエリ内でNQL IDを使用してカスタムフィールドを参照します。 Nexthinkは、カスタムフィールド名に基づいてNQL IDを提案します。カスタムフィールドを保存すると、NQL IDは編集できません。 |
| **説明 (オプション)** | 他のユーザーがカスタムフィールドの意味を理解できるように、任意のテキストを入力します。                                                                  |

カスタムフィールドの**Type**を選択します。選択できるオプションは三つあります：

* **Object**を指定した[手動タイプ](#customfieldsmanagement-choosingmanualcustomfieldtypemanual)
* **NQLクエリ**を指定した[計算タイプ](#customfieldsmanagement-choosingcomputedcustomfieldtypecomputed)
* **Object**と**Rules**を指定した[ルールベースタイプ](#customfieldsmanagement-choosingrule-basedcustomfieldtyperuledbased)

### 手動カスタムフィールドタイプの選択 <a href="#customfieldsmanagement-choosingmanualcustomfieldtypemanual" id="customfieldsmanagement-choosingmanualcustomfieldtypemanual"></a>

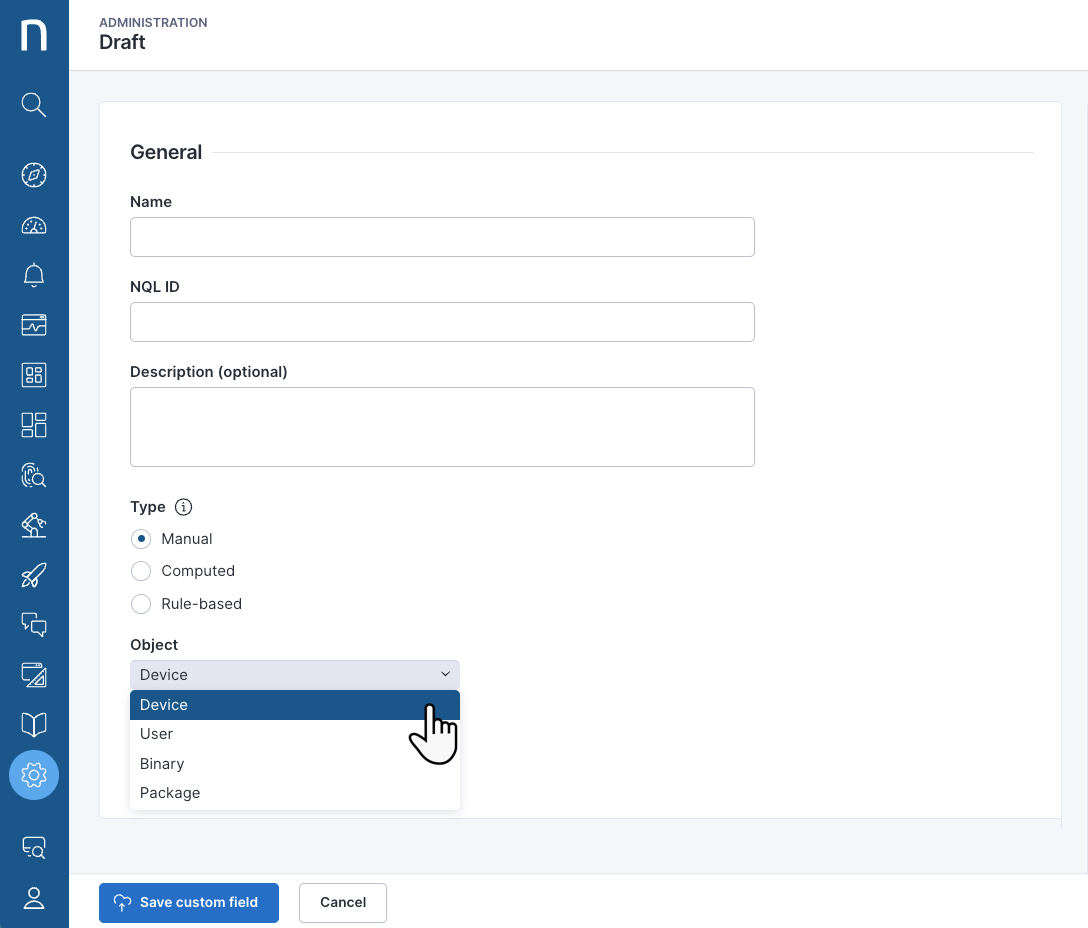
* **Type**で**Manual**を選択します。
* **Object**ドロップダウンメニューから、システムがカスタムフィールドを適用するオブジェクトを選択します：**Device**、**User**、**Binary**、または**Package**。

詳細については、[手動カスタムフィールドの値の設定](#customfieldsmanagement-settingvaluesformanualcustomfieldssetvalues)セクションを参照してください。

<figure><img src="https://3549141153-files.gitbook.io/~/files/v0/b/gitbook-x-prod.appspot.com/o/spaces%2FeLm8O7QKZDn6z806e7Sv%2Fuploads%2Fgit-blob-5b6e147eeb60c8cb6a61273eb75303f0cce384f0%2Fcustomfields-1698745428.png?alt=media" alt="" width="563"><figcaption></figcaption></figure>

### 計算カスタムフィールドタイプの選択 <a href="#customfieldsmanagement-choosingcomputedcustomfieldtypecomputed" id="customfieldsmanagement-choosingcomputedcustomfieldtypecomputed"></a>

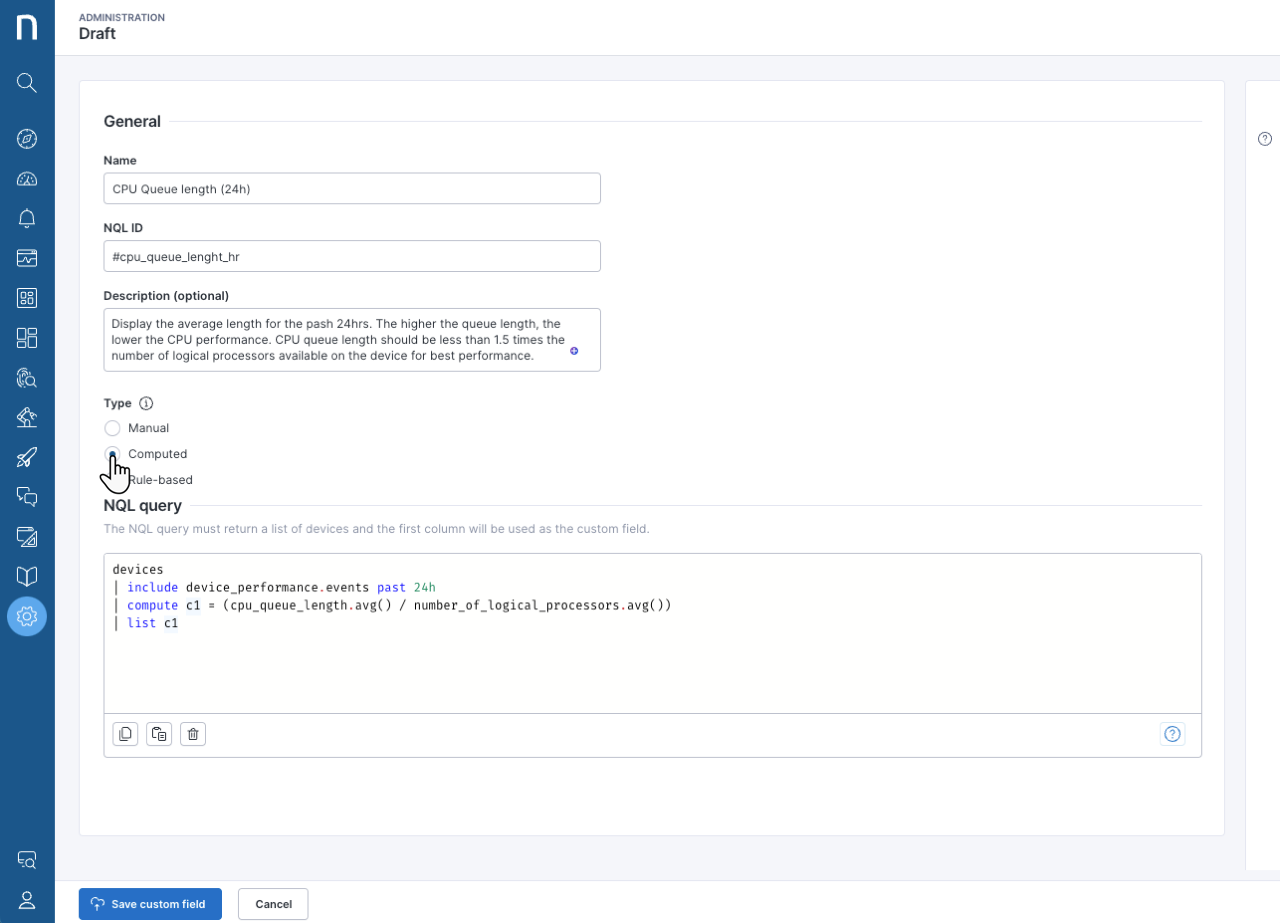
* **Type.でComputed**を選択します
* 各行に`devices`の計算結果を含む、単一列の表を返す**NQLクエリ**を記述します。

以下に、\*\*CPU Queue length (24h)\*\*カスタムフィールドの例を示します。

<figure><img src="https://3549141153-files.gitbook.io/~/files/v0/b/gitbook-x-prod.appspot.com/o/spaces%2FeLm8O7QKZDn6z806e7Sv%2Fuploads%2Fgit-blob-b3e8d4563845c18fde9c2b6f0ca075343fcecc58%2Fcustomfields-1698747841.png?alt=media" alt="" width="760"><figcaption></figcaption></figure>

以下の表は、上記の**Computed Type**の例のフィールド入力を示しています：

| フィールド          | 入力（例）                                                                                                                                                                |
| -------------- | -------------------------------------------------------------------------------------------------------------------------------------------------------------------- |
| **名前**         | CPUキューの長さ（24時間）                                                                                                                                                      |
| **NQL ID**     | <p><code>#cpu\_queue\_length\_1hr</code></p><p>上記の例では、ユーザーがカスタムフィールド名を24時間の期間に更新しても、NQL IDには最初の1時間の期間が反映されたままです。</p><p>カスタムフィールドを保存すると、NQL IDは編集できないことに注意してください。</p> |
| **説明 (オプション)** | 過去24時間の平均長を表示します。キュー長が大きいほど、CPUパフォーマンスは低下します。最適なパフォーマンスを得るには、CPUキュー長をデバイスで使用可能な論理プロセッサ数の1.5倍未満にする必要があります。                                                            |
| **NQLクエリ**     | 以下のクエリコードを参照してください。                                                                                                                                                  |

{% code lineNumbers="true" %}

```
devices 
| include device_performance.events past 24h
| compute c1 = (cpu_queue_length.avg() / number_of_logical_processors.avg())
| list c1
```

{% endcode %}

#### **計算カスタムフィールド用のNQLクエリを記述するためのガイドライン**

* クエリの対象は`devices`コレクションである必要があります。
* クエリには`include`句が一つだけ必要です。
* システムでは、`where`句は`include`句の後にのみ使用できます。
* クエリには`compute`句が一つだけ必要です。
* クエリは`list`句と、事前に計算された単一のフィールドで終了する必要があります。
* システムでは、`sort`、`limit`、`summarize`、`with`句は使用できません。
* クエリを含む計算カスタムフィールドを保存すると、異なるデータ型を返すクエリに変更することはできません。

### ルールベースのカスタムフィールドタイプの選択 <a href="#customfieldsmanagement-choosingrule-basedcustomfieldtyperuledbased" id="customfieldsmanagement-choosingrule-basedcustomfieldtyperuledbased"></a>

* 事前定義済みの条件に従ってオブジェクトを分類するには、**Type**で**Rule-based**を選択します。
* **Object**ドロップダウンメニューから、システムがカスタムフィールドを適用するオブジェクトを選択します：**Device**、**User**、**Binary**、または**Package**。

ルールベースのカスタムフィールドの一般的なユースケースは次のとおりです：

* ハードウェア仕様に基づいて、デバイスモデルをプレミアム、メインストリーム、または低価格に分類する。
* 搭載メモリに基づいてデバイスを分類する。
* 名前またはメールパターンに基づいて、ユーザーを内部または外部に分類する。
* ビジネス継続性における重要度に基づいて、パッケージおよびバイナリを分類する。
* コンプライアンスのために、パッケージまたはバイナリのブロックリストを定義する。

{% hint style="info" %}
ルールベースのカスタムフィールドには、最大20個のルールを含めることができます。
{% endhint %}

<figure><img src="https://3549141153-files.gitbook.io/~/files/v0/b/gitbook-x-prod.appspot.com/o/spaces%2FeLm8O7QKZDn6z806e7Sv%2Fuploads%2Fgit-blob-a51c3afd459c6d1692e7738f99971d3b7b842f9c%2Fimage-20231012-072718.png?alt=media" alt="" width="760"><figcaption></figcaption></figure>

{% hint style="info" %}
ルールベースのカスタムフィールドは、ドラッグアンドドロップで順序を変更できます。システムはルールを上から下へ評価します。
{% endhint %}

各ルールは次の属性によって特徴付けられます：

| ルール属性      | 説明                                                                     |
| ---------- | ---------------------------------------------------------------------- |
| **値**      | ルールを満たすすべてのオブジェクトに付与されるラベルです。                                          |
| **評価**     | ルールに付与される評価値：**Poor**、**Average**、または**Good**。デフォルトでは、**None**に設定されます。 |
| **NQLクエリ** | ルールの評価時に実行されるクエリです。                                                    |

{% hint style="info" %}
ルールベースのカスタムフィールドの値を並べ替える場合、アルファベット順または設定ページ上のルールの表示順になるとは限りません。代わりに、最初に保存された順序に従います。
{% endhint %}

ルールベースのカスタムフィールド用NQLクエリには、次の制約があります：

* クエリは、カスタムフィールドが定義されているオブジェクトを対象にする必要があります。たとえば、デバイスのカスタムフィールドの場合は`devices`です。
* クエリには少なくとも一つの`where`句が必要です。
* `with`、`include`、`summarize`、`compute`、`list`句は使用できません。
* `during past`、`from`、`to`などの期間指定は使用できません。
* クエリで参照できるのはネイティブオブジェクトのプロパティのみです

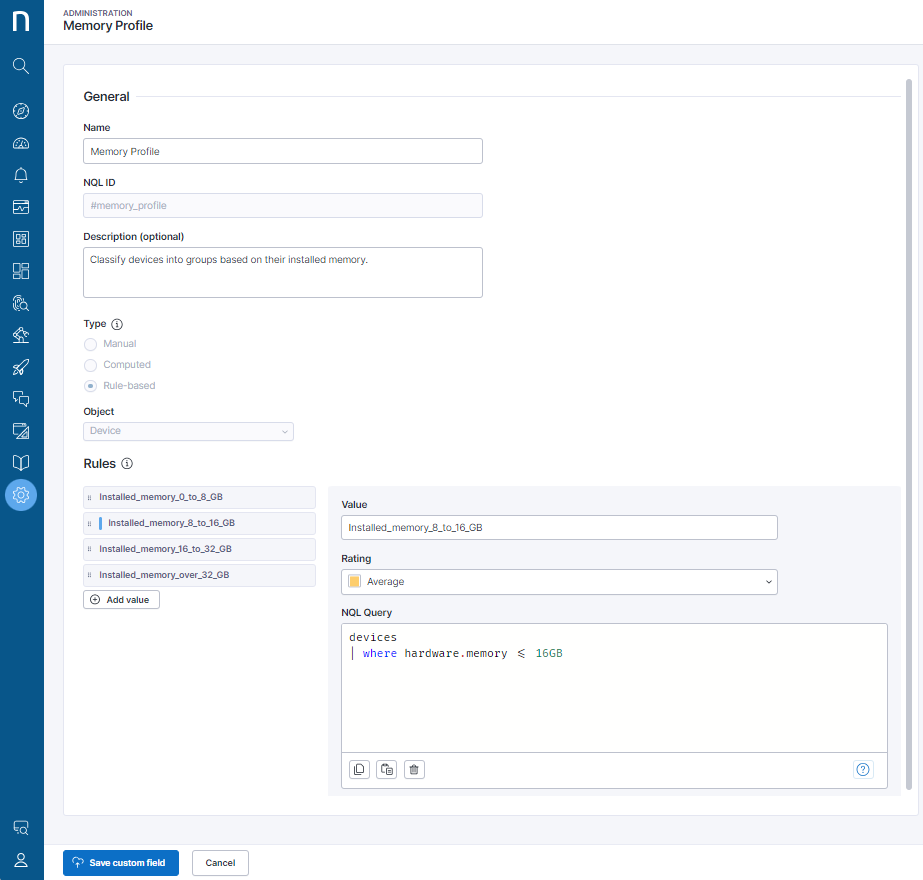
#### 搭載メモリプロファイルのルールベースの例 <a href="#customfieldsmanagement-rule-basedexampleofinstalledmemoryprofile" id="customfieldsmanagement-rule-basedexampleofinstalledmemoryprofile"></a>

このセクションでは、搭載メモリに基づいてデバイスを分類するルールベースのカスタムフィールドの例を示します。フィールド入力とルールは次のとおりです：

* **名前**：Memory Profile
* **NQL ID：**`#memory_profile`
* \*\*説明：\*\*搭載メモリに基づいてデバイスを分類します。
* \*\*オブジェクト：\*\*Device

\| **ルール1** |

* 値：Installed\_memory\_0\_to\_8\_GB
* 評価：Poor
* NQLクエリ：`devices | where hardware.memory <= 8GB`

\| | ---------- | --------------------------------------------------------------------------------------------------------------------------------------------------------- | | **ルール2** |

* 値：Installed\_memory\_8\_to\_16\_GB
* 評価：Average
* NQLクエリ：`devices | where hardware.memory <= 16GB`

\| | **ルール3** |

* 値：Installed\_memory\_16\_to\_32\_GB
* 評価：Good
* NQLクエリ：`devices | where hardware.memory <= 32GB`

\| | **ルール4** |

* 値：Installed\_memory\_over\_32\_GB
* 評価：Good
* NQLクエリ：`devices | where hardware.memory > 32GB`

|

上記のルールに基づくと、搭載メモリが16GBのデバイスには、NQLクエリの条件を最初に満たす**Rule 2**に従って、**Installed\_memory\_8\_to\_16\_GB**のタグが付与されます。

**Investigations**ページでは、ルールベースのカスタムフィールドを使用する[NQLクエリ](/platform/ja/user-guide/investigations/creating-investigations/nql-editor.md)を実行して調査できます。

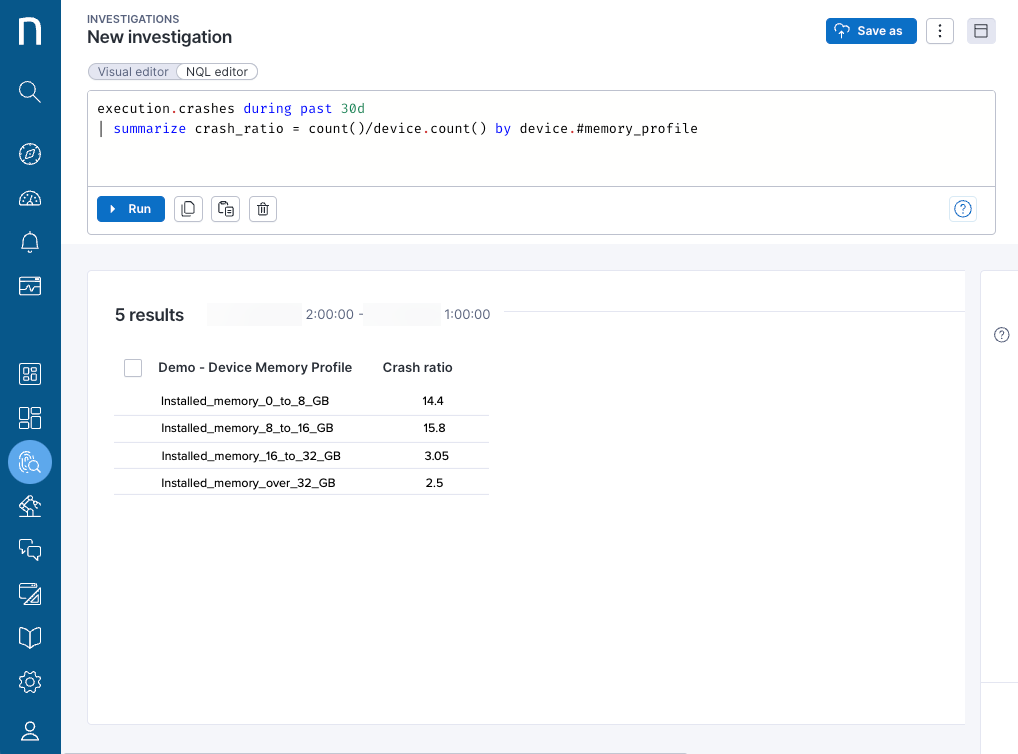
次のクエリは、デバイスのメモリプロファイルに応じたデバイスごとの実行クラッシュ数を返します：

{% code lineNumbers="true" %}

```
execution.crashes 過去30日間
| summarize crash_ratio = count()/device.count() by device.#memory_profile
```

{% endcode %}

<figure><img src="https://3549141153-files.gitbook.io/~/files/v0/b/gitbook-x-prod.appspot.com/o/spaces%2FeLm8O7QKZDn6z806e7Sv%2Fuploads%2Fgit-blob-b2c4abd0ca44c71bf29981f95107965221649a56%2Fcustomfields-1699614262.png?alt=media" alt="" width="760"><figcaption></figcaption></figure>

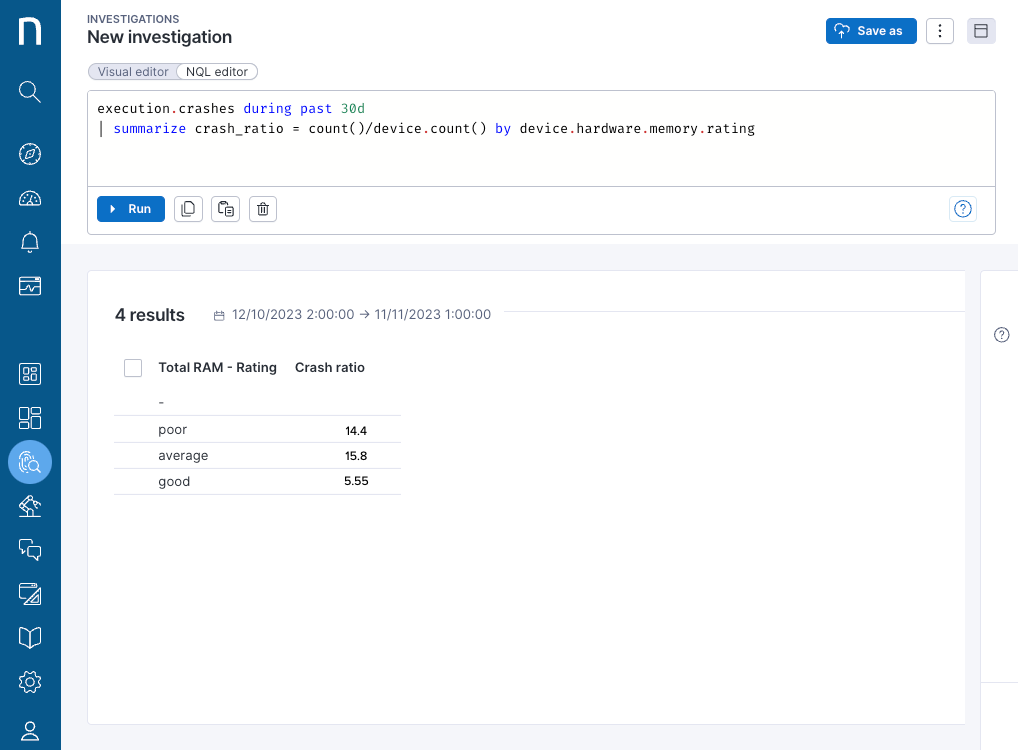
結果をメモリ別に分類する代わりに、ルールで設定された評価別に分類することもできます：**poor**、**average**、**good**。

この場合、Nexthinkは**Installed\_memory\_16\_to\_32\_GB**および**Installed\_memory\_over\_32\_GB**を持つデバイスを、まとめて**good**と評価します。

{% code lineNumbers="true" %}

```
execution.crashes 過去30日間
| summarize crash_ratio = count()/device.count() by device.#memory_profile.rating
```

{% endcode %}

<figure><img src="https://3549141153-files.gitbook.io/~/files/v0/b/gitbook-x-prod.appspot.com/o/spaces%2FeLm8O7QKZDn6z806e7Sv%2Fuploads%2Fgit-blob-314278396d633c7f7f997f684eb1584e99dcb0d5%2Fcustomfields-1700144407.png?alt=media" alt="" width="760"><figcaption></figcaption></figure>

***

## 手動カスタムフィールドの値の設定 <a href="#customfieldsmanagement-settingvaluesformanualcustomfieldssetvalues" id="customfieldsmanagement-settingvaluesformanualcustomfieldssetvalues"></a>

カスタムフィールドを作成した後、次の方法で値を設定できます：

* Investigationsページの[Edit](#customfieldsmanagement-editingcustomfieldsontheinvestigationspageeditcf)オプション。
  * 手動カスタムフィールドを編集する権限には、[View domain](/platform/ja/user-guide/administration/account-management/roles/view-domain.md#administration)への**限定アクセス**のみが必要です。
* Custom fields administrationページのアクションメニューから[Update values](#customfieldsmanagement-updatingcustomfieldsbyimportingacsvfileimportcsv)を実行。
* **Enrichment API**：詳細については、[Nexthink API Documentation](https://developer.nexthink.com/)を参照してください。
* Nexthinkの[ワークフロー実行](/platform/ja/user-guide/workflows/creating-workflows.md#updating-custom-fields-in-workflows-for-downstream-use)で、**Update custom field** Thinkletを使用して値を更新します。

値の設定方法にかかわらず、次の要件が適用されます：

* バックスラッシュ`\`および二重引用符`"`を除き、UTF-8文字がサポートされます。
* フィールド値ごとに最大64文字まで使用できます。

### Investigationsページでのカスタムフィールドの編集 <a href="#customfieldsmanagement-editingcustomfieldsontheinvestigationspageeditcf" id="customfieldsmanagement-editingcustomfieldsontheinvestigationspageeditcf"></a>

Investigationページでは、次の方法でカスタムフィールドを編集できます：

* アクションメニュー
* アクションバー
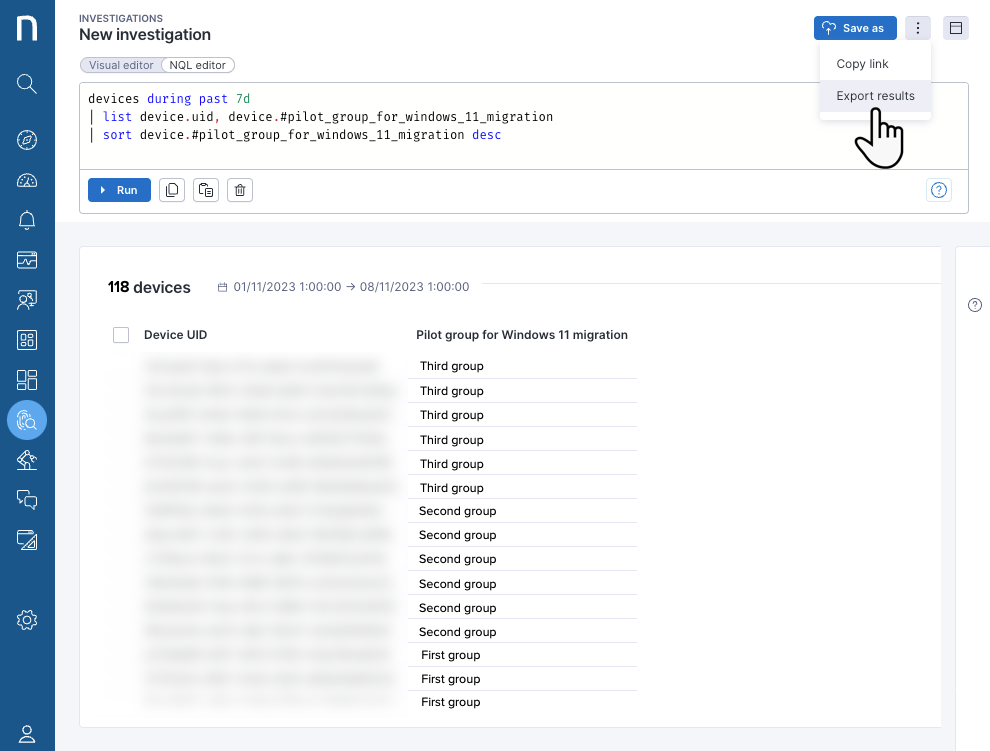
* Export resultsオプション（一括編集）

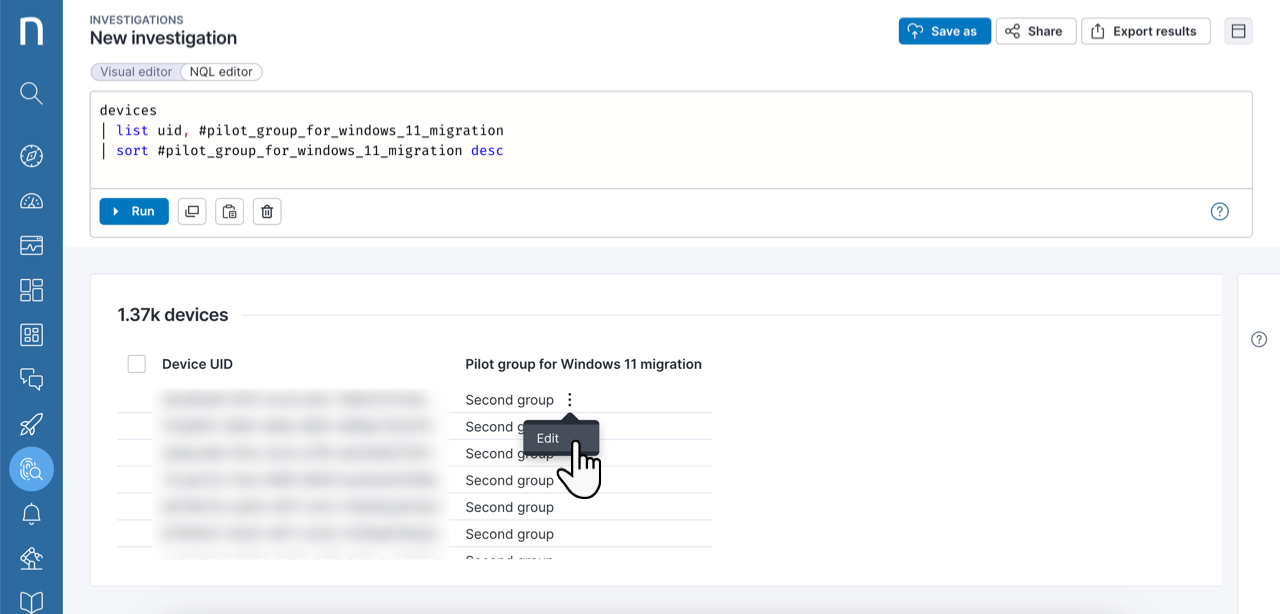
#### **アクションメニューを使用したカスタムフィールドの編集**

**Investigations**ページから：

* NQL結果表で、カスタムフィールドのアクションメニューから**Edit**を選択します。
* **Edit custom field**モーダルで、**New value**フィールドの値を入力します。
* 変更を保存するには、**Done**をクリックします。

<figure><img src="https://3549141153-files.gitbook.io/~/files/v0/b/gitbook-x-prod.appspot.com/o/spaces%2FeLm8O7QKZDn6z806e7Sv%2Fuploads%2Fgit-blob-dfd62843df0dbca9af8b19d66831159573086364%2Ffield-1682080382.png?alt=media" alt="" width="756"><figcaption></figcaption></figure>

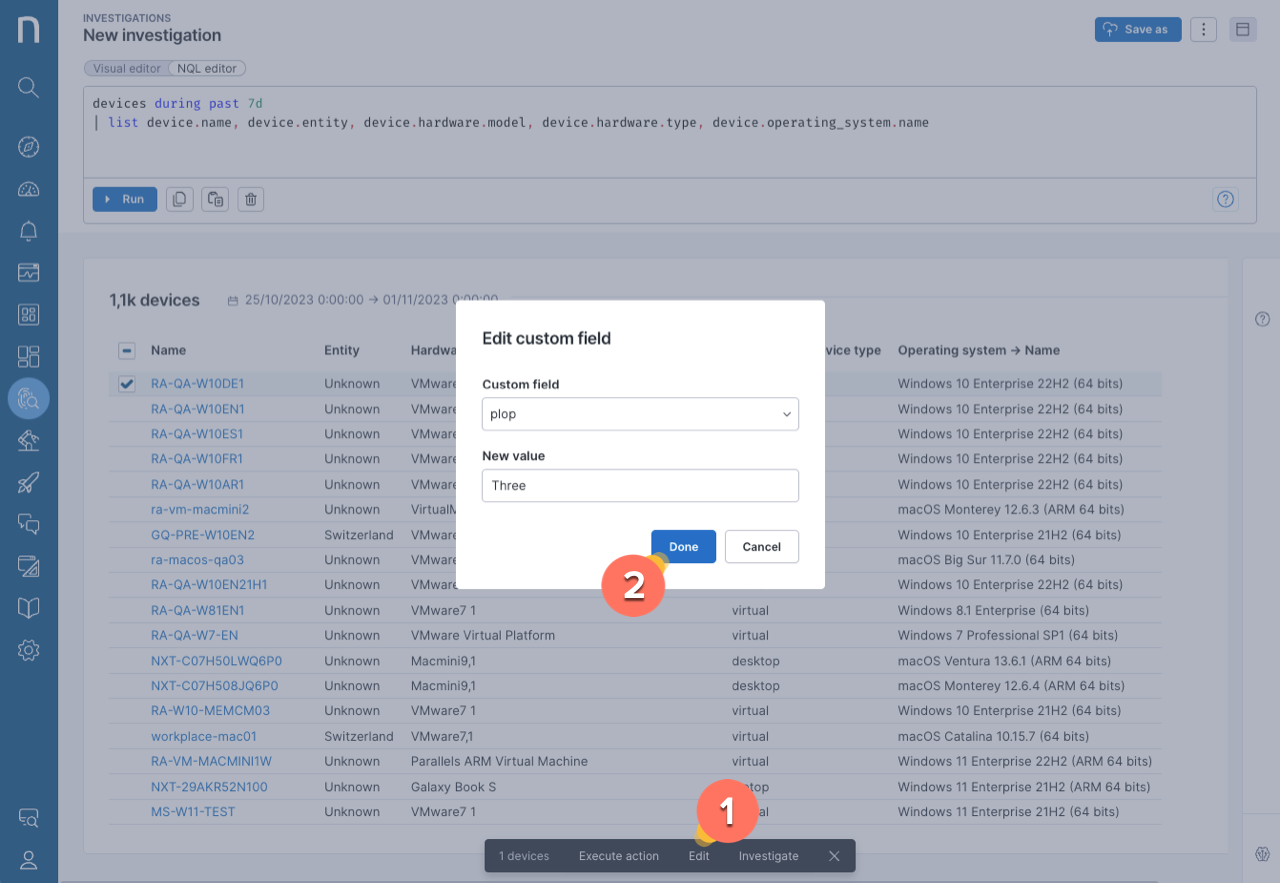
#### **アクションバーを使用したカスタムフィールドの編集**

**Investigations**ページから：

1. 編集するオブジェクトタイプ（たとえば`devices`）のNQLクエリ結果について、ページ下部のアクションバーで**Edit**オプションを選択します。

{% hint style="info" %}
**Edit**オプションが表示されない場合は、[Roles](/platform/ja/user-guide/administration/account-management/roles.md)に適切な権限があることを確認してください。
{% endhint %}

<figure><img src="https://3549141153-files.gitbook.io/~/files/v0/b/gitbook-x-prod.appspot.com/o/spaces%2FeLm8O7QKZDn6z806e7Sv%2Fuploads%2Fgit-blob-dd25129da3d447525479bf1abe5fa4e7f525e427%2Fcustomfields-1698767690.png?alt=media" alt="" width="760"><figcaption></figcaption></figure>

2. **Edit custom field**モーダルで：
   * **Custom field**ドロップダウンメニューからカスタムフィールドを選択します。
   * **New value**テキストフィールドに新しい値を入力します。
   * 変更を保存するには、**Done**をクリックします。

{% hint style="info" %}
アクションバーでは、ページに完全に読み込まれて表示されていない大量の調査結果を一括編集することはできません。
{% endhint %}

#### **結果をエクスポートしてカスタムフィールドを一括編集する**

**Investigations**ページから：

* IDフィールドと編集するカスタムフィールドを含む調査を実行します。
* 結果をCSVファイルとして**Export**します。
* スプレッドシートエディターを使用してカスタムフィールド値を編集します。
* 編集したCSVファイルを[Import](#customfieldsmanagement-updatingcustomfieldsbyimportingacsvfileimportcsv)します。

このページの[CSVファイルの例](#example-of-a-csv-file-for-updating-custom-fields)では、ファイルの表形式の構成について説明しています。また、以下の画像は、調査ページから結果を**Export**する方法を示しています。

<figure><img src="https://3549141153-files.gitbook.io/~/files/v0/b/gitbook-x-prod.appspot.com/o/spaces%2FeLm8O7QKZDn6z806e7Sv%2Fuploads%2Fgit-blob-f7a884f3c43b08afa5552f93b3d01d7da2ea75fd%2Fcustomfields-1699353656.png?alt=media" alt="" width="760"><figcaption></figcaption></figure>

### CSVファイルをインポートしてカスタムフィールドを更新する <a href="#customfieldsmanagement-updatingcustomfieldsbyimportingacsvfileimportcsv" id="customfieldsmanagement-updatingcustomfieldsbyimportingacsvfileimportcsv"></a>

{% hint style="info" %}
Nexthinkの[ワークフロー実行](/platform/ja/user-guide/workflows/creating-workflows.md#updating-custom-fields-in-workflows-for-downstream-use)で、**Update custom field** Thinkletを使用して手動カスタムフィールド値を更新することもできます。
{% endhint %}

[Custom fields](#customfieldsmanagement-accessingcustomfieldsaccesscs)ページから：

* ページ右上のアクションメニューをクリックします。
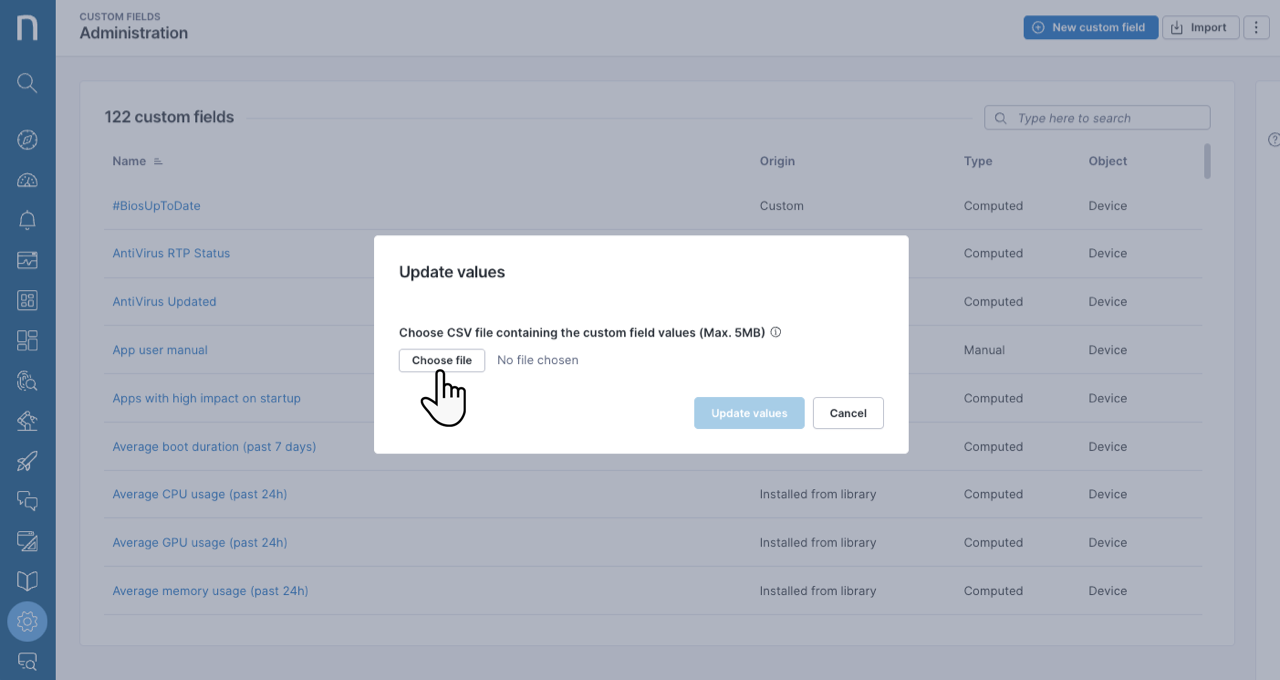
* **Update values**を選択して、複数のカスタムフィールドを一度にNexthink Webインターフェイスへインポートします。

<figure><img src="https://3549141153-files.gitbook.io/~/files/v0/b/gitbook-x-prod.appspot.com/o/spaces%2FeLm8O7QKZDn6z806e7Sv%2Fuploads%2Fgit-blob-b3594ef5bd54e3caebc5975d709fcaa2bcb2200d%2Ffield-1682086883.png?alt=media" alt="" width="680"><figcaption></figcaption></figure>

* **Update values**ダイアログボックスで、次の条件を満たす有効なCSVファイルを選択します：
  * ファイルサイズが5MB未満であること。
  * ファイルエンコーディングがUTF-8であること（UTF-8-BOMはサポートされません）。
  * バックスラッシュ`\`文字はサポートされません。
  * フィールド区切り文字はコンマです。
  * フィールドデリミタは任意ですが、使用できるデリミタの種類は引用符`"`のみです。

<figure><img src="https://3549141153-files.gitbook.io/~/files/v0/b/gitbook-x-prod.appspot.com/o/spaces%2FeLm8O7QKZDn6z806e7Sv%2Fuploads%2Fgit-blob-8c3b0dd6e50a8fa7ce94f4ad5304f7291735c779%2Fcustomfields-1698769277.png?alt=media" alt="" width="760"><figcaption></figcaption></figure>

#### **カスタムフィールド更新用CSVファイルの例**

* データをインポートするために、表形式のCSVファイルを構成します。
  * ```
    device.name,device.#custom_field1,device.#custom_field2
    device-1,A1,B
    device-2,A1,B
    device-3,A2,B
    device-4,A2,
    ```
  * 最初のカスタムフィールドでは、`A1`または`A2`の値がCSVファイルにリストされたすべてのデバイスに割り当てられます。
  * 二番目のカスタムフィールドでは、最初の三つのデバイスに値`B`が割り当てられます。
  * `device-4`には`#custom_field2`の値が設定されません。以前に設定されていた場合、このCSVファイルにより`#custom_field2`の値が`NULL`に更新されます。
* 次の書式ルールに従ってください：
  * ヘッダーは明示的なオブジェクトタイプを含むNQL ID形式です。例：`device.name`、`device.#custom_field1`。
  * ファイルには少なくとも一つのID列が必要です。使用できるIDは次のとおりです：
    * device：`device.uid`、`device.name`
    * user：`user.uid`、`user.sid`、`user.upn`
    * binary：`binary.uid`
    * package：`package.uid`

{% hint style="info" %}
`user.upn`に基づくユーザー更新の前提条件：Collectorレベルで、クリアテキストとしてUPNコレクションを有効にする必要があります。これは、次のLibraryコンテンツで実現できます：

<https://www.nexthink.com/library/#set-anonymization-features-windows>

<https://www.nexthink.com/library/collector-configuration#set-anonymization-features-macos>
{% endhint %}

## 権限 <a href="#customfieldsmanagement-permissionspermissions" id="customfieldsmanagement-permissionspermissions"></a>

カスタムフィールドに適切な権限を設定するには：

* メインメニューから**Administration**を選択します。
* ナビゲーションパネルで**Roles**をクリックします。
* 新しいロールを作成するには、ページ右上の**New Role**ボタンをクリックします。
  * または、既存のロールにカーソルを合わせて編集アイコンをクリックし、ロール設定を変更します。
* **Permissions**セクションで、**Administration**までスクロールし、**Manage all custom fields**を有効にします。これにより、ユーザーはカスタムフィールドの作成、編集、削除、および手動カスタムフィールドの値の設定を行えるようになります。この権限は、**フルビュー ドメイン**を持つユーザーのみが使用できます。
  * **Manage all custom fields**権限を持つユーザーには、**Manage all ratings**権限が自動的に付与されます（ルールベースのカスタムフィールドを設定するユーザー権限を付与します）。
* それ以外の場合、**Edit manual custom fields**権限は、**限定ビュー ドメイン**を持つユーザーに付与できます。
  * この権限は、**Manage all custom fields**権限を持つユーザーに自動的に付与されます。

{% hint style="info" %}
権限オプションの詳細については、[Roles](/platform/ja/user-guide/administration/account-management/roles.md)ドキュメントを参照してください。
{% endhint %}


---

# Agent Instructions
This documentation is published with GitBook. GitBook is the documentation platform designed so that both humans and AI agents can read, navigate, and reason over technical content effectively. Learn more at gitbook.com.

## Querying This Documentation
If you need additional information that is not directly available in this page, you can query the documentation dynamically by asking a question.

Perform an HTTP GET request on the current page URL with the `ask` query parameter, and the optional `goal` query parameter:

```
GET https://docs.nexthink.com/platform/ja/user-guide/administration/content-management/custom-fields-management.md?ask=<question>&goal=<endgoal>
```

`ask` is the immediate question: it should be specific, self-contained, and written in natural language.
`goal` is optional and describes the broader end goal you are ultimately trying to accomplish on behalf of the user. GitBook uses it to tailor the answer towards what is most useful for that goal.

The response will contain a direct answer to the question and relevant excerpts and sources from the documentation.

Use this mechanism when the answer is not explicitly present in the current page, you need clarification or additional context, or you want to retrieve related documentation sections.