# オムニッサ・ホライゾン コネクタ

{% hint style="info" %}
このドキュメントは外部ソースを参照しています。 Nexthink はサードパーティのドキュメントの正確性や、このページに記載されている情報に矛盾を生じさせる可能性のある外部の更新または変更を制御することはできません。 エラーや矛盾を[Nexthink サポート](https://support.nexthink.com/)に報告してください。
{% endhint %}

Omnissa Horizon 用 Nexthink コネクタは、Horizon 仮想デスクトップインフラストラクチャ（VDI）に関する重要な情報、特にデスクトッププール名と、VM が属する関連する仮想化コンテキストを取得します。 このコネクタは、Nexthink環境にホライゾン固有のデータを追加し、VDIの健全性、使用パターン、設定の変化を可視化します。

このインストールガイドは、ホライゾン用コネクタを安全にデプロイする手助けをするために設計されています。 貴組織のセキュリティチームが、ここに示された設定とインストール手順を確認し、内部のセキュリティポリシーやコンプライアンス要件に合わせて調整することを推奨します。

## デバイスフィールド <a href="#connectorforcitrixvirtualappsanddesktops-devicefields" id="connectorforcitrixvirtualappsanddesktops-devicefields"></a>

オムニッサ ホライゾン用コネクタは、以下のデバイス仮想化フィールドをインポートします。

| **フィールド**        | **説明**                                                                               |
| ---------------- | ------------------------------------------------------------------------------------ |
| 仮想化デスクトッププール名    | 関連VMのハードウェア特性。                                                                       |
| 仮想化デスクトッププールのタイプ | <p>デスクトッププールのタイプです。 使用可能な値は以下の通りです：</p><ul><li>共有</li><li>個人</li><li>プール済み</li></ul> |
| 仮想化ホスト名          | VMをホストする物理デバイス。 Azureなどのクラウドベンダーでホストされているマシンの場合、空欄の可能性があります。                         |
| 環境名              | 仮想デバイスを強化するコネクタ・インスタンスの名前。                                                           |
| デスクトップブローカー      | 使用されているデスクトップ仮想化製品の名称。 この場合は「omnissa\_horizon」です。                                    |
| ディスク イメージ        | VMをデプロイするために使用されるディスクイメージの名前。                                                        |

## Nexthink コネクタサーバー <a href="#connectorforcitrixvirtualappsanddesktops-nexthinkconnectorserver" id="connectorforcitrixvirtualappsanddesktops-nexthinkconnectorserver"></a>

Nexthinkはオムニッサ ホライゾン用のNexthinkコネクタを別のサーバーにインストールすることを推奨します。

### 前提条件 <a href="#connectorforcitrixvirtualappsanddesktops-prerequisites" id="connectorforcitrixvirtualappsanddesktops-prerequisites"></a>

* インストールされたWindows PowerShell 5.1。
* 実行ポリシーは **バイパス**に設定されています。
* 必要なPowerShellモジュール：
  * [Logging 4.8.5](https://www.powershellgallery.com/packages/Logging/4.8.5)
  * [CredentialManager 2.0](https://www.powershellgallery.com/packages/CredentialManager/2.0)
* オムニッサ ホライゾンの最小互換バージョンは8 2309です。
* [Omnissa Horizon 用 Nexthink コネクタをダウンロードしました](https://download.nexthink.com/integrations/Omnissa+onPrem+Connector/0.2.16/OmnissaConnector-0.2.16.zip)。

### ハードウェア要件

| コンポーネント      | 最小人数                     | 推奨人数                     |
| ------------ | ------------------------ | ------------------------ |
| CPU          | 2 コア x64                 | 4 コア x64                 |
| RAM          | 2 GB                     | 4—8 GB                   |
| ディスクの空き容量    | 2 GB                     | 5 GB                     |
| オペレーティングシステム | Windows 10 / Server 2016 | Windows 11 / Server 2022 |

#### **PowerShell `Install-Module`用にファイアウォール/プロキシを通過させるURL**

<table><thead><tr><th width="319">目的</th><th>URL</th></tr></thead><tbody><tr><td>PowerShell Gallery</td><td><code>[Workflows APIの概要](https://www.powershellgallery.com)</code></td></tr><tr><td>NuGetプロバイダー</td><td><code>[Workflows APIの概要](https://www.nuget.org)</code></td></tr><tr><td>NuGet API</td><td><code>[Workflows APIの概要](https://api.nuget.org)</code></td></tr><tr><td>パッケージ用CDN</td><td><code>https://www.powershellgallery.com/api/v2/を参照してください</code></td></tr><tr><td>代替NuGet V2 API</td><td><code>https://www.nuget.org/api/v2/を参照してください</code></td></tr><tr><td>証明書失効</td><td><code>http://crl.microsoft.com</code><br>(通常はオプションです; 必要な場合があります)</td></tr></tbody></table>

#### 追加の考慮事項

* プロキシでSSL検査が有効化されている場合、TLSハンドシェイクが壊れないようにしてください。
* プロキシの背後にいる場合、次のコマンドを実行して`PowerShell`がそれを使用するように設定されていることを確認してください：

{% code overflow="wrap" %}

```powershell
[System.Net.WebRequest]::DefaultWebProxy.Credentials = [System.Net.CredentialCache]::DefaultNetworkCredentials
```

{% endcode %}

#### **接続をテストする**

PowerShell ターミナルを使用して次のコマンドを実行することでアクセスをテストできます:

```powershell
Invoke-WebRequest https://www.powershellgallery.com
```

### ネットワーク <a href="#connectorforcitrixvirtualappsanddesktops-networking" id="connectorforcitrixvirtualappsanddesktops-networking"></a>

Nexthink コネクター for Omnissa Horizon は Omnissa Horizon REST API をクエリする必要があります。

### スケジュールされたタスクのサービスアカウント <a href="#connectorforcitrixvirtualappsanddesktops-serviceaccountforscheduledtasks" id="connectorforcitrixvirtualappsanddesktops-serviceaccountforscheduledtasks"></a>

Nexthink コネクター for Omnissa Horizon はスケジュールされたタスクとして実行され、Omnissa Horizon API にアクセスする必要があります。 セキュリティ懸念を限定するために、Nexthink は Nexthink コネクターサーバー上でローカルユーザーアカウントまたはドメインレベルで特別な権限を持たない通常のドメインユーザーアカウントを使用することを推奨します。

以下のガイドでは、Nexthink コネクターサーバー上のローカルアカウントを使用します。

{% stepper %}
{% step %}
Nexthink コネクター for Omnissa Horizon を実行するサーバーに管理者としてログオンします。
{% endstep %}

{% step %}
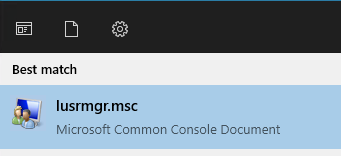
スタートメニューから次のコマンドを実行して、ローカルユーザーおよびグループコンソールを起動します。

```powershell
lusrmgr.msc
```

<figure><img src="/files/ajx8gWBWYNxE3xnpob8x" alt="Run the lusrmgr.msc command"><figcaption></figcaption></figure>
{% endstep %}

{% step %}
**ローカルユーザーとグループ (ローカル)** ディレクトリ内の **ユーザー** フォルダーを右クリックし、**新規ユーザー…** を選択します。
{% endstep %}

{% step %}
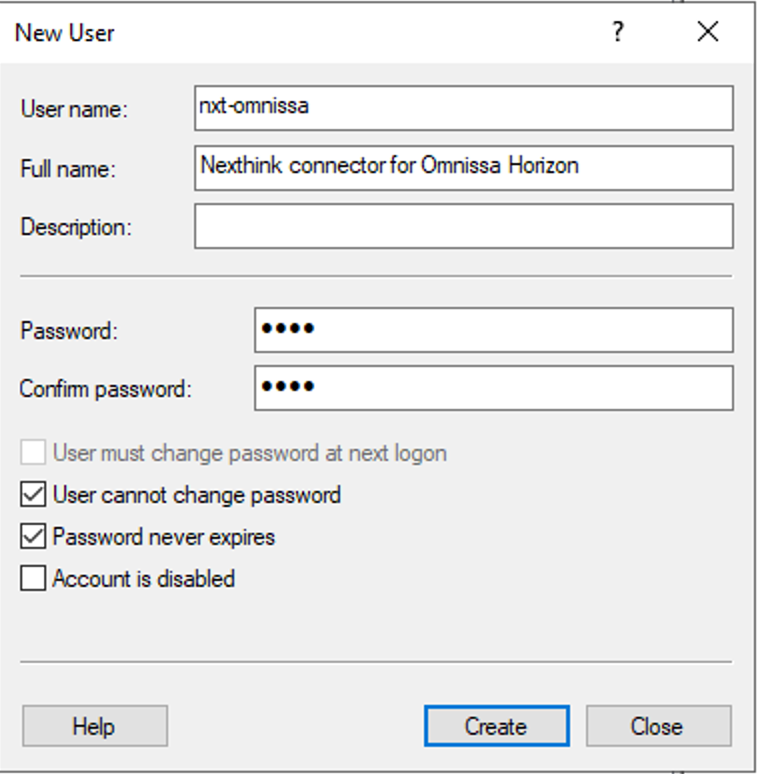
組織の命名規則に従ってユーザーアカウントを作成します。 **ユーザー名** と **パスワード** を控えてください、スケジュールされたタスクを作成する際に必要になります。 コネクターの機能を保護するため、次のオプションを選択します。

* **ユーザーはパスワードを変更できません**
* **パスワードの有効期限は切れません**

<figure><img src="/files/mzAkjVx1Cfmciy4EuuhM" alt="New user options" width="375"><figcaption></figcaption></figure>
{% endstep %}

{% step %}
**作成** を選択します。
{% endstep %}

{% step %}
スタートメニューから次のコマンドを実行して、ローカルグループポリシーエディタを開きます。

```powershell
gpedit
```

{% endstep %}

{% step %}
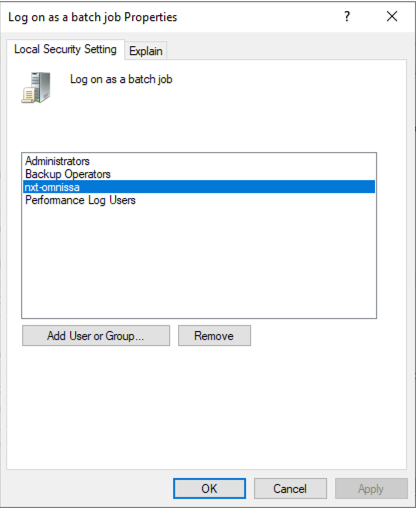
**コンピューターの構成 > Windows 設定 > セキュリティ設定 > ローカルポリシー > ユーザー権利の設定** に移動し、**バッチジョブとしてのログオン** ポリシーを見つけます。
{% endstep %}

{% step %}
ポリシーを開き、**ユーザーまたはグループを追加** を選択して、以前に作成したユーザーをリストに追加します。

<figure><img src="/files/WEseIevOUglzVaQR8cDY" alt="Add user or group"><figcaption></figcaption></figure>
{% endstep %}
{% endstepper %}

### コネクターのインストール <a href="#connectorforcitrixvirtualappsanddesktops-installingtheconnector" id="connectorforcitrixvirtualappsanddesktops-installingtheconnector"></a>

{% stepper %}
{% step %}
[Nexthink コネクター for Omnissa Horizon](#connectorforcitrixvirtualappsanddesktops-prerequisites)をダウンロードします。
{% endstep %}

{% step %}
Zipファイルをシステム上のフォルダーに解凍します。 Nexthink は次のフォルダーに配置することを推奨します:

`C:\program files\Nexthink\Connectors\Omnissa`
{% endstep %}

{% step %}
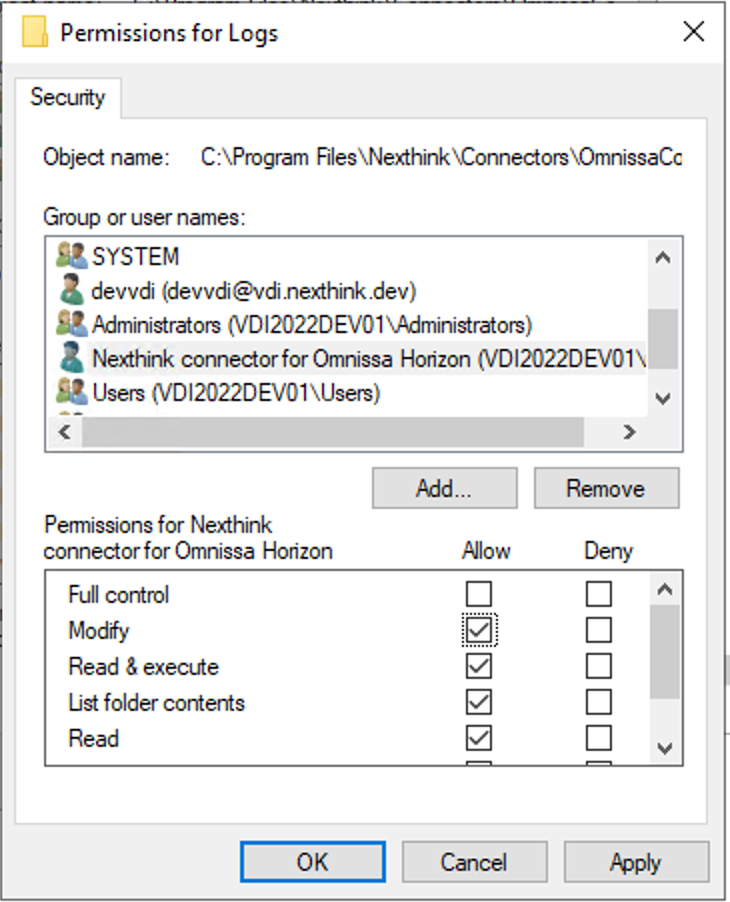
以前に作成したユーザーアカウントに**ログ**フォルダーの**修正**アクセス許可を適用します。

<figure><img src="/files/2i7qtfrz3oGK6E8bC22F" alt="Data properties" width="365"><figcaption></figcaption></figure>
{% endstep %}
{% endstepper %}

### Nexthink Enrichment API クレデンシャル <a href="#connectorforcitrixvirtualappsanddesktops-nexthinkenrichmentapicredentials" id="connectorforcitrixvirtualappsanddesktops-nexthinkenrichmentapicredentials"></a>

Nexthink コネクター for Omnissa Horizon は、Nexthink Enrichment API への接続に適切なクレデンシャルを必要とします。 Nexthink は、クレデンシャルを先ほど作成したローカルユーザーアカウントのクレデンシャルストアに安全に保存します。

{% stepper %}
{% step %}
[APIクレデンシャル](https://developer.nexthink.com/docs/api/api-credentials)ドキュメントを参照して、手順ガイドをご覧ください。

API クレデンシャルを保存すると、クライアント ID とシークレットキーが含まれる新しいウィンドウが表示されます。 ウィンドウを閉じるとこの情報に再アクセスできなくなるため、控えてください。

<figure><img src="/files/jaZZ0r5FJBHfDIfsfSel" alt="OAuth client credentials"><figcaption></figcaption></figure>
{% endstep %}

{% step %}
Omnissa Horizon 用 Nexthink Connector を実行するサーバーで、コマンドラインで `runas` を実行して、先ほど作成したローカルユーザーの資格情報で PowerShell を開きます。

```powershell
runas /user:nxt-omnissa-connector powershell.exe
```

<figure><img src="/files/mjMy8nrAT0oLjuqoUDe0" alt="runas CLI"><figcaption></figcaption></figure>
{% endstep %}

{% step %}
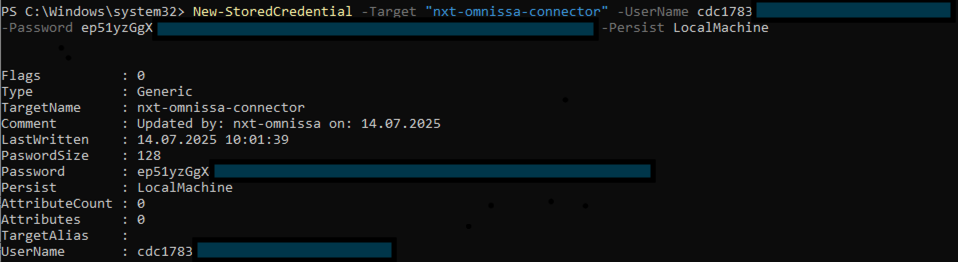
新しい PowerShell ウィンドウで、Nexthink ウェブインターフェースで作成したばかりの API クレデンシャルを次のコマンドを書いて追加します。

{% code overflow="wrap" %}

```powershell
New-StoredCredential -Target "nxt-omnissa-connector" -UserName <Client ID> -Password <Secret key> -Persist LocalMachine
```

{% endcode %}

API 資格情報を作成した際に控えておいた値で、`<ClientID>` および `<Secret key>` を置き換えてコマンドを実行します。 使った `TargetName` を控えてください、この値は設定ファイルに必要です。

<figure><img src="/files/ULWcKZ4CoolVl0crKUk0" alt="PowerShell window"><figcaption></figcaption></figure>
{% endstep %}
{% endstepper %}

### 設定ファイルの更新 <a href="#connectorforcitrixvirtualappsanddesktops-updatingtheconfigurationfile" id="connectorforcitrixvirtualappsanddesktops-updatingtheconfigurationfile"></a>

構成ファイルの更新には、Nexthink クラウド API インスタンスの URL が必要です。 URL パターンは次のようになります:

`instance.api.region.nexthink.cloud`

詳細は次の手順をご覧ください。

{% hint style="info" %}
地域がわからない場合は、Nexthink 担当者に連絡して情報を取得してください。
{% endhint %}

{% stepper %}
{% step %}
Nexthink コネクター for Omnissa Horizon を解凍したフォルダーを探します。
{% endstep %}

{% step %}
`Config` フォルダーに移動し、テキストエディタを使用して `config.json` ファイルを開きます。
{% endstep %}

{% step %}
`"NexthinkAPI"` セクションまでスクロールし、次のコードを挿入します。

```json
{
    "_Info": "Omnissa コネクターの JSON ベースの設定です",
    "Info": {
        "Project": "connector-omnissa-horizon-server",
        "ConfigVersion": "0.1.0"
    },
    "Logging": {
        "LogRetentionDays": 7,
        "LogLevel": "INFO"
    },
    "OmnissaEnvironments": [
        {
            "Name": "<環境名-1>",
            "Host": "<ホスト>",
            "WindowsCredentialEntry": "<omnissa-user-credentials-1>"
        },
        {
            "Name": "<環境名-2>",
            "Host": "<ホスト>",
            "WindowsCredentialEntry": "<omnissa-user-credentials-2>"
        }
    ],
    "NexthinkAPI": {
        "HostFQDN": "<nexthink_api_host>",
        "WindowsCredentialEntry": "<nxt-omnissa-credentials>",
        "RequestBatchSize": 1000
    }
}
```

{% endstep %}

{% step %}
`"NexthinkAPI"` セクションの次の値を変更します。

* `"HostFQDN"` の値を `<instance>.api.<region>.nexthink.cloud` フォーマットを使用して、Nexthink クラウド API インスタンスの URL に置き換えます。それぞれの `<instance>` と `<region>` はプレースホルダーです。
  * `<instance>` をインスタンスの名前に置き換えます。
  * `<region>` を次の地域のいずれかに置き換えます:
    * `us` はアメリカ合衆国
    * `eu` はヨーロッパ連合
    * `pac` はアジア太平洋
    * `meta` は中東、トルコ、アフリカ
  * 必要に応じて、次の URL 例を参照してください：\
    `gwy-eu-west-3-fuji-rest.api.eu.nexthink.cloud`
* `"WindowsCredentialEntry"` を、先ほど PowerShell ウィンドウからメモしたクレデンシャルの `TargetName` に置き換えます。例: \`"WindowsCredentialEntry": "nxt-omnissa-credentials",\`

{% hint style="warning" %} 設定ファイル内の `"OmnissaEnvironments"` 値を置き換えて Omnissa Horizon ファームへの接続を設定するには、[#connectorforcitrixvirtualappsanddesktops-updatingtheconfigurationfile](#connectorforcitrixvirtualappsanddesktops-updatingtheconfigurationfile) を参照してください。 {% endhint %} {% endstep %} {% endstepper %}

### Omnissa Horizon API への接続の設定 <a href="#connectorforcitrixvirtualappsanddesktops-settingupaconnectiontothecvadfarm" id="connectorforcitrixvirtualappsanddesktops-settingupaconnectiontothecvadfarm"></a>

#### 管理者アカウントの作成 <a href="#connectorforcitrixvirtualappsanddesktops-creatingaread-onlycitrixadministrator" id="connectorforcitrixvirtualappsanddesktops-creatingaread-onlycitrixadministrator"></a>

{% stepper %} {% step %} **AD にサービスアカウントを作成する**

Horizon は Active Directory (AD) 統合認証に依存しています。 通常、次のことを行います:

* AD に専用のユーザーを作成します。例えば、`svc_horizon_api`。
* 強力なパスワードを設定し、自動化に使用する場合は**パスワードの有効期限は切れません**に設定します。
* 追跡と管理のために適切な組織単位 (OU) またはセキュリティグループに配置します。

{% hint style="info" %} API アクセスが不要であれば、ドメイン管理者または Horizon 管理者アカウントの使用を避けてください。 Nexthink は最小権限の使用を推奨しています。 {% endhint %} {% endstep %}

{% step %} **Horizon Console でユーザーを（最小権限で）管理者として割り当てる**

1. **Horizon 管理コンソール**にログインします。
2. **設定** > **管理者**に移動します。
3. **追加**をクリックします。
4. 作成した**AD ユーザー**を検索します。例: `svc_horizon_api`。
5. **役割**を割り当てます。
   * フルアクセスの場合は**管理者**を使用します。
   * 制限されたアクセスの場合は**ヘルプデスク管理者**または**カスタム役割**を使用します(作成可能です)。

{% hint style="warning" %} ユーザーを API クエリの読み取りのみが可能に制限したい場合はカスタム役割の設定を検討してください。 {% endhint %} {% endstep %} {% endstepper %}

#### 保存されたクレデンシャルの設定 <a href="#connectorforcitrixvirtualappsanddesktops-settingupstoredcredentials" id="connectorforcitrixvirtualappsanddesktops-settingupstoredcredentials"></a>

{% stepper %} {% step %} Omnissa Horizon 用 Nexthink Connector を実行するサーバーで、コマンドラインで `runas` を実行して、先ほど作成したローカルユーザーの資格情報で PowerShell を開きます。

```powershell
runas /user:nxt-omnissa-connector powershell.exe
```

<figure><img src="/files/mjMy8nrAT0oLjuqoUDe0" alt=""><figcaption></figcaption></figure>
{% endstep %}

{% step %}
新しく開いた PowerShell ウィンドウで、Nexthink Web インターフェイスで作成した API 資格情報を追加するため、次のコマンドを実行します。

{% code overflow="wrap" %}

```powershell
New-StoredCredential -Target "nxt-omnissa-prod" -UserName <domain\username> -Password -Persist LocalMachine
```

{% endcode %}

読み取り専用の Omnissa 管理者でドメインユーザーアカウントを作成したときに控えた `<domain\username>` と `<password>` を置き換えます。

設定ファイルに必要になるため、使用した `TargetName` を控えてください。

<figure><img src="/files/QTSzOZThxnGbqFjRN5dD" alt="PowerShell window"><figcaption></figcaption></figure>
{% endstep %}
{% endstepper %}

### 設定ファイルの更新 <a href="#connectorforcitrixvirtualappsanddesktops-updatingtheconfigurationfile.1" id="connectorforcitrixvirtualappsanddesktops-updatingtheconfigurationfile.1"></a>

各 Omnissa Horizon 環境には、構成ファイルに独自のセクションがあります。 このコネクターに付属する構成ファイルには、複数の環境を構成する方法の例が含まれています。 必要に応じて、将来の参考のために元の `config.json` ファイルのコピーを作成します。

{% stepper %}
{% step %}
コネクタを解凍したフォルダーを探します。
{% endstep %}

{% step %}
**`Config`** フォルダーに移動し、テキストエディタを使用して `config.json` ファイルを開きます。
{% endstep %}

{% step %}
`"OmnissaEnvironments"` セクションまでスクロールし、リストの2番目の項目を削除します。 コードは次のように見えるはずです:

```json
{
    "_Info": "Omnissa コネクターの JSON ベースの設定です",
    "Info": {
        "Project": "connector-omnissa-horizon-server",
        "ConfigVersion": "0.1.0"
    },
    "Logging": {
        "LogRetentionDays": 7,
        "LogLevel": "INFO"
    },
    "OmnissaEnvironments": [
        {
            "Name": "<環境名-1>",
            "Host": "<ホスト>",
            "WindowsCredentialEntry": "<omnissa-user-credentials-1>"
        }
    ],
    "NexthinkAPI": {
        "HostFQDN": "<nexthink_api_host>",
        "WindowsCredentialEntry": "<nxt-omnissa-credentials>",
        "RequestBatchSize": 1000
    }
}
```

次の `"OmnissaEnvironments"` セクションの値を変更します:

* `<環境名-1>` を環境の名前に置き換えます。
* `<ホスト>` を Omnissa ホストに置き換えます。
* `<omnissa-user-credentials-1>` を PowerShell で以前に作成した保存されたクレデンシャルの `TargetName` に置き換えます。
* 識別子を控えてください、後で必要になります。
  {% endstep %}
  {% endstepper %}

### コネクターのテスト <a href="#connectorforcitrixvirtualappsanddesktops-testingtheconnector" id="connectorforcitrixvirtualappsanddesktops-testingtheconnector"></a>

{% stepper %}
{% step %}
Nexthink コネクター for Omnissa Horizon を実行するサーバーで、コマンドラインで `runas` コマンドを使用して、以前に作成したローカルユーザーの資格で PowerShell を開きます。

```powershell
runas /user:nxt-omnissa-connector powershell.exe
```

{% endstep %}

{% step %}
コネクターをインストールしたディレクトリに移動します。たとえば:

```powershell
cd 'C:\Program Files\Nexthink\Connectors\Omnissa\'
```

{% endstep %}

{% step %}
次のコマンドを実行します:

```powershell
.\Omnissa-Connector-Auto-Updater.ps1
```

{% endstep %}

{% step %}
次のコマンドを実行します：

```powershell
.\Omnissa-Connector-Runner.ps1 -OmnissaEnvironment <omnissa-name>
```

設定内の次のセクションで名前として指定した値で `<omnissa-name>` を置き換えます:

```json
"OmnissaEnvironments": [
        {
            "Name": "omnissa-name",
            "Host": "https://horizon.vdi.nexthink.dev",
            "WindowsCredentialEntry": "omnissa-user-credentials"
        }
    ],
```

コマンドを実行すると、PowerShell ウィンドウが閉じ、接続のために選択した名前のフォルダーが表示されるはずです。 フォルダー内に、テストの結果が記録されたログファイルがあります。
{% endstep %}
{% endstepper %}

### スケジュールされたタスクの設定 <a href="#connectorforcitrixvirtualappsanddesktops-settingupascheduledtask" id="connectorforcitrixvirtualappsanddesktops-settingupascheduledtask"></a>

#### 自動更新プログラム

{% stepper %}
{% step %}
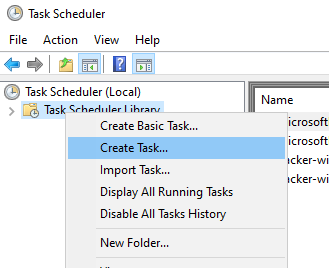
タスクスケジューラを開き、\*\*タスクの作成...\*\*を選択します。

<figure><img src="/files/9p0il2mmNOWiY1Sfn2xj" alt="Create a task"><figcaption></figcaption></figure>
{% endstep %}

{% step %}
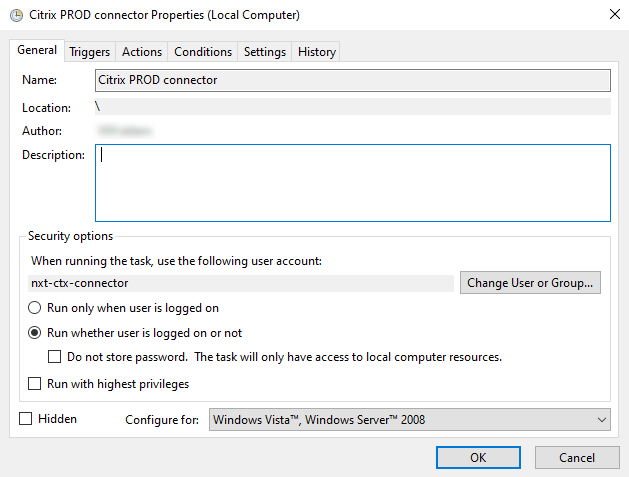
タスクに名前を付け、ユーザーを事前に作成したサービスアカウントに変更します（**全般**タブ）。 ユーザーがログオンしていなくても実行する (Run whether user is logged on or not) を選択します。 **OK**を選択します。

<figure><img src="/files/Bj28idIXsR3yLPbTFhSg" alt="Citrix PROD connector properties" width="315"><figcaption></figcaption></figure>
{% endstep %}

{% step %}
**トリガー**タブに切り替えます。
{% endstep %}

{% step %}
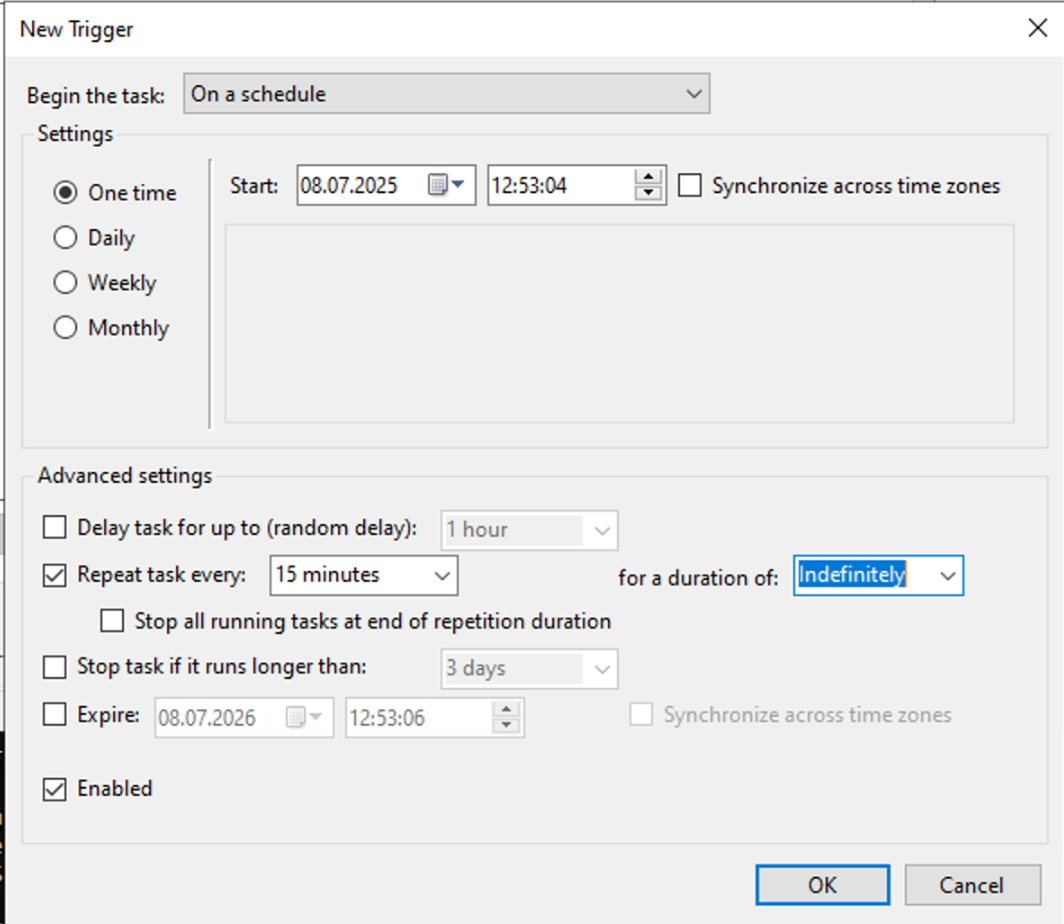
詳細設定で、**タスクを15分ごとに繰り返す**を選択します。 **OK**を選択します。

<figure><img src="/files/dI9tfWCg9nvixvkwCS5J" alt="" width="375"><figcaption></figcaption></figure>
{% endstep %}

{% step %}
**アクション**タブに切り替え、新しいアクションを作成します。
{% endstep %}

{% step %}
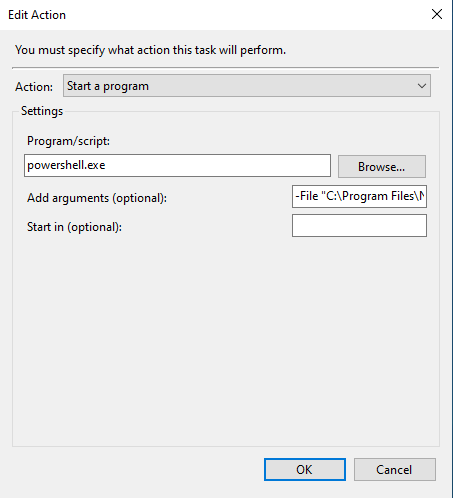
`Omnissa-Connector-Auto-Updater.ps1`スクリプトのフルパスを\*\*追加引数（オプション）\*\*フィールドに貼り付けてください。例えば：

`-ExecutionPolicy Bypass -File "C:\Program Files\Nexthink\Connectors\Omnissa\Omnissa-Connector-Auto-Updater.ps1"`

スクリプトが含まれているフォルダーから始める、例えば：

`C:\Program Files\Nexthink\Connectors\Omnissa`.

**OK**を選択します。

<figure><img src="/files/64L9nw4b4fRXUg5kPmfP" alt="Edit action" width="227"><figcaption></figcaption></figure>
{% endstep %}

{% step %}
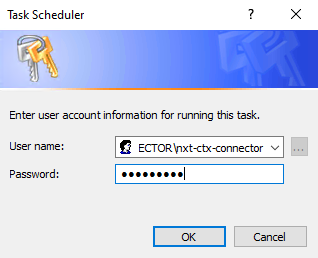
ウィンドウが表示され、サービスアカウントのパスワードを入力するように求められます。 **OK**を選択します。

<figure><img src="/files/ZlobO8mH7v4JbFS30TE6" alt="Confirm credentials"><figcaption></figcaption></figure>
{% endstep %}
{% endstepper %}

#### ランナー

{% stepper %}
{% step %}
タスクスケジューラを開き、\*\*タスクの作成...\*\*を選択します。

<figure><img src="/files/9p0il2mmNOWiY1Sfn2xj" alt="Create a task"><figcaption></figcaption></figure>
{% endstep %}

{% step %}
タスクに名前を付け、ユーザーを事前に作成したサービスアカウントに変更します（**全般**タブ）。 ユーザーがログオンしていなくても実行する (Run whether user is logged on or not) を選択します。 **OK**を選択します。

<figure><img src="/files/Bj28idIXsR3yLPbTFhSg" alt="Citrix PROD connector properties" width="315"><figcaption></figcaption></figure>
{% endstep %}

{% step %}
**トリガー**タブに切り替えます。
{% endstep %}

{% step %}
詳細設定で、**タスクを15分ごとに繰り返す**を選択します。 **OK**を選択します。

<figure><img src="/files/dI9tfWCg9nvixvkwCS5J" alt="" width="375"><figcaption></figcaption></figure>
{% endstep %}

{% step %}
**アクション**タブに切り替え、新しいアクションを作成します。
{% endstep %}

{% step %}
`Omnissa-Connector-Runner.ps1`スクリプトのフルパスを\*\*追加引数（オプション）\*\*フィールドに貼り付けてください。例えば：

`-ExecutionPolicy Bypass -File "C:\Program Files\Nexthink\Connectors\Omnissa\Omnissa-Connector-Runner.ps1" -OmnissaEnvironment "omnissa-name"`

スクリプトが含まれているフォルダーから始める、例えば：

`C:\Program Files\Nexthink\Connectors\Omnissa`

**OK**を選択します。

<figure><img src="/files/64L9nw4b4fRXUg5kPmfP" alt="Edit action" width="227"><figcaption></figcaption></figure>
{% endstep %}

{% step %}
ウィンドウが表示され、サービスアカウントのパスワードを入力するように求められます。 **OK**を選択します。

<figure><img src="/files/ZlobO8mH7v4JbFS30TE6" alt="Confirm credentials"><figcaption></figcaption></figure>
{% endstep %}
{% endstepper %}

***

関連トピック

* [API Credentials](https://developer.nexthink.com/docs/api/api-credentialsを参照してください)


---

# Agent Instructions: Querying This Documentation

If you need additional information that is not directly available in this page, you can query the documentation dynamically by asking a question.

Perform an HTTP GET request on the current page URL with the `ask` query parameter:

```
GET https://docs.nexthink.com/platform/ja/configuring_nexthink/bringing-data-into-your-nexthink-instance/integrating-nexthink-with-third-party-tools/inbound-connectors/connector-for-omnissa-horizon.md?ask=<question>
```

The question should be specific, self-contained, and written in natural language.
The response will contain a direct answer to the question and relevant excerpts and sources from the documentation.

Use this mechanism when the answer is not explicitly present in the current page, you need clarification or additional context, or you want to retrieve related documentation sections.