> For the complete documentation index, see [llms.txt](https://docs.nexthink.com/platform/llms.txt). Markdown versions of documentation pages are available by appending `.md` to page URLs; this page is available as [Markdown](https://docs.nexthink.com/platform/ja/configuring_nexthink/bringing-data-into-your-nexthink-instance/integrating-nexthink-with-third-party-tools/outbound-connectors/webhooks/webhook-use-cases-setup/sending-data-to-a-slack-channel.md).
# Slackチャンネルへのデータ送信
{% hint style="warning" %}
外部ソースを参照するこのドキュメント。
{% endhint %}
Nexthink はサードパーティのドキュメントまたは外部更新の正確性を管理せず、これにより不一致が生じる可能性があります。
エラーや不一致があれば [Nexthink サポート](https://support.nexthink.com/) に報告してください。
このドキュメントは、Nexthink ウェブフック機能を使用して、他のチャンネルメッセージに対して目立たせるために Slack チャンネルにデータを送信する方法を示しています。
## Slack で
1. [新しい Slack アプリを作成](https://api.slack.com/apps?new_app=1) して、投稿したいワークスペースでアプリを作成してください。
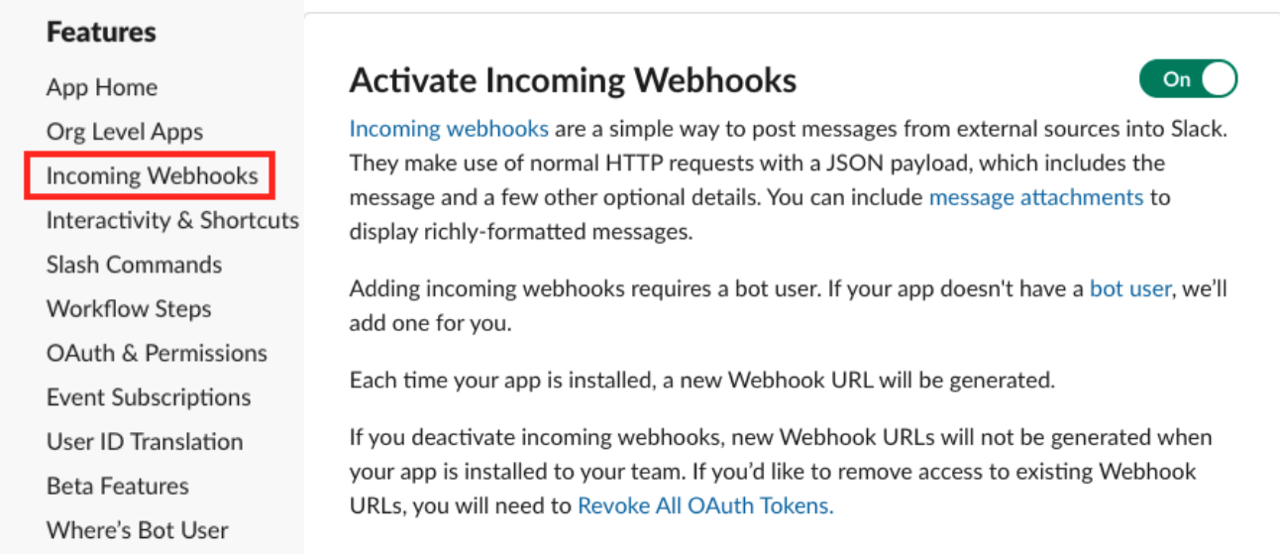
2. **Features** ページから **Activate Incoming Webhooks** をオンに切り替えます。
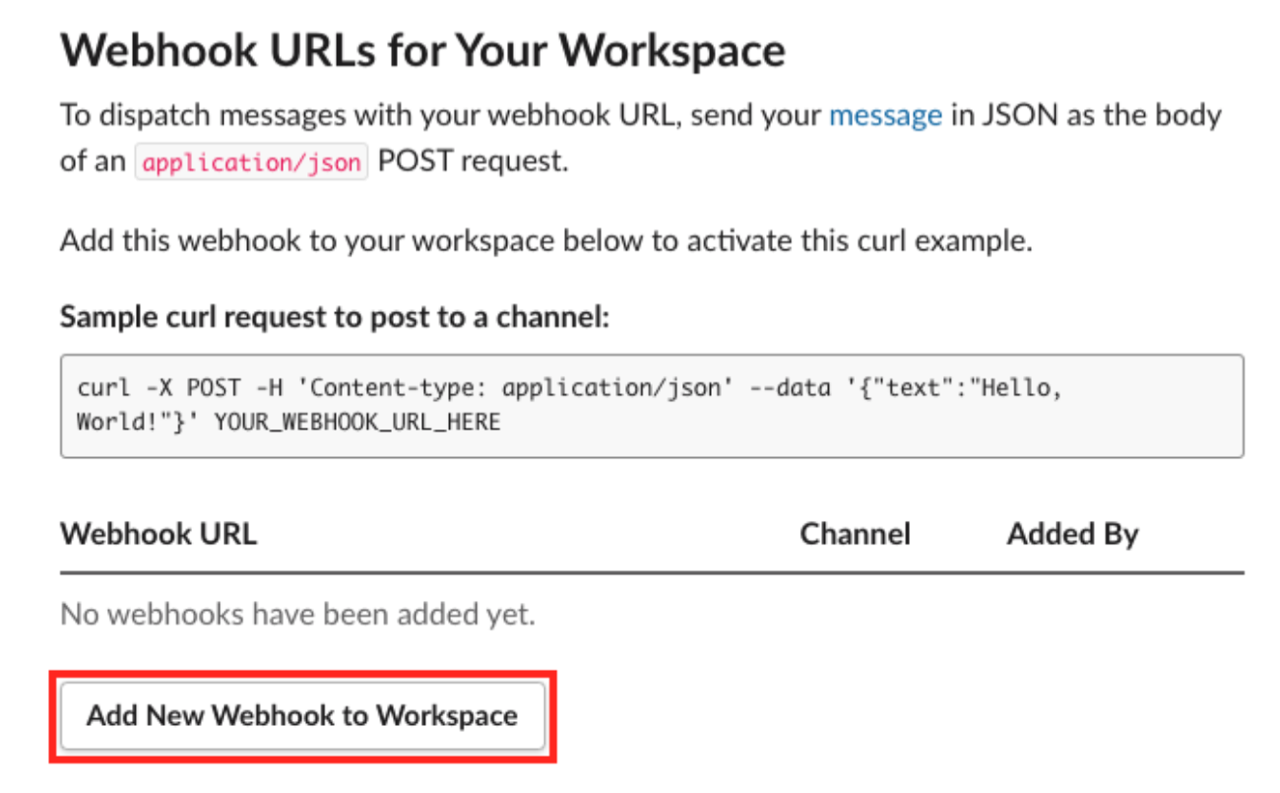
3. **Add New Webhook to Workspace** をクリックします。
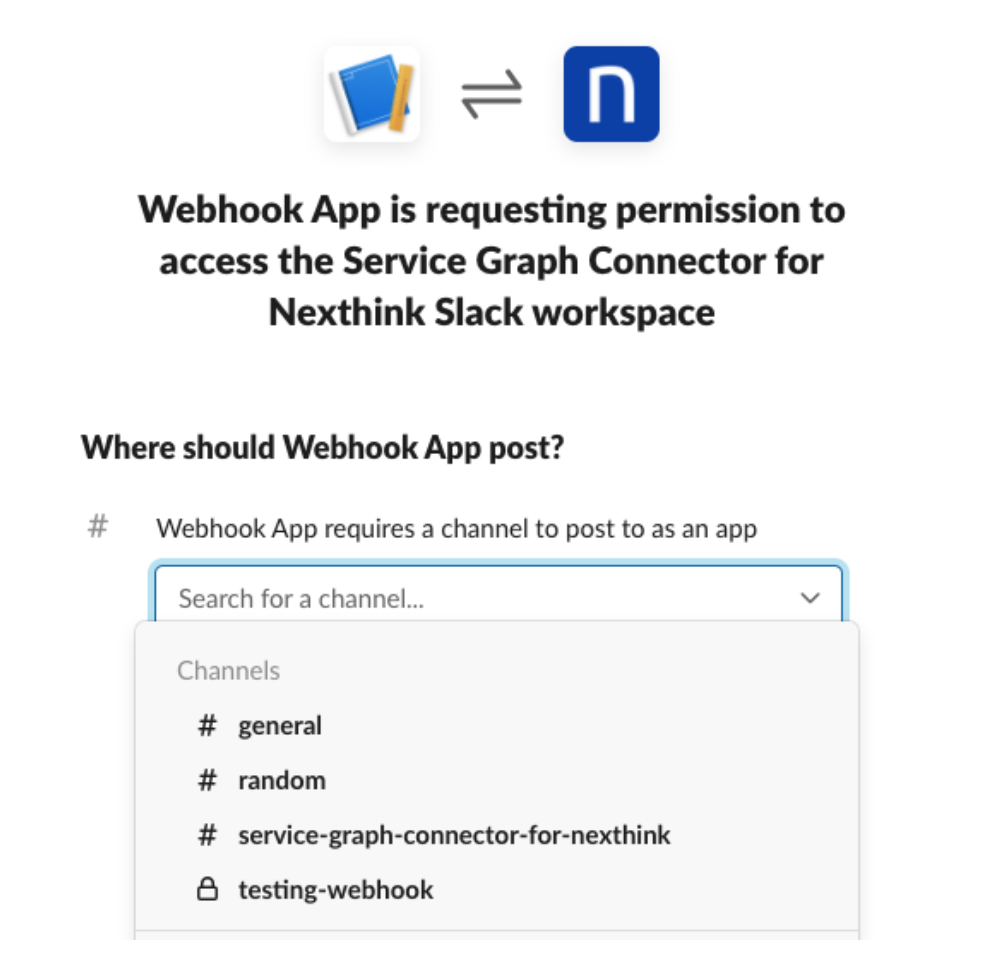
4. アプリが投稿するチャンネルを選び、**Authorize** をクリックします。
5. 生成された [Incoming Webhook URL](https://api.slack.com/messaging/webhooks#posting_with_webhooks) をコピーして、将来的な参照用に保管します。これは、Nexthink のウェブインターフェースで [コネクタークレデンシャル](#configuring-a-connector-credential-for-the-servicenow-incident-creation) と [ウェブフックの設定](#configuring-a-webhook-for-servicenow-incident-creation) 用です。 Webhook URL 例:`https://hooks.slack.com/services/T00000000/BXXXXXXXXXX/PLVXXXXXXXXXXXXXXXXXXXXX`
## Nexthink で
Nexthink のウェブインターフェースから:
* [Webhook 用のコネクタークレデンシャルを設定する](#postingamessageinzoom-configuringaconnectorcredentialforzoomcredentialzoomtrue)
* [Slack にメッセージを投稿するためのウェブフックを設定しテストする](#postingamessagetoanmsteamschannel-configuringawebhookformschannel)
### Slack 用のコネクタークレデンシャルを設定する
[コネクタークレデンシャル](/platform/ja/configuring_nexthink/bringing-data-into-your-nexthink-instance/integrating-nexthink-with-third-party-tools/outbound-connectors/connector-credentials.md) 設定ページから、Slack で作成した接続情報を使ってフィールドを埋めてください。
1. ドロップダウンから **HTTPS** オプションを選択します。
2. Slack 設定での [Webhook URL](#sendingdatatoaslackchannel-inslack) から、ルート `https://hooks.slack.com/` を **URL アドレス** フィールドに貼り付けます。
3. ドロップダウンから **Basic** オプションを選択します。
4. フィールド **Username** および **Password** に `Test` と入力します。これらのフィールドは Slack の Incoming Webhooks 設定時には必要ありません。
5. クレデンシャルを**保存**します。
### Slack チャンネル用ウェブフックを設定する
[ウェブフックの設定ページ](/platform/ja/configuring_nexthink/bringing-data-into-your-nexthink-instance/integrating-nexthink-with-third-party-tools/outbound-connectors/webhooks/managing-webhooks.md)から、Slack で作成した接続情報と Nexthink で定義したコネクタークレデンシャルを使ってフィールドを入力してください。
1. [Configuring webhook NQL conditions](/platform/ja/configuring_nexthink/bringing-data-into-your-nexthink-instance/integrating-nexthink-with-third-party-tools/outbound-connectors/webhooks/managing-webhooks/configuring-webhook-nql-conditions.md) ドキュメントに従い、**NQL Condition** を入力します。
* NQL Condition を入力すると、システムは **Payload** 用の[許可されたプレースホルダ](/platform/ja/configuring_nexthink/bringing-data-into-your-nexthink-instance/integrating-nexthink-with-third-party-tools/outbound-connectors/webhooks/managing-webhooks/configuring-webhook-fields_-method-resource-and-payload.md#configuringwebhookfields-method-resource-andpayload-usingdatamodelvariablesasplaceholdersinthepayloa) をリスト表示します。
```
alert.alerts
| where monitor.tags contains "web-applications"
| where alert.context contains "*Salesforce*" or alert.context contains "*Microsoft*"
| list alert.monitor.name, alert.status, monitor.tags, alert.context, trigger_time, recovery_time, alert.monitor.thresholds, monitor.priority, alert.trigger_values, alert.trigger_reference_value, alert.recovery_values, alert.context, device_view_link, issue_view_link, device.name
```
2. Slack の [connector credential](#postingamessageinzoom-configuringaconnectorcredentialforzoomcredentialzoomtrue) で設定したものを **Credentials** ドロップダウンから選んでください。
3. ドロップダウンから **POST** を選択します。
4. [Slack 設定](#sendingdatatoaslackchannel-inslack) から、ルート URL アドレスを除いた URL エンドポイントを **Resources** フィールドに貼り付けます。例えば:\
`services/T00000000/BXXXXXXXXXX/PLVXXXXXXXXXXXXXXXXXXXXX`
5. **Payload** に送信したいメッセージを追加します。下の例をご覧ください。\
alert.alerts
```
{
"text": "There is an alert {{alert.monitor.name}} that is affecting the digital experience"
}
```
6. Slack にメッセージが送信されたことを確認するために**テスト送信**を行います。
{% hint style="info" %}
サポートされているペイロードについての詳細は、\[Slack API]\(
{% endhint %}
---
# Agent Instructions
This documentation is published with GitBook. GitBook is the documentation platform designed so that both humans and AI agents can read, navigate, and reason over technical content effectively. Learn more at gitbook.com.
## Querying This Documentation
If you need additional information that is not directly available in this page, you can query the documentation by asking a question.
Perform an HTTP GET request on the following URL with the `ask` and `goal` query parameters:
```
GET https://docs.nexthink.com/platform/ja/configuring_nexthink/bringing-data-into-your-nexthink-instance/integrating-nexthink-with-third-party-tools/outbound-connectors/webhooks/webhook-use-cases-setup/sending-data-to-a-slack-channel.md?ask=&goal=
```
`ask` is the immediate question: it should be specific, self-contained, and written in natural language.
`goal` is what the user is ultimately trying to achieve, the reason they need the answer. Sharing it helps GitBook give you a better, more relevant answer. A goal is most helpful when it describes the outcome the user wants rather than restating the question. For example, with `ask=how do I create an API token`, a goal like `automate deployments from our CI pipeline` lets GitBook tailor the answer to that use case.
The response will contain a direct answer to the question and relevant excerpts and sources from the documentation.
Use this mechanism when the answer is not explicitly present in the current page, you need clarification or additional context, or you want to retrieve related documentation sections.