> For the complete documentation index, see [llms.txt](https://docs.nexthink.com/llms.txt). Markdown versions of documentation pages are available by appending `.md` to page URLs; this page is available as [Markdown](https://docs.nexthink.com/platform/ja/configuring_nexthink/bringing-data-into-your-nexthink-instance/integrating-nexthink-with-third-party-tools/outbound-connectors/data-exporters/exporter-for-secure-file-transfer-protocol-sftp-server.md).
# Secure File Transfer Protocol (SFTP) サーバー用エクスポーター
{% hint style="warning" %}
このドキュメンテーションは外部ソースを参照しています。 Nexthink はサードパーティのドキュメントの正確性や、このページに記載されている情報に矛盾を生じさせる可能性のある外部の更新または変更を制御することはできません。エラーや矛盾を[Nexthink サポート](https://support.nexthink.com/)に報告してください。
{% endhint %}
データエクスポートを利用すると、カンマ区切りのCSVファイルを使用して、NexthinkのデータインサイトをUTF-8形式でSFTPサーバーにエクスポートできます。
NexthinkのウェブインターフェースでSFTPサーバーを設定し、データエクスポートを作成して配信します。
## 前提条件
資格情報を取得するにはSFTPサーバーを設定する必要があります。すでにSFTPサーバーを設定している場合は、本ページの[Configuring (SFTP) connector credentials](#exporterforsecurefiletransferprotocol-sftp-server-configuringsftpconnectorcredentialsinnexthinkcrede)セクションに移動してください。
以下の手順に従って、AzureにSFTPサーバーを作成してください。これは複数あるプロバイダーの一つにすぎません:
* [ステップ1 - Microsoft Azureポータルでストレージアカウントを作成する](#exporterforsecurefiletransferprotocol-sftp-server-creatingastorageaccountinthemicrosoftazureportal-o)
* [ステップ2 - ストレージアカウント内にAzure DLコンテナを作成する](#exporterforsecurefiletransferprotocol-sftp-server-creatinganeazuredlcontainerwithinastorageaccount-o)
* [ステップ3 - SFTP資格情報を取得する](#exporterforsecurefiletransferprotocol-sftp-server-obtainingsftpcredentials-optional-step3)
{% hint style="info" %}
SFTPデータエクスポーターは他のSFTPサーバーとも連携するように設定できます。
{% endhint %}
### (オプション) Microsoft Azureポータルでストレージアカウントを作成する
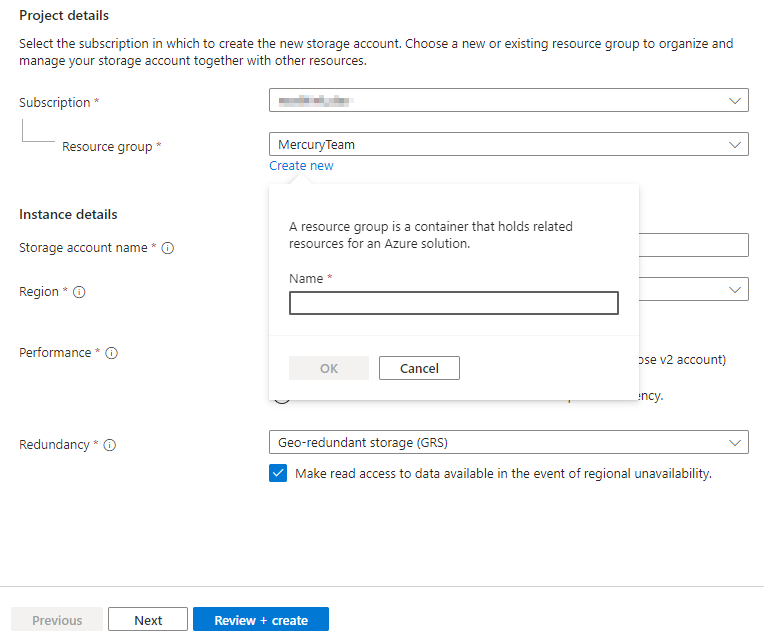
Azureポータルで汎用v2ストレージアカウントを使用してファイルシステムを作成する(データレイクストレージgen1ではない):
1. Azureポータルメニューで**すべてのサービス**を選択します。
2. リソースのリストに「Storage Accounts」と入力します。
3. **Storage Accounts**を選択します。
4. ストレージアカウントウィンドウで**追加**を選択します。
5. ストレージアカウントを作成したいサブスクリプションを選択します。
6. **リソースグループ**フィールド下で**新規作成**を選択します。新しいリソースグループの名前を入力します。すでにリソースグループが存在する場合は、ドロップダウンリストから選択します。
7. ストレージアカウントの名前を入力します。名前はAzureポータル内で一意であり、3文字から24文字の長さでなければなりません。名前には数字と小文字のアルファベットのみを含めてください。
8. ストレージアカウントの場所を選択するか、デフォルトの場所を使用してください。
9. **高度**, **ネットワーキング**, **データ保護**, **暗号化**および **タグ** のタブの情報を入力してください。
10. <編集 + 作成>を選択してストレージアカウントの設定をレビューし、アカウントを作成します。
### (オプション) ストレージアカウント内にeAzure DLコンテナを作成する
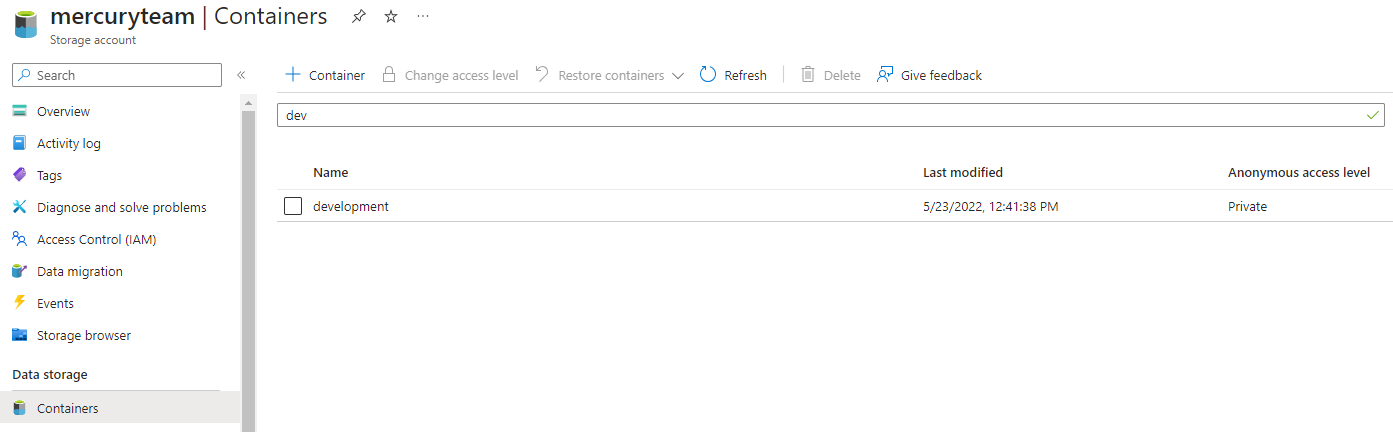
1. **Storage accounts** 内で新しく作成したストレージアカウントを見つけます。
2. 使用したいストレージアカウントを選択します。
3. 新しいコンテナを作成する必要があります。
4. **コンテナ** を選択し、新しいコンテナを追加して、例えば、openbridge-sftpのように意味のある名前を入力します。
5. アクセスを**プライベート(匿名アクセスなし)** に設定してください。
6. **作成**をクリックします。
### (オプション) SFTP資格情報を取得する
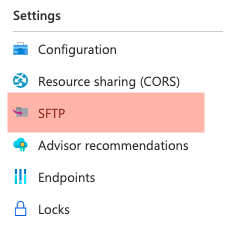
1. **設定**で、メニューの左側にある**SFTP**オプションを選択します。
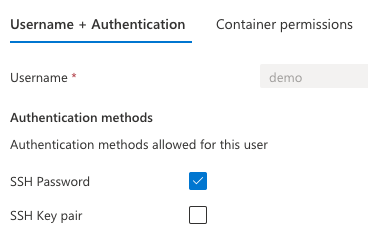
2. ローカルユーザーを追加します。
3. **Username + Authentication**タブでユーザー名を挿入し、パスワード認証方式を選択します。
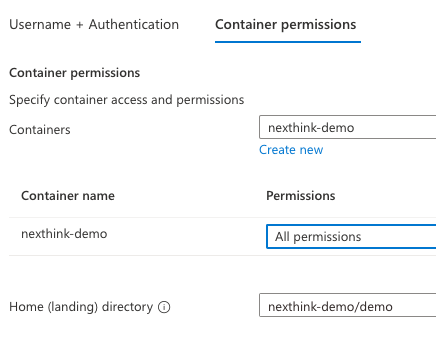
4. Container permissions タブで[ステップ2](#exporterforsecurefiletransferprotocol-sftp-server-creatinganeazuredlcontainerwithinastorageaccount-o)で定義したコンテナを選択し、コンテナへのアクセス許可を与えてルートディレクトリを挿入してください。ルートディレクトリは事前に存在していなければなりません。
{% hint style="info" %}
**ホーム(ランディング)ディレクトリ** はパターン *container\_name/folder* の文字列でなければなりません。そうでなければシステムは正しく設定しません。システムはコンテナのルートにあるランディングディレクトリを見つけることができません。ルートの中に存在するフォルダーにのみ設置できます。
{% endhint %}
5. ユーザーを作成した後、システムが生成したパスワードをコピーします。
6. ユーザーを設定したら、Nexthinkのウェブインターフェースでコネクターの資格情報を構成するために次の値を保存してください。
* ユーザー名
* 接続文字列
* SSHパスワード
## NexthinkでSFTPコネクターの資格情報を構成する
NexthinkウェブインターフェースからSFTPサーバーにアクセスするための資格情報を構成してください。
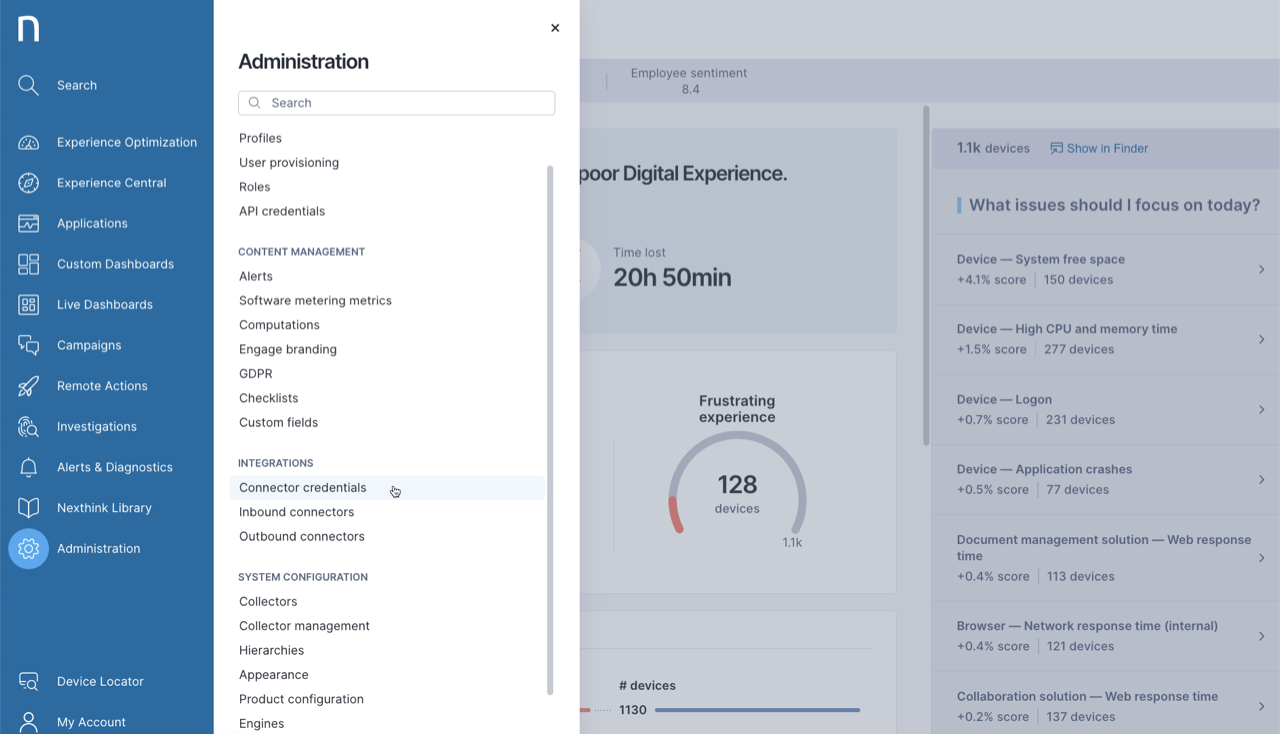
1. メインメニューから**管理**を選択します。
2. ナビゲーションパネルの連携セクション下の**コネクター資格情報**を選択します。
1. コネクタ資格情報ページの右上にある**新しい資格情報**ボタンをクリックします。
2. 一意の**名前**を入力します。
3. プロトコルとして**Secure File Transfer Protocol (SFTP)** を選択すると追加のフォーム要素が表示されます。
4. **ホスト名**: [ステップ3](#exporterforsecurefiletransferprotocol-sftp-server-obtainingsftpcredentials-optional-step3) の `sftp://<接続文字列>:<ポート>`
5. **SFTPサーバーフィンガープリント**: コマンドラインインターフェースで `ssh-keyscan .blob.core.windows.net` を実行し、最も安全なサポートされているホストキーアルゴリズムで始まる完全な文字列をコピーします。
* サポートされているホストキーアルゴリズムのリストについては、[コネクター資格情報](/platform/ja/configuring_nexthink/bringing-data-into-your-nexthink-instance/integrating-nexthink-with-third-party-tools/outbound-connectors/connector-credentials.md) ドキュメンテーション内の *SFTPのコネクター資格情報* セクションを参照してください。
6. **認可**: BASIC
7. **ユーザー名**: [ステップ3](#exporterforsecurefiletransferprotocol-sftp-server-obtainingsftpcredentials-optional-step3) の `<ユーザー名>`
8. **パスワード**: [ステップ3](#exporterforsecurefiletransferprotocol-sftp-server-step3) の ``
9. **保存**をクリックしてください。
詳細は[コネクター資格情報](/platform/ja/configuring_nexthink/bringing-data-into-your-nexthink-instance/integrating-nexthink-with-third-party-tools/outbound-connectors/connector-credentials.md) ドキュメンテーションを参照してください。
## NexthinkでSFTPデータエクスポーターを作成する
データをSFTPサーバーにエクスポートするためのアウトバウンドコネクタを構成します。
1. メインメニューから**管理**を選択します。
2. ナビゲーションパネルの連携セクションから**アウトバウンドコネクタ**をクリックします。
3. 表から**データエクスポーター**を選択します。
4. ページの右上にある**新しいエクスポーター**ボタンをクリックします。
### 一般タブ
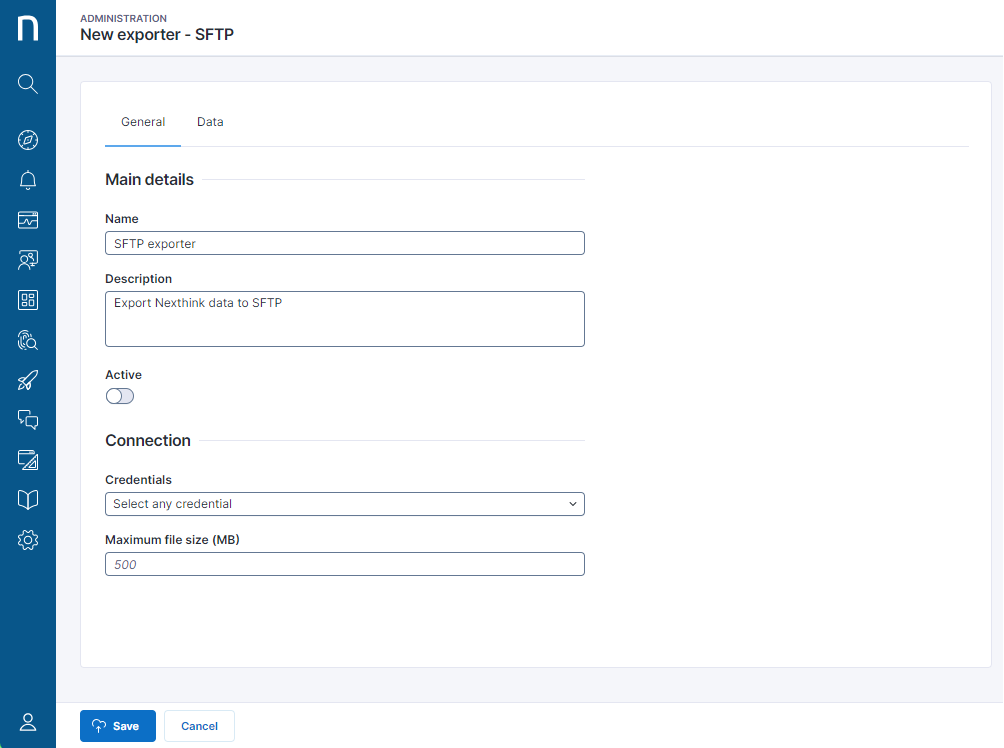
* **名前:** データエクスポーターに意味のある名前を入力します。
* **説明:** データエクスポーターの目標について意味のある説明を入力します。
* **アクティブ:** エクスポーターを有効にするためにトグルをオンにします。
* **資格情報:** データエクスポーターがデータを送信するサードパーティツールの資格情報を定義します。詳細は[コネクター資格情報](/platform/ja/configuring_nexthink/bringing-data-into-your-nexthink-instance/integrating-nexthink-with-third-party-tools/outbound-connectors/connector-credentials.md) を参照してください。
* **最大ファイルサイズ:** Data Exportによって生成される最大ファイルサイズを定義します。特定の**NQLクエリ**からのデータセットが指定されたファイルサイズを超える場合、複数の別々のファイルに分割されます。
### データタブ
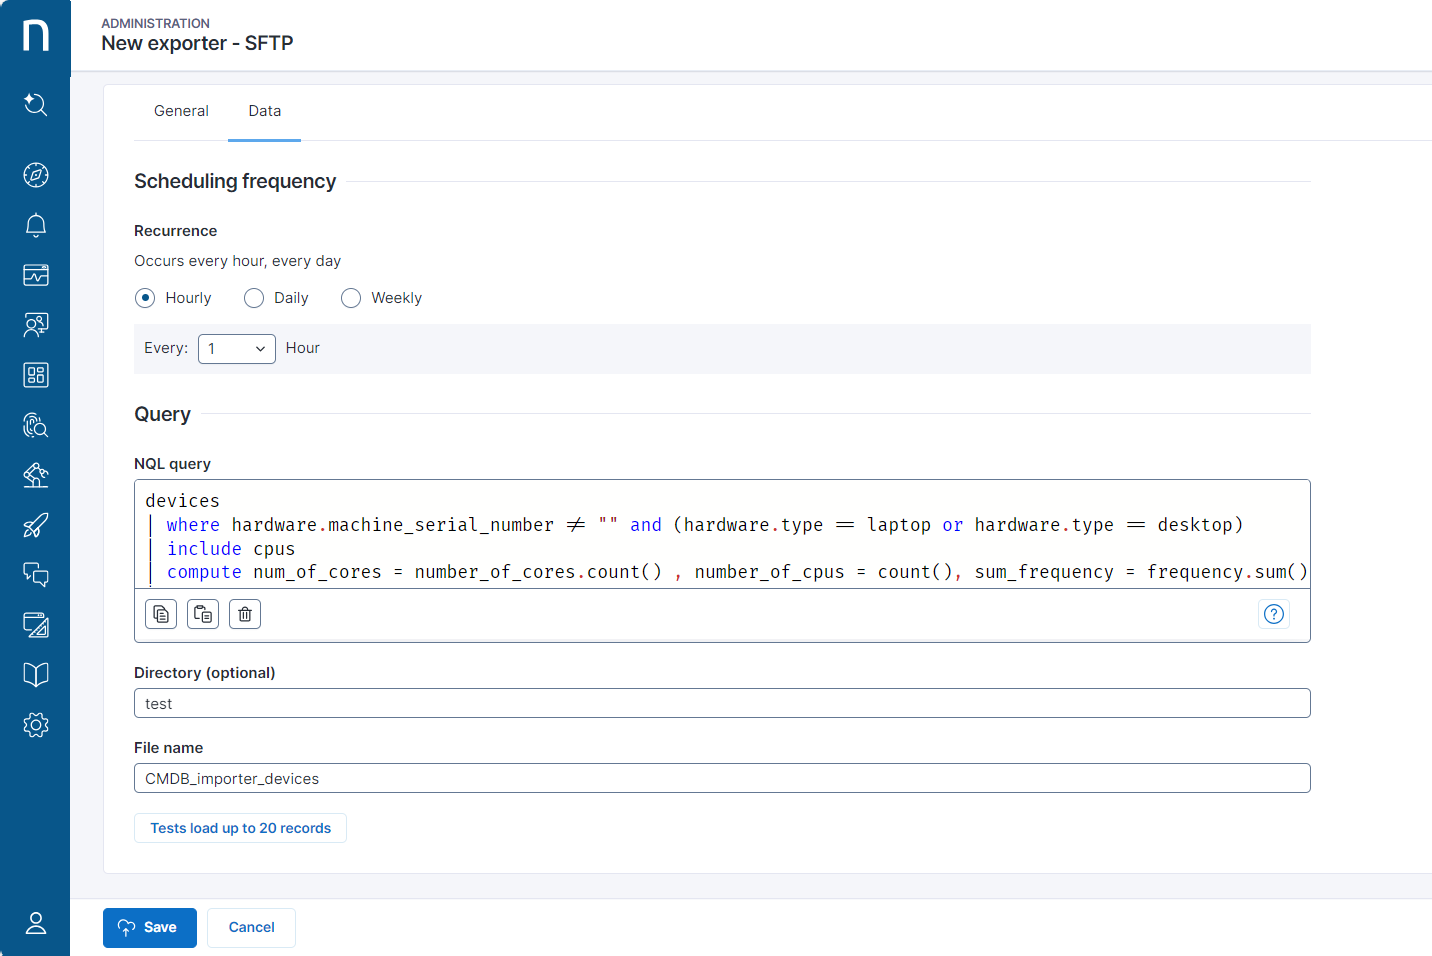
* **スケジューリング頻度:** システムがどのくらいの頻度でNQLクエリを実行しデータをエクスポートするかを定義します。利用可能なオプションは次のとおりです。
* **毎時:** ドロップダウンメニューで選択された値に基づいてデータエクスポートを行う。例えば、毎1時間、2時間、3時間、4時間、6時間、または12時間。
* **毎日:** Nexthinkクラウドインスタンスが配置されているタイムゾーンで毎日00:00にデータエクスポートを実行します。
* **毎週:** Nexthinkクラウドインスタンスが配置されているタイムゾーンで選択された日に毎週00:00にデータエクスポートを実行します。
**毎時**および**毎日**のスケジューリング頻度では、システムはデータ完全性のために前のバケットが適切に閉じるのを許可するために20分待機してからデータエクスポーターを実行します。
{% hint style="info" %}
システムがデフォルト値を生成せず、バリデーションプロセス中に値が欠落していることを示さないため、**再発**オプションの値を選択する必要があります。
{% endhint %}
* **NQLクエリ**: エクスポート先に転送するデータを生成するためのNQLクエリを入力します。
* **ディレクトリ(オプション):** サードパーティツールのコンテナ資格情報内のディレクトリを定義してください。サードパーティツールで事前にディレクトリを作成している必要があります。
* **ファイル名:** 送信先で作成されるファイル名を入力します。アンダースコアのみがサポートされる特殊文字です。例: *CMDB\_importer\_devices*
### NexthinkでSFTPデータエクスポーターをテストする
**テストで最大20件のレコードをロード**ボタンをクリックして、構成を保存する前に接続を確認します。
* NQLクエリおよび接続が有効な場合、クエリの結果が正常に送信されたことを示すメッセージが表示されます。
* NQLクエリまたは接続が無効な場合、エラーの詳細を通知するメッセージが表示されます。
[データエクスポーターの管理](/platform/ja/configuring_nexthink/bringing-data-into-your-nexthink-instance/integrating-nexthink-with-third-party-tools/outbound-connectors/data-exporters/managing-data-exporters.md) ドキュメンテーションを参照してください。データエクスポーターの作成、編集、削除、無効化について詳しく学べます。
## SFTPデータエクスポーターのNQLクエリ例
パッケージのリスト
```
package.packages
| list name, publisher , version
```
ローカルでないユーザーをリスト
```
users
| where name !in ["*Local*"]
```
デバイスに接続したユーザーのリスト
```
session.connects during past 7d
| where hardware.type == laptop or hardware.type == desktop
| summarize c1 = count() by device.name, user.name, user.ad.full_name
| list device.name, user.name, user.ad.full_name
```
ノートパソコンおよびデスクトップワークステーションのリスト
```
devices
| where hardware.machine_serial_number != ""
and (hardware.type == laptop or hardware.type == desktop)
| include cpus
| compute
num_of_cores = number_of_cores.count(),
number_of_cpus = count(),
freq = frequency.sum()
| include disks
| compute disk_capacity = capacity.sum()
| list group_name, last_seen, first_seen, entity,
hardware.manufacturer, hardware.model,
operating_system.architecture, hardware.machine_serial_number,
name, hardware.memory, num_of_cores, number_of_cpus, freq,
disk_capacity, operating_system.name, operating_system.build
```
特定のデバイスにインストールされたパッケージのリスト
```
package.installed_packages
| summarize
c1=count() by package.name, package.version, device.name
| list package.name, package.version, device.name
```
## トラブルシューティングガイド
### 誤った資格情報
SFTP資格情報が機能しているか確認する方法は多数あります。
* **Windows**: [WindowsおよびLinuxの記事でsftp接続をテストする](https://simplyfies.com/2021/12/13/test-sftp-connection/)(外部リンク)を参照してください。
* **Linux**: ターミナルでこのコマンドを実行します `sftp -P 22 @`
* **FileZillaやWinSCPなどのSFTPクライアント**: ドキュメンテーションで定義された資格情報を使用して新しいコネクターを設定し、システムが接続を確立できるか確認します。
### データのエクスポートエラー
* [Nexthinkサポート](https://support.nexthink.com/) チームに確認してください。
## FAQ ssh-rsaをSFTPサーバーフィンガープリントとして使用できますか?
はい。ただし、それはSFTPサーバーの構成によります。これに複数のプロトコルが利用可能である場合は、最も安全なプロトコルを選択してください。そうでない場合、システムは接続時にエラーをスローする可能性があります。
エクスポートされるファイル名を指定できますか?
はい、エクスポートされたコンテンツは次の命名規則に従ったファイル内にあります: `${file_name}_X_yyyymmdd-hhmmss.csv` ここで `X` はファイル番号、`yyyymmdd-hhmmss` はタイムスタンプを表します。
**最大20件のレコードをロードでテスト**を実行すると、エクスポートされたコンテンツは命名規則に従ったファイル内にあります: `Test_X_yyyymmdd-hhmmss.csv`
---
# Agent Instructions
This documentation is published with GitBook. GitBook is the documentation platform designed so that both humans and AI agents can read, navigate, and reason over technical content effectively. Learn more at gitbook.com.
## Querying This Documentation
If you need additional information that is not directly available in this page, you can query the documentation by asking a question.
Perform an HTTP GET request on the following URL with the `ask` and `goal` query parameters:
```
GET https://docs.nexthink.com/platform/ja/configuring_nexthink/bringing-data-into-your-nexthink-instance/integrating-nexthink-with-third-party-tools/outbound-connectors/data-exporters/exporter-for-secure-file-transfer-protocol-sftp-server.md?ask=&goal=
```
`ask` is the immediate question: it should be specific, self-contained, and written in natural language.
`goal` is what the user is ultimately trying to achieve, the reason they need the answer. Sharing it helps GitBook give you a better, more relevant answer. A goal is most helpful when it describes the outcome the user wants rather than restating the question. For example, with `ask=how do I create an API token`, a goal like `automate deployments from our CI pipeline` lets GitBook tailor the answer to that use case.
The response will contain a direct answer to the question and relevant excerpts and sources from the documentation.
Use this mechanism when the answer is not explicitly present in the current page, you need clarification or additional context, or you want to retrieve related documentation sections.