> For the complete documentation index, see [llms.txt](https://docs.nexthink.com/platform/llms.txt). Markdown versions of documentation pages are available by appending `.md` to page URLs; this page is available as [Markdown](https://docs.nexthink.com/platform/ja/configuring_nexthink/bringing-data-into-your-nexthink-instance/connecting-mobile-devices-to-nexthink/nexthink-mobile-for-ios.md).

# Jamf で iOS および iPadOS デバイス向け Nexthink Mobile をデプロイする

このガイドでは、Jamf を使用して iOS および iPadOS デバイスに Nexthink Mobile アプリケーションを展開する方法を説明します。 本ガイドは、デバイス管理や Nexthink のオンボーディングを担当する IT 管理者を対象としており、iOS および iPadOS のデバイス管理の概念と Jamf の管理に精通していることを前提としています。

## 開始前に

展開を開始する前に、次の要件を満たしていることを確認してください。

* 対象デバイスが監視下にあり、Microsoft Intune や Jamf などの UEM ソリューションに登録されていること。 本ドキュメントでは例として Intune を使用します。
* 対象デバイスが Apple App Store にアクセスできること。
* [Nexthink Mobile アプリ設定プロファイル（iOS）](https://edocs.nexthink.com/nexthink-infinity/infinity-specifications/nexthink-mobile-app-configuration-profile-ios)のドキュメントで説明されているとおりに、`Nexthink Mobile Device Configuration.xml` ファイルをダウンロードして設定します。
* [インストールトークンの作成](/platform/ja/configuring_nexthink/bringing-data-into-your-nexthink-instance/connecting-mobile-devices-to-nexthink/creating-an-installation-token.md) のドキュメントに従って、インストレーショントークンを作成します。

***

## Nexthink Mobile アプリの定義

{% stepper %}
{% step %}
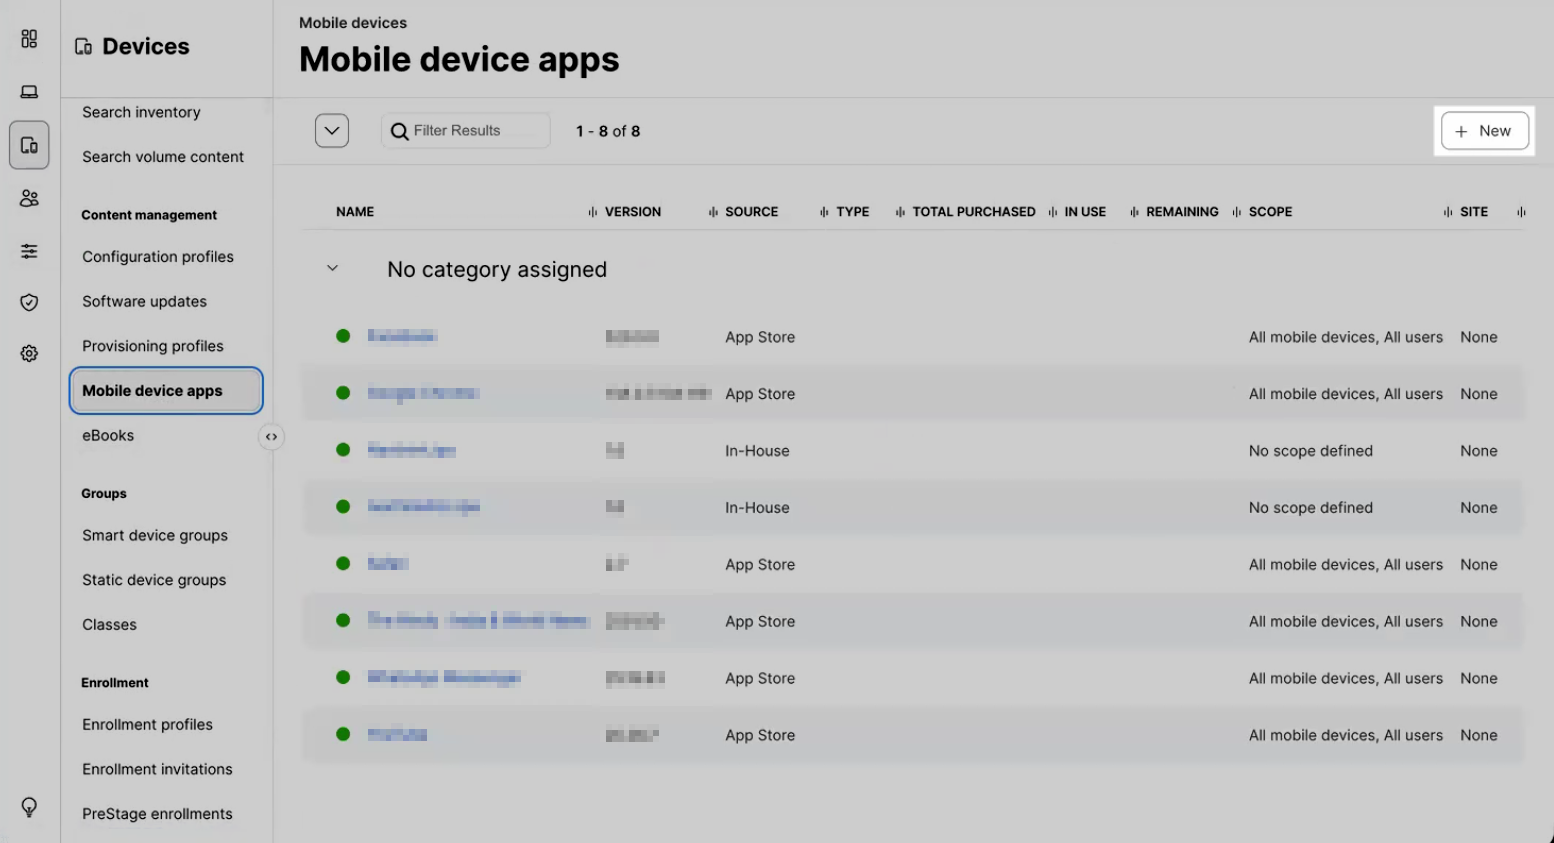
Jamf Pro ダッシュボードで、**Devices > Mobile device apps > New** を選択します。

<figure><img src="/files/lbNyyZb654LMr5uscArH" alt=""><figcaption></figcaption></figure>
{% endstep %}

{% step %}
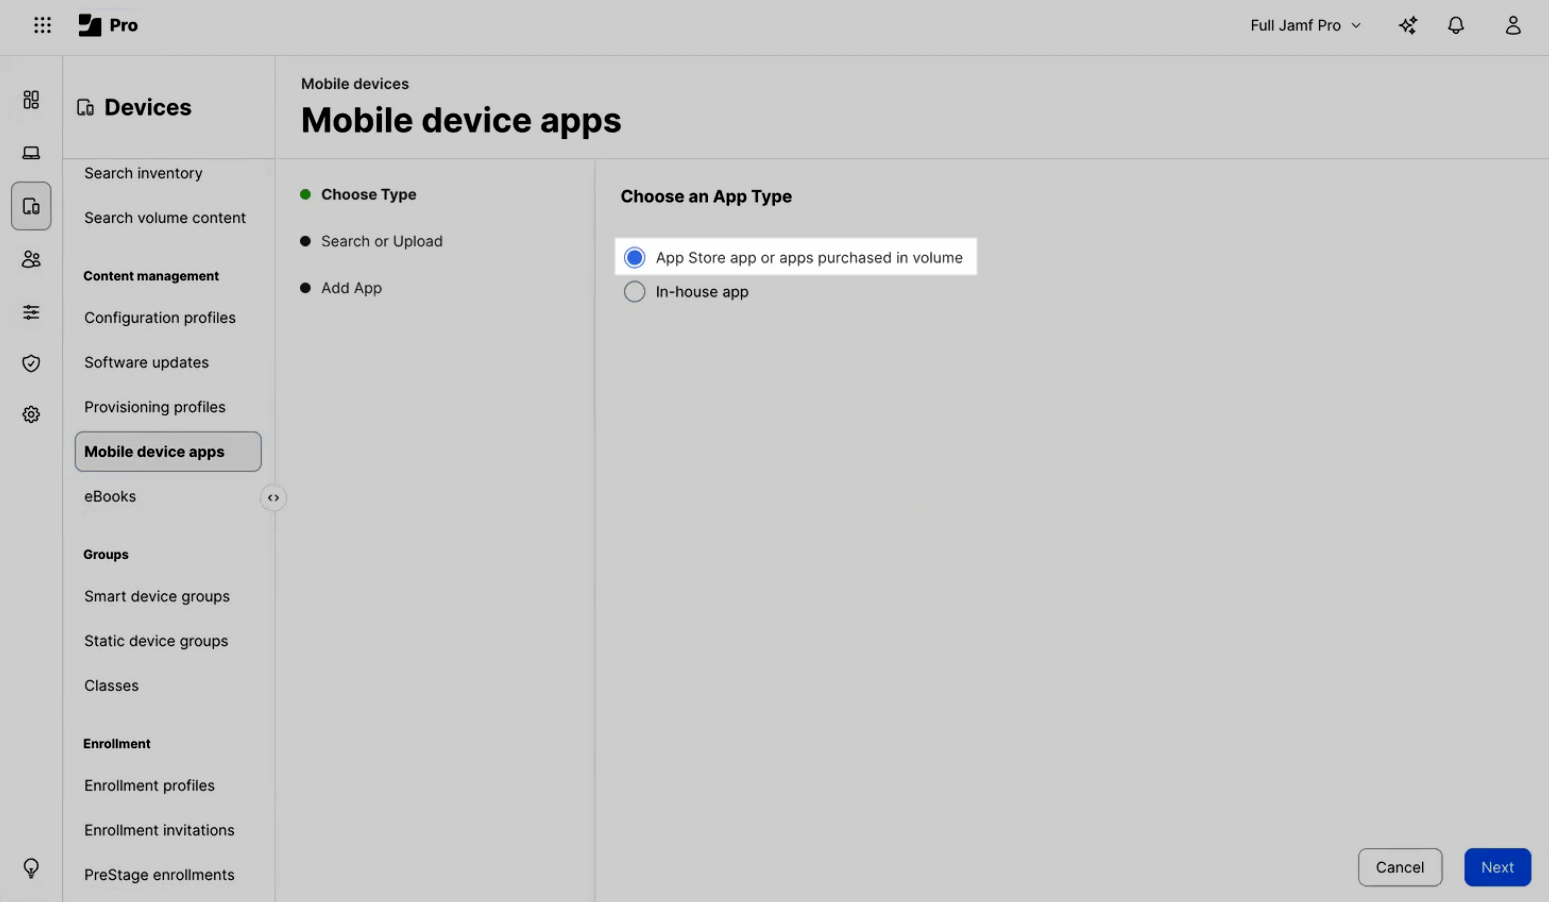
アプリタイプとして **App Store app or apps purchased in volume** を選択し、**Next** を選択します。

<figure><img src="/files/VkjGqNOXEt1RvvmULQjf" alt=""><figcaption></figcaption></figure>
{% endstep %}

{% step %}
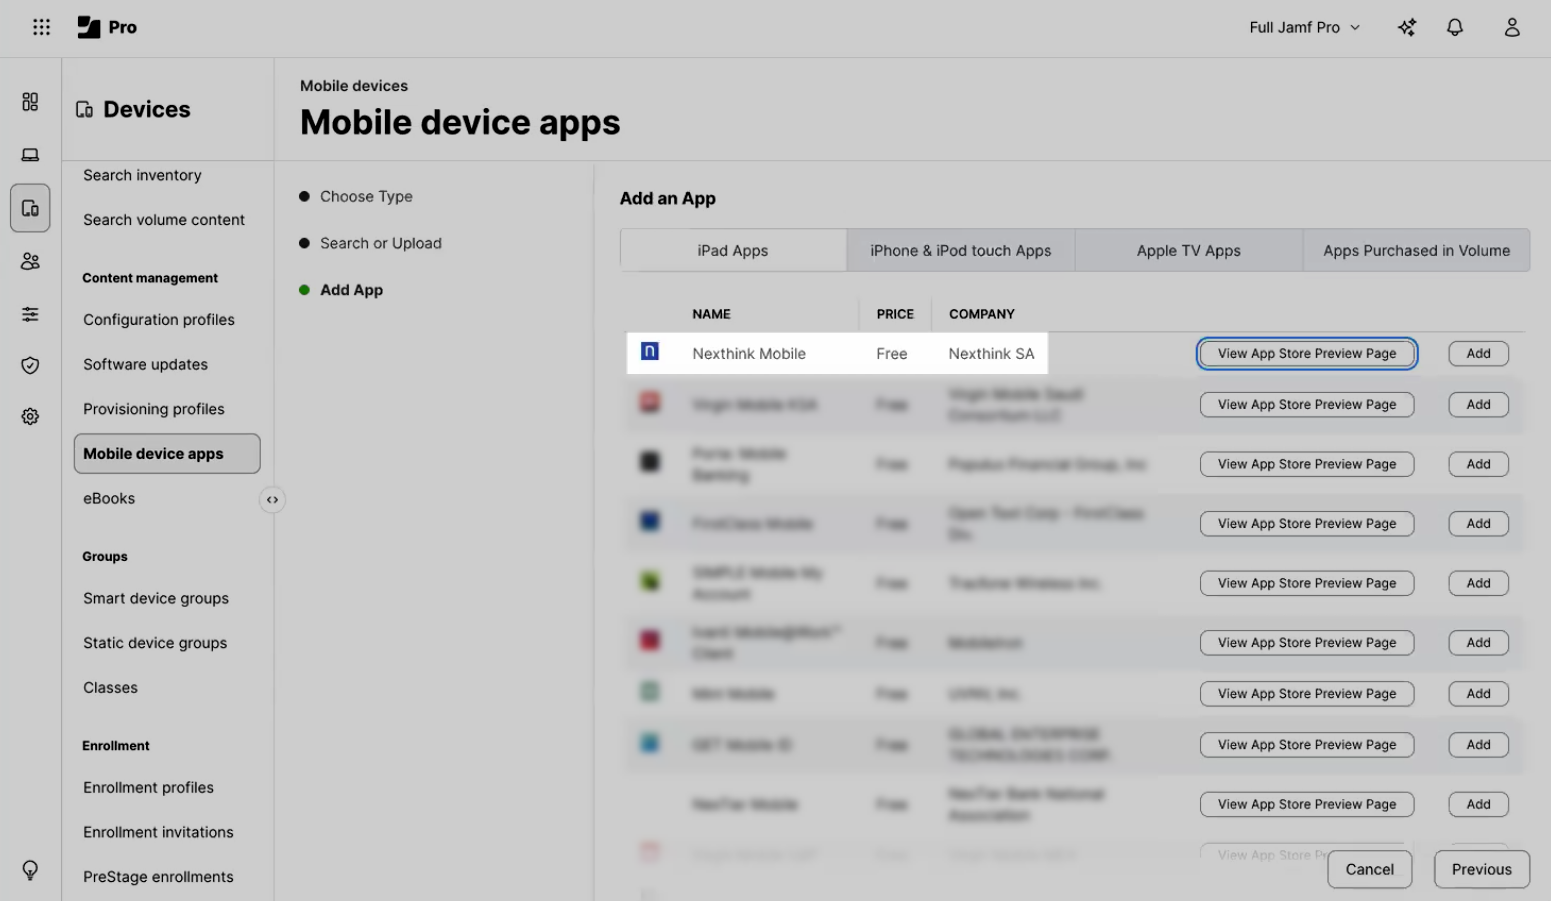
検索バーに "Nexthink Mobile" と入力し、結果から Nexthink Mobile を **Add** します。

<figure><img src="/files/XDL8BAFQO7LQlM2Fthoy" alt=""><figcaption></figcaption></figure>
{% endstep %}

{% step %}
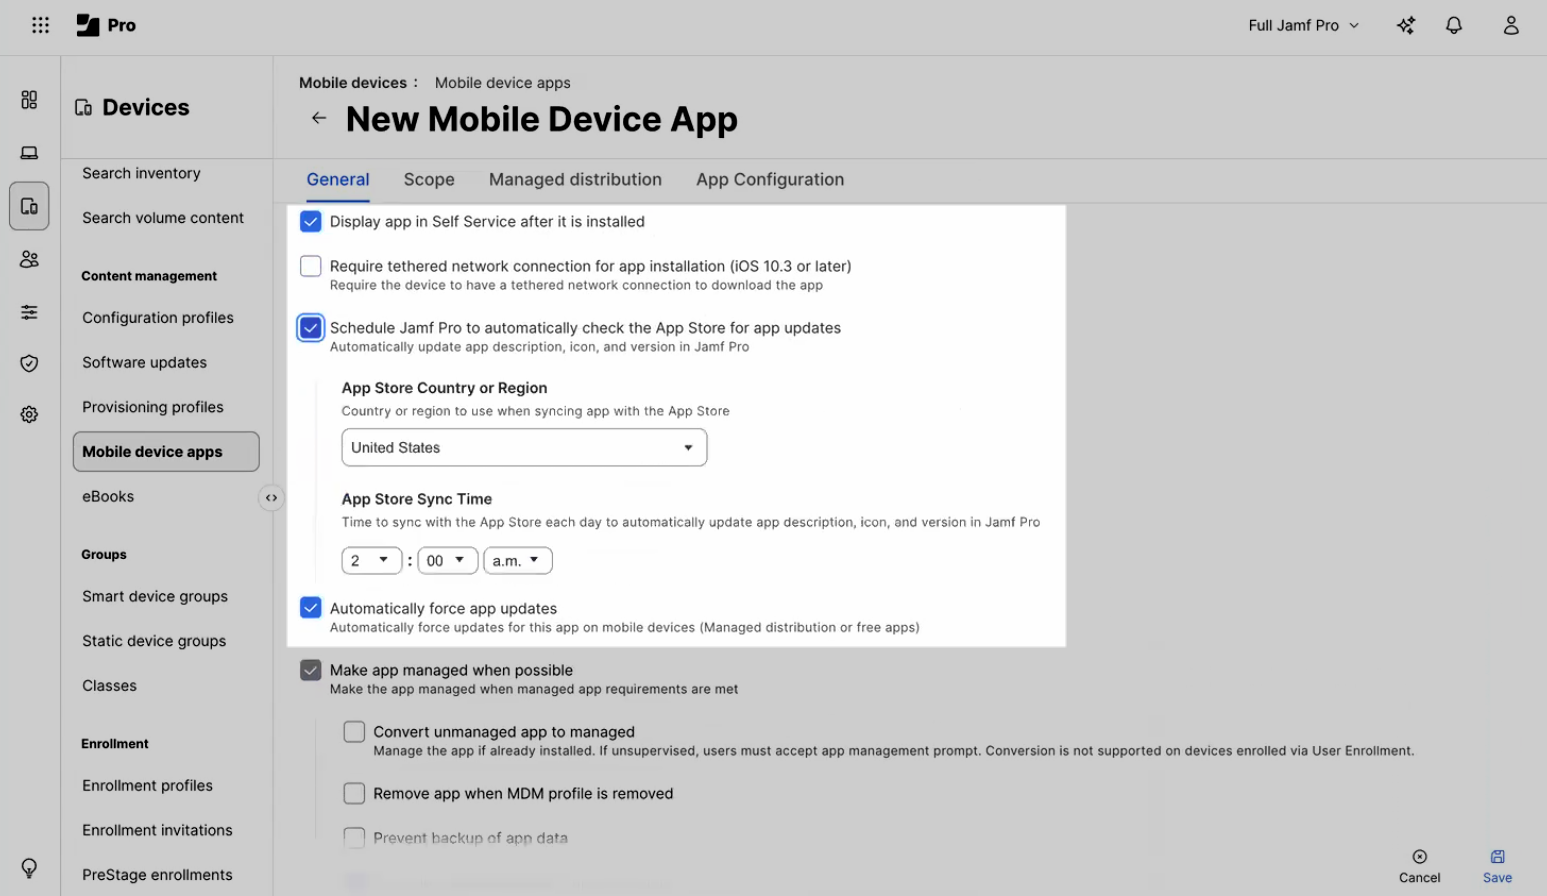
**General** タブで、次の構成値を変更します。

<table><thead><tr><th>設定</th><th width="355.5555419921875">値</th></tr></thead><tbody><tr><td>配布方法</td><td>自動的にインストール/ユーザーにインストールを促す</td></tr><tr><td>インストール後に Self Service にアプリを表示</td><td>有効</td></tr><tr><td>Jamf Pro に App Store のアプリ更新を自動チェックさせるスケジュール</td><td>有効</td></tr><tr><td>アプリアップデートを自動的に強制</td><td>有効</td></tr></tbody></table>

<figure><img src="/files/weCsiLDwvlkJDvxEpwgD" alt=""><figcaption></figcaption></figure>
{% endstep %}

{% step %}
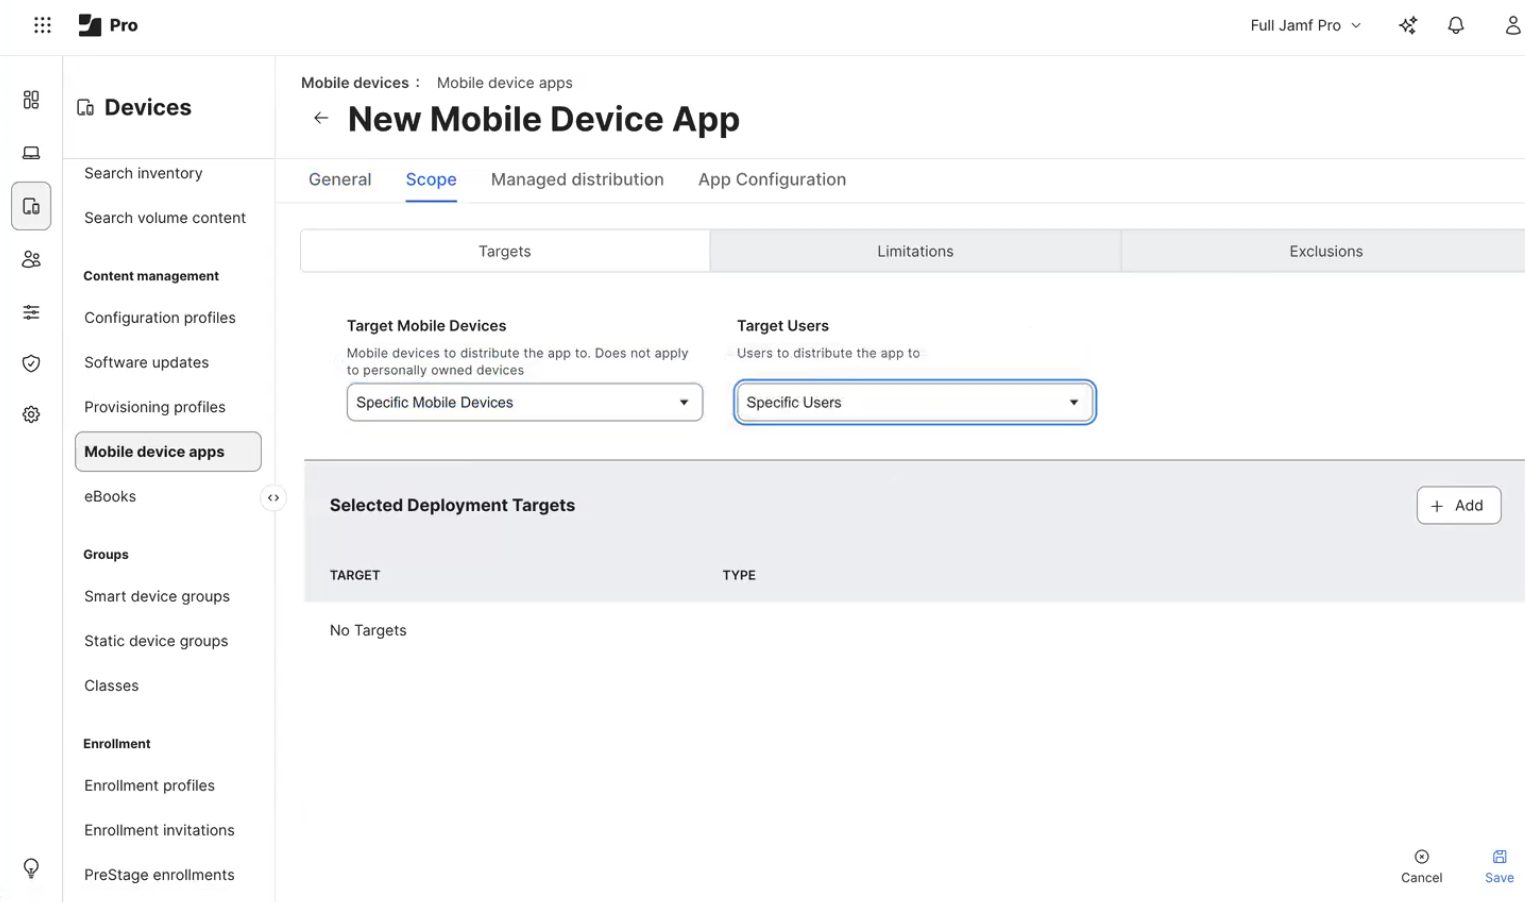
**Scope** タブで、**Target Mobile Devices** または **Target Users**、および **Selected Deployment Targets** を定義します。

<figure><img src="/files/2iK5CptBRIVqwQbiFT6Q" alt=""><figcaption></figcaption></figure>
{% endstep %}

{% step %}
アプリ構成を保存します。
{% endstep %}
{% endstepper %}

***

## コンテンツフィルタの定義

{% stepper %}
{% step %}
[Nexthink Mobile device configuration profile for iOS and iPadOS](https://edocs.nexthink.com/ja/nexthink-infinity/infinity-specifications/nexthink-mobile-app-configuration-profile-ios) の拡張子を `.xml` から `.mobileconfig` に変更します。
{% endstep %}

{% step %}
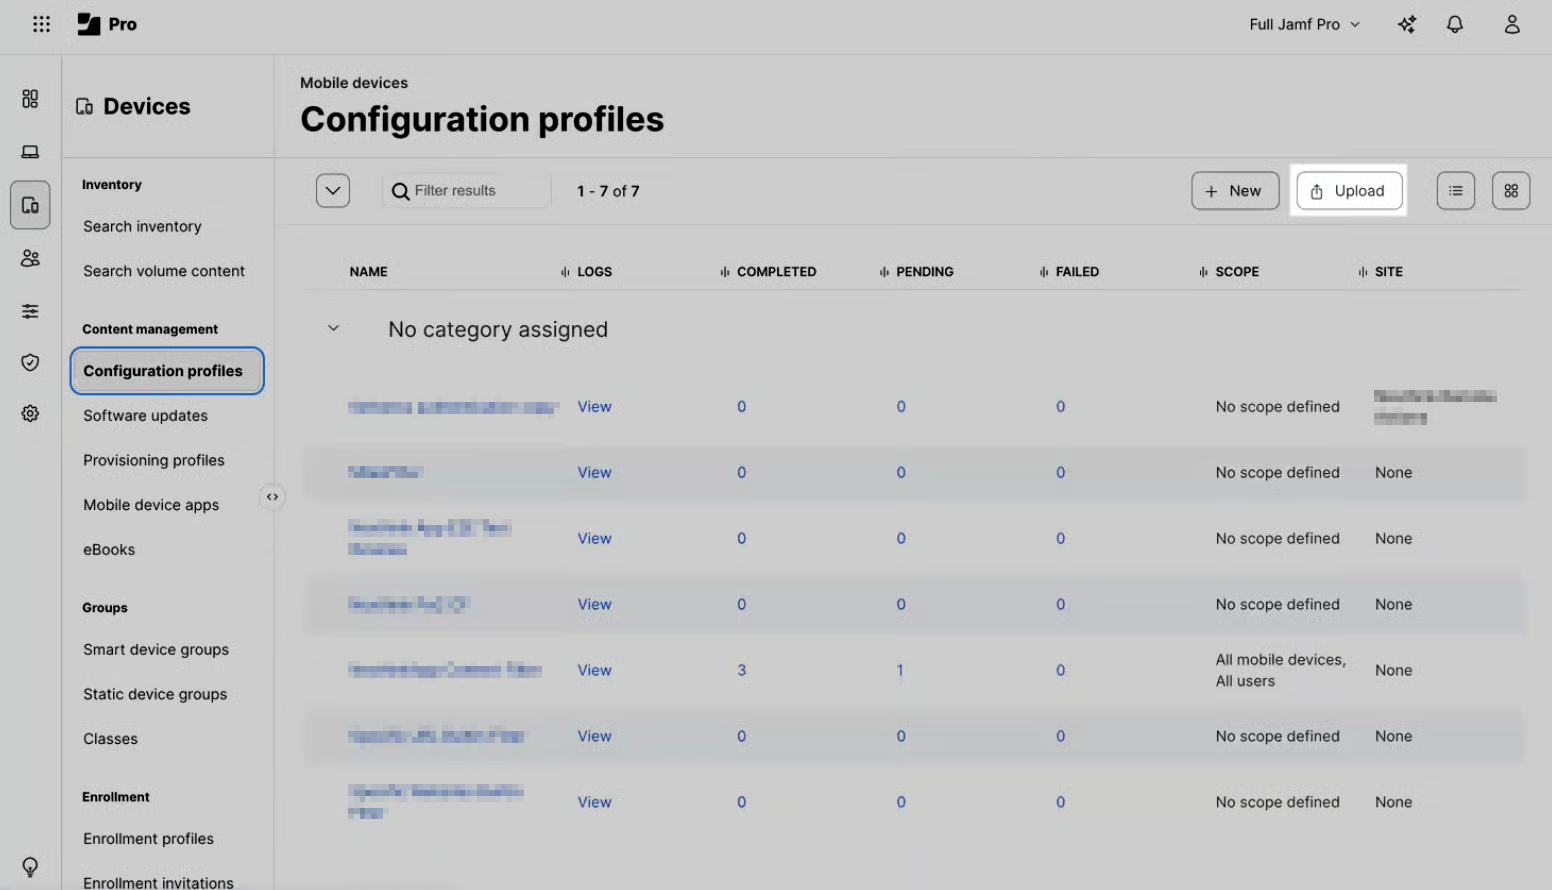
**Configuration profiles** で、構成ファイルを **Upload** します。

<figure><img src="/files/jZ8w4q88lP1UsEqAGyeM" alt=""><figcaption></figcaption></figure>
{% endstep %}

{% step %}
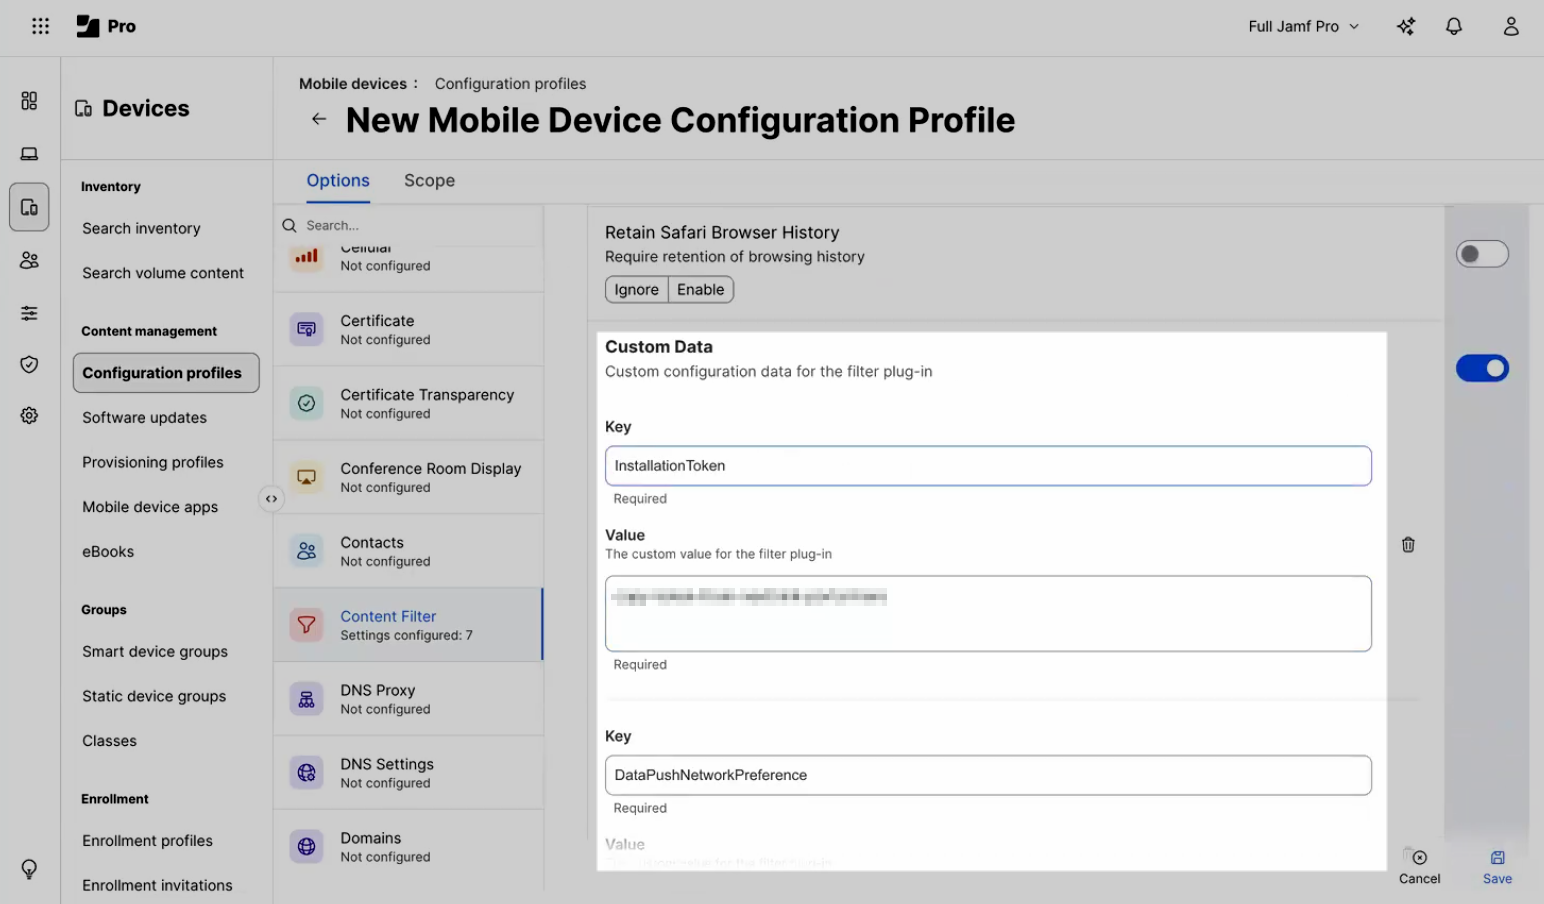
**Options** タブの **Content filter** タブに移動し、**Custom Data** セクションで次の構成値を変更します。

<table><thead><tr><th width="277.22216796875">キー</th><th>値</th></tr></thead><tbody><tr><td>InstallationToken</td><td>Nexthink で作成したインストレーショントークン</td></tr><tr><td>DeviceID</td><td>$UDID</td></tr><tr><td>UserPrimaryUPN</td><td>$EMAIL</td></tr></tbody></table>

<figure><img src="/files/Fespn6BAT5TlwcJnFNHY" alt=""><figcaption></figcaption></figure>
{% endstep %}

{% step %}
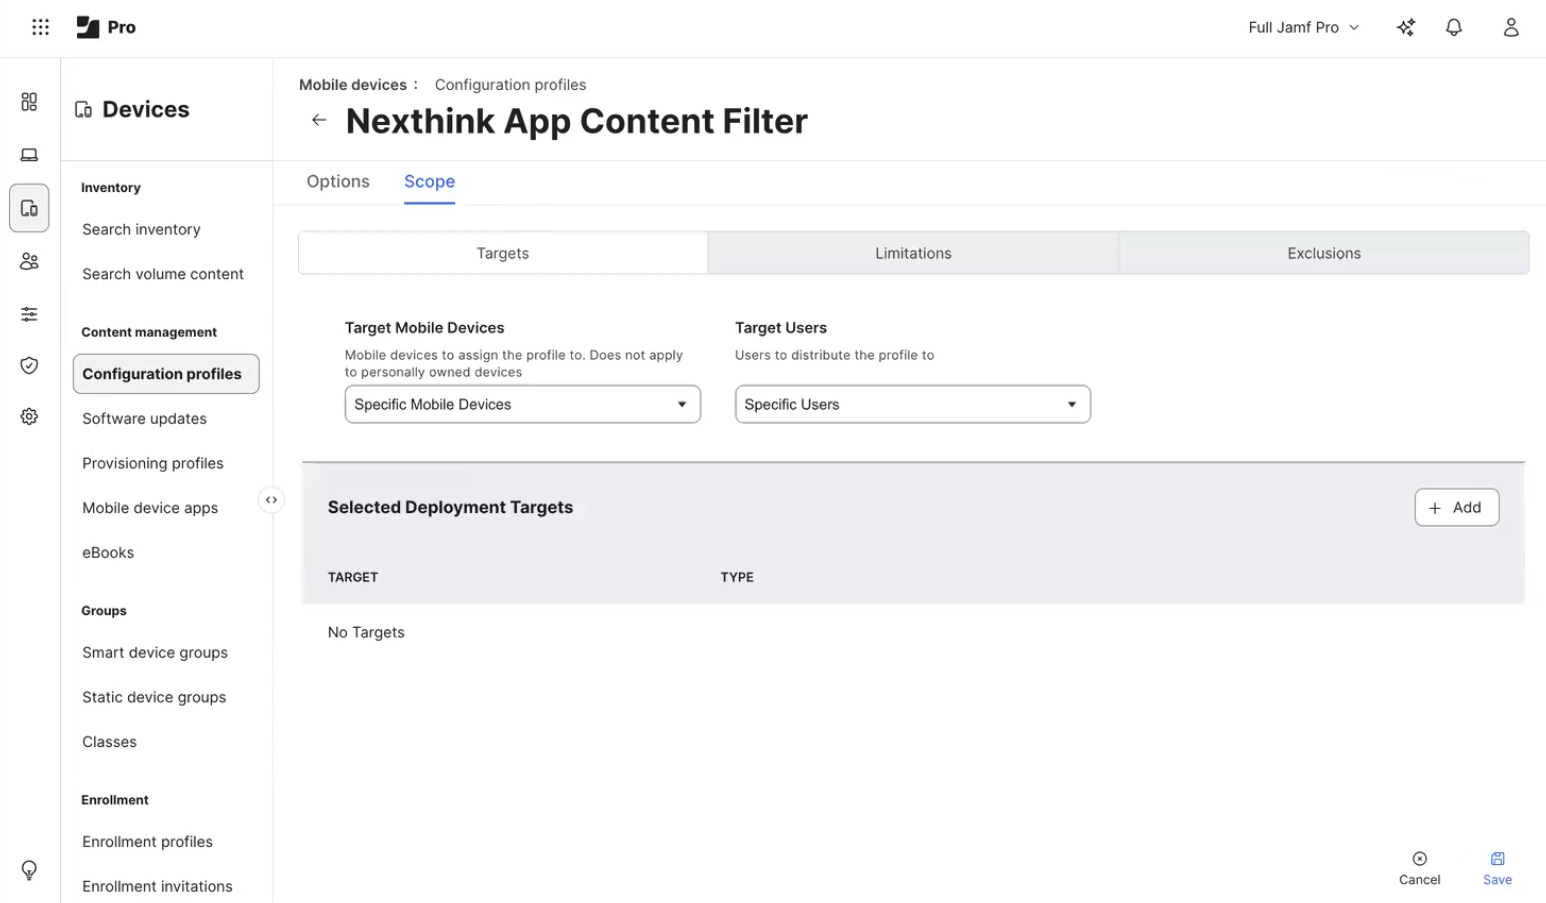
**Scope** タブで、**Target Mobile Devices** または **Target Users**、および **Selected Deployment Targets** を定義します。

<figure><img src="/files/EmJYi61fI18no3F6Cba6" alt=""><figcaption></figcaption></figure>
{% endstep %}

{% step %}
コンテンツフィルタを保存します。
{% endstep %}
{% endstepper %}

***

## 非準拠デバイスのグループ定義

組織内の非準拠デバイスをコネクタで報告できるようにするため、[Jamf：iOS モバイルデバイス コネクタ](/platform/ja/configuring_nexthink/bringing-data-into-your-nexthink-instance/integrating-nexthink-with-third-party-tools/inbound-connectors/jamf-ios-mobile-devices-connector.md) 用のスマートグループを作成します。

{% stepper %}
{% step %}
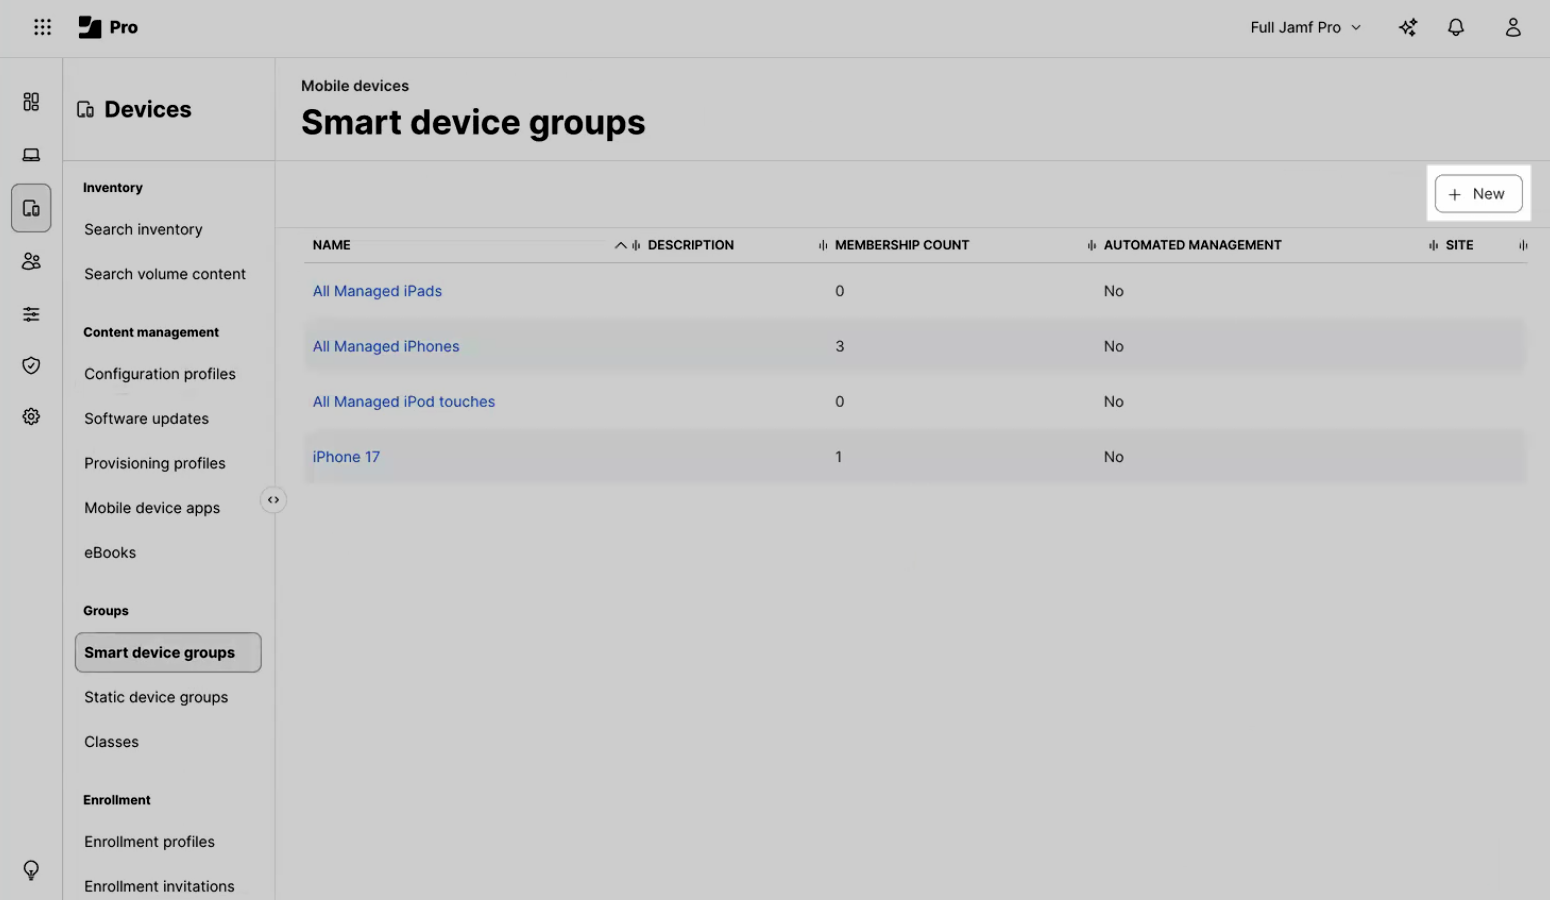
**Smart device groups** を選択し、**New** グループを追加します。

<figure><img src="/files/ZHycp65e72g2leUS6XCF" alt=""><figcaption></figcaption></figure>
{% endstep %}

{% step %}
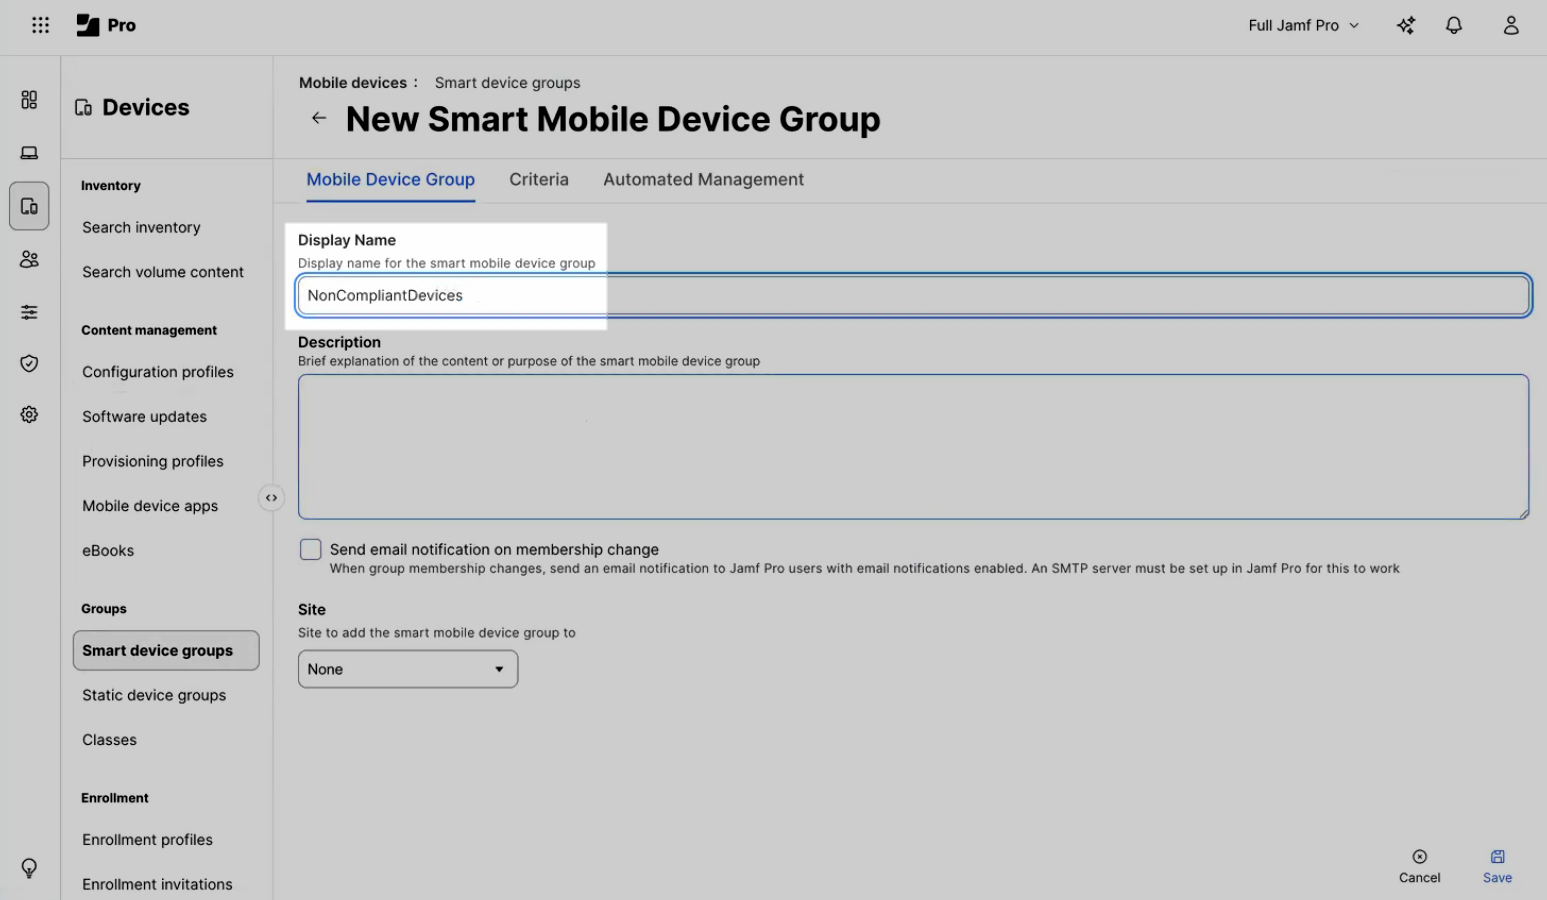
**Mobile Device Group** タブで、"NonCompliantDevices" などの表示名を追加します。

<figure><img src="/files/RSJfD0O70CHn4vfXpU4N" alt=""><figcaption></figcaption></figure>
{% endstep %}

{% step %}
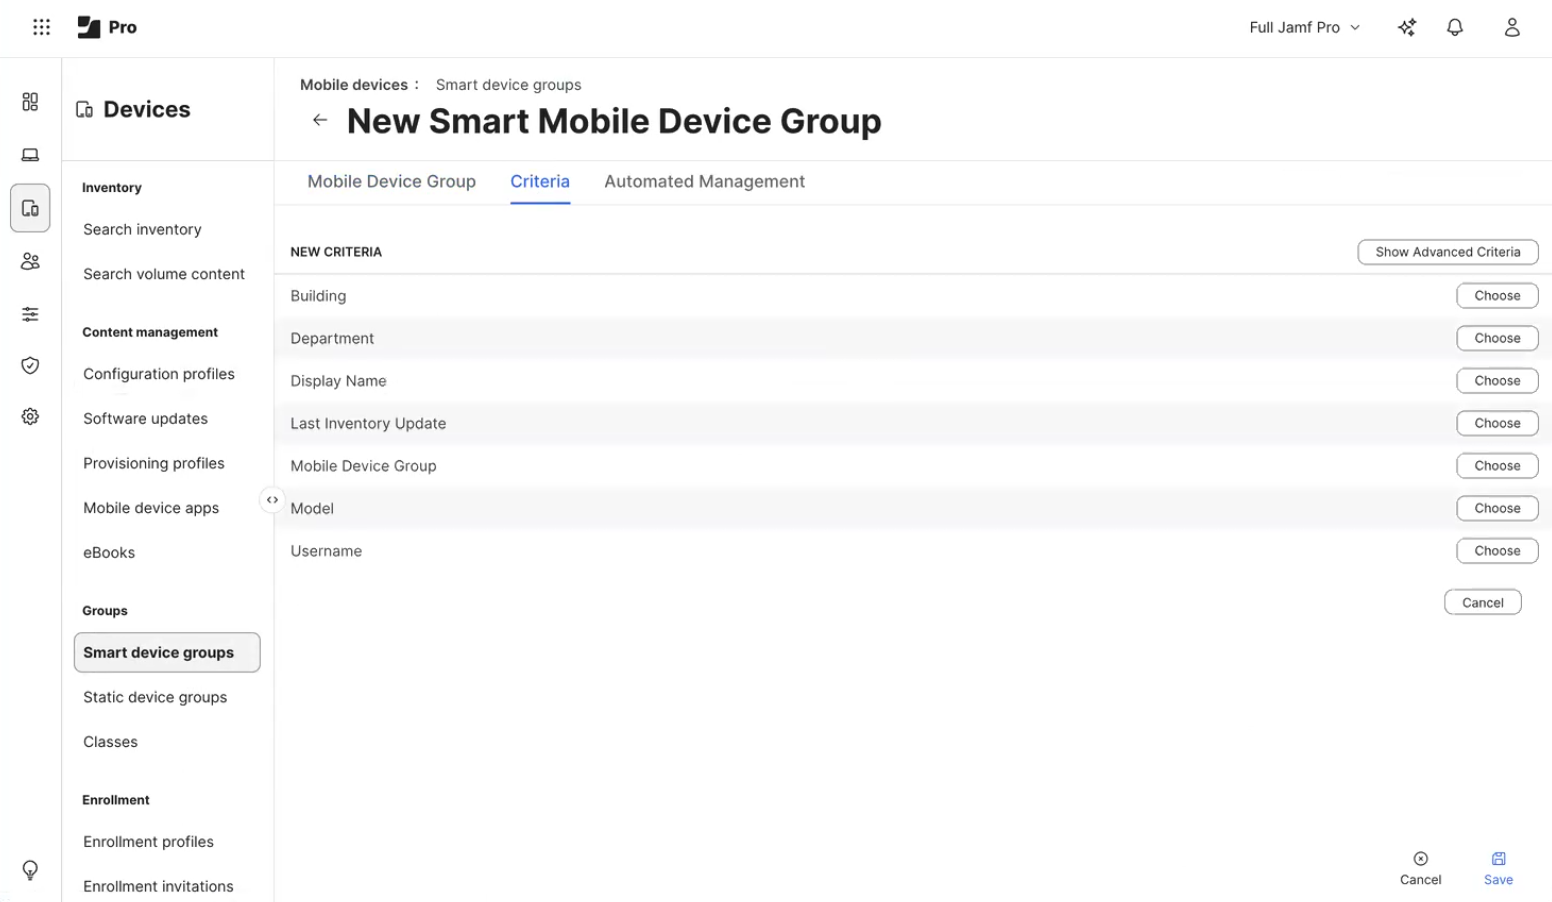
**Criteria** タブで、Jamf コネクタに対して非準拠と判定されるデバイスを定義する条件を **Add** します。

<figure><img src="/files/u24OIl4Sar58WM1CjRRE" alt=""><figcaption></figcaption></figure>
{% endstep %}
{% endstepper %}

***

## オンボーディングとデータ収集の確認

{% stepper %}
{% step %}

### デバイス上で構成を確認する

[Nexthink Mobile device configuration profile for iOS and iPadOS](https://edocs.nexthink.com/ja/nexthink-infinity/infinity-specifications/nexthink-mobile-app-configuration-profile-ios) のドキュメントに従い、構成ファイルが正しく動作していることを確認します。
{% endstep %}

{% step %}

### Nexthink でデバイスの可視性を確認する

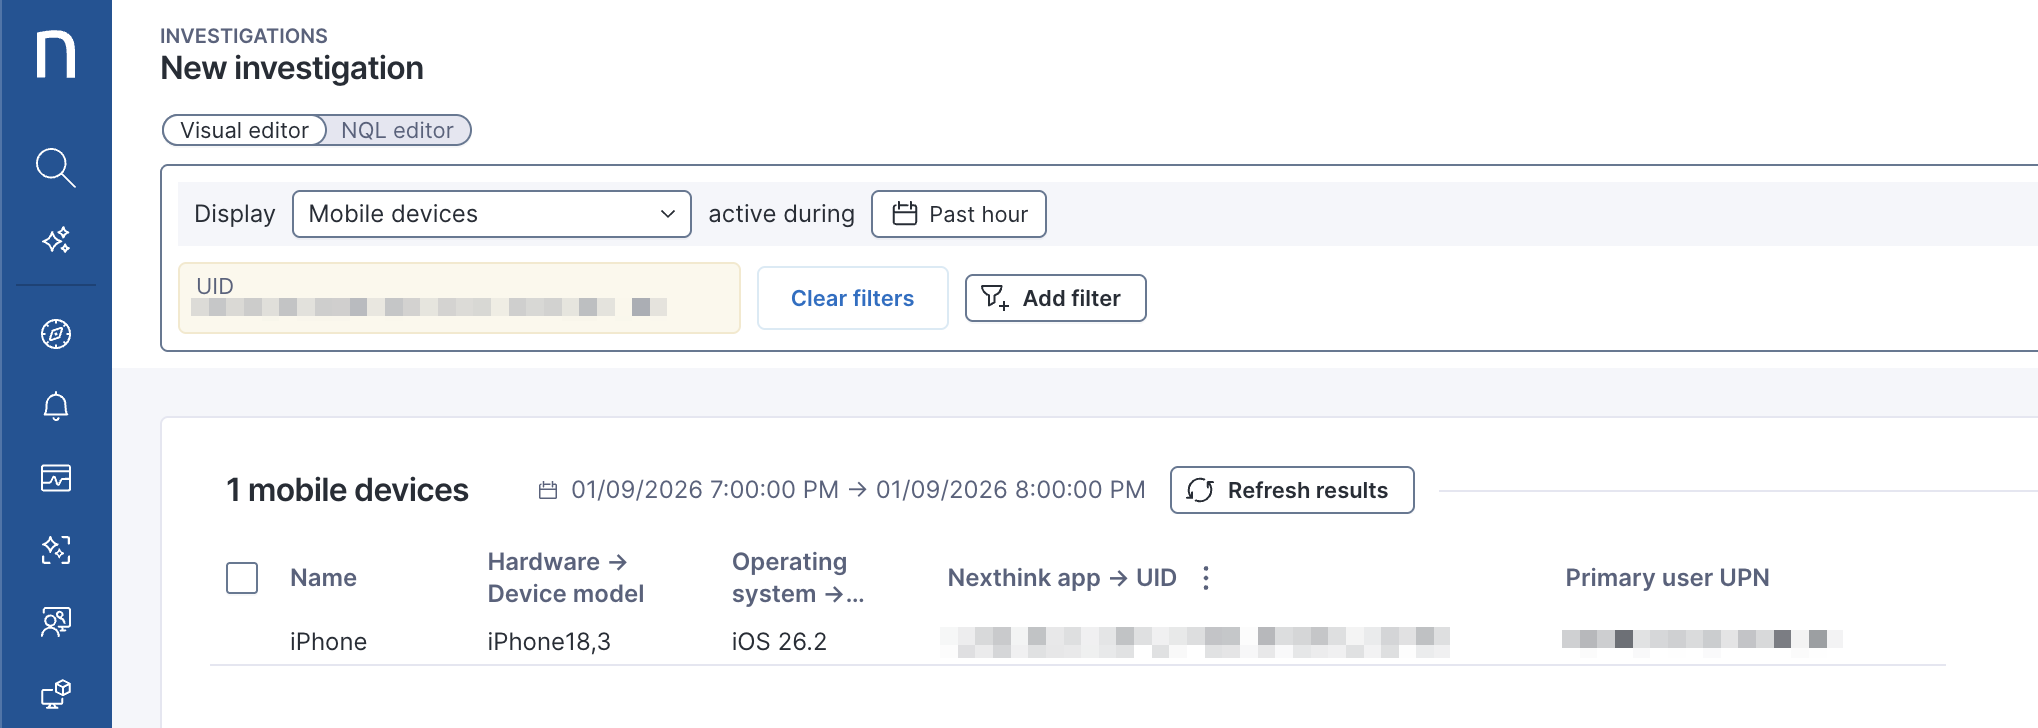
Nexthink にて、以下の調査を実行してデバイスがデータを報告していることを確認します。`<app-uid>` は実際のアプリ ID に変更してください。

{% code overflow="wrap" %}

```sql
mobile_devices during past 1h
| where mobile_device.uid in ["<app-uid>"]
| list mobile_device.name, mobile_device.hardware.model, mobile_device.operating_system.name, mobile_device.uid, mobile_device.primary_user_upn
```

{% endcode %}

デバイスがクエリ結果に表示されれば、オンボーディングは成功です。

<figure><img src="/files/ucVoLIOUrj1RGLGBNbtB" alt=""><figcaption></figcaption></figure>
{% endstep %}
{% endstepper %}

***

## クライアントデバイスで Nexthink Mobile を構成する（オプション）

必要に応じて、クライアント デバイスで Nexthink Mobile を構成する方法については [ユーザー デバイスでの Nexthink Mobile の構成](/platform/ja/configuring_nexthink/bringing-data-into-your-nexthink-instance/connecting-mobile-devices-to-nexthink/configuring-on-client-devices.md) ドキュメントを参照してください。


---

# Agent Instructions
This documentation is published with GitBook. GitBook is the documentation platform designed so that both humans and AI agents can read, navigate, and reason over technical content effectively. Learn more at gitbook.com.

## Querying This Documentation
If you need additional information that is not directly available in this page, you can query the documentation dynamically by asking a question.

Perform an HTTP GET request on the current page URL with the `ask` query parameter, and the optional `goal` query parameter:

```
GET https://docs.nexthink.com/platform/ja/configuring_nexthink/bringing-data-into-your-nexthink-instance/connecting-mobile-devices-to-nexthink/nexthink-mobile-for-ios.md?ask=<question>&goal=<endgoal>
```

`ask` is the immediate question: it should be specific, self-contained, and written in natural language.
`goal` is optional and describes the broader end goal you are ultimately trying to accomplish on behalf of the user. GitBook uses it to tailor the answer towards what is most useful for that goal.

The response will contain a direct answer to the question and relevant excerpts and sources from the documentation.

Use this mechanism when the answer is not explicitly present in the current page, you need clarification or additional context, or you want to retrieve related documentation sections.