> For the complete documentation index, see [llms.txt](https://docs.nexthink.com/llms.txt). Markdown versions of documentation pages are available by appending `.md` to page URLs; this page is available as [Markdown](https://docs.nexthink.com/configuring_nexthink/bringing-data-into-your-nexthink-instance/integrating-nexthink-with-third-party-tools/inbound-connectors/connector-for-citrix-virtual-apps-and-desktops.md).
# Citrix Virtual Apps and Desktops connector
{% hint style="warning" %}
This documentation references external sources. Nexthink does not have control over the accuracy of third-party documentation, nor any external updates or changes that might create inconsistencies with the information presented on this page. Please report any errors or inconsistencies to [Nexthink Support](https://support.nexthink.com/).
{% endhint %}
Nexthink Connector for Citrix Virtual Apps and Desktops (CVAD) retrieves important information about your CVAD environments, most notably the name of the Delivery Group to which the virtual machines belong.
This installation guide helps you install the connector securely. Your security team should review the installation steps described in this document and adjust them to meet your organization’s security policy.
## Data imported into Nexthink
The connector populates the following fields of the `virtualization` grouping in the [`devices`](https://docs.nexthink.com/understanding-key-data-platform-concepts/nql-data-model.md#device_device) table.
| Nexthink field | Type | Description |
| --------------------------------- | ----------- | ------------------------------------------------------------------------------------------------------------------------------------------------------------------------------------------------------------------------------------------------------------------------------------------------------------------------------------------------------------------------------------------------ |
| `virtualization.desktop_pool` | string | The name of the Citrix Delivery Group the virtual machine belongs to. |
| `virtualization.type` | enumeration |
The type of the desktop pool. Possible values are:
shared: several users work on the same virtual machine at the same time
personal: the virtual machine is used by one user at a time and all changes to the system persist
pooled: the device is used by one user at a time and during the logoff all changes including documents and data are erased.
|
| `virtualization.hostname` | string | The name of the virtualization host where the virtual machine was last observed running. |
| `virtualization.hypervisor_name` | string | The hardware virtualization system running the virtual machine. |
| `virtualization.environment_name` | string | The name of the connector used to retrieve the virtualization details: the `Name` of the CVAD environment in the configuration file. |
| `virtualization.desktop_broker` | enumeration | The VDI broker platform of the virtual machine, `citrix_cvad` for this connector. |
| `virtualization.disk_image` | string | The disk image last observed in use by the virtual machine. |
## Nexthink connector server
To limit the risk of disrupting the Citrix Delivery Controller (also known as DDC), Nexthink recommends installing the Nexthink Connector for CVAD on a separate server.
For a proof of value, you can install the connector directly on the Delivery Controller, since its impact there is minimal.
### Prerequisites
* Nexthink Collector installed on the virtual machines of every CVAD environment, as described in [Configuring and deploying Collector for VMs](https://docs.nexthink.com/configuring_nexthink/bringing-data-into-your-nexthink-instance/deploying-nexthink-in-non-vdi-environment/installing-collector/installing-collector-on-windows/configuring-and-deploying-collector-for-vms.md).
* Installed Windows PowerShell 5.1.
* Execution policy set to **Bypass**.
* The following PowerShell modules, installed for the user account that runs the connector:
* [Logging 4.8.5](https://www.powershellgallery.com/packages/Logging/4.8.5)
* [CredentialManager 2.0](https://www.powershellgallery.com/packages/CredentialManager/2.0)
* Installed Citrix PowerShell SDK 2203 LTSR or newer. Refer to the [SDKs and APIs for Citrix Virtual Apps and Desktops 7 2203 LTSR](https://docs.citrix.com/en-us/citrix-virtual-apps-desktops/2203-ltsr/sdk-api.html) documentation for the installation procedure using Citrix Studio.
* The server where you install the connector is joined to the same Active Directory domain as your Citrix Delivery Controller, so the connector can sign in to Citrix with a domain user account.
* [Downloaded the Nexthink Connector for CVAD](https://download.nexthink.com/integrations/Citrix+OnPrem+Connector/1.7.12/CitrixConnector-1.7.12.zip).
* The following accounts:
* A local user account that runs the scheduled tasks, on the server where you install the connector.
* A domain user account with the Citrix **Read Only Administrator** role, which the connector uses to read data from Citrix.
### Hardware requirements
| Component | Minimum | Recommended |
| ---------------- | ------------------------ | ------------------------ |
| CPU | 2-core x64 | 4-core x64 |
| RAM | 2 GB | 4—8 GB |
| Free disk space | 2 GB | 5 GB |
| Operating system | Windows 10 / Server 2016 | Windows 11 / Server 2022 |
### Networking
The Nexthink Connector for CVAD connects to the Citrix Delivery Controller, the Citrix Director and your Nexthink instance.
* The connector communicates with your Nexthink instance over TCP port 443.
* The connector connects to the Citrix Director on TCP port 80.
* The connector connects to the Delivery Controller on TCP port 80, or 443 if the controller uses HTTPS.
The following figure shows a simplified architecture with a connection between the connector and a Delivery Controller:
```mermaid
%%{ init : { "theme" : "default", "flowchart" : { "curve" : "linear" }}}%%
flowchart BT
subgraph domain["Client domain"]
ddc["Delivery controller"]
dir["Director"]
nxt["Nexthink Instance"]
subgraph machine["Machine"]
conn["Connector"]
end
end
conn -.->|"PowerShell"| ddc
conn -.->|"REST"| dir
conn -.->|"REST"| nxt
linkStyle 0 stroke:#1046A8,stroke-dasharray:8 6;
linkStyle 1,2 stroke:#1046A8,stroke-dasharray:2 4;
classDef start fill:#EEF3F7,stroke:#1046A8,color:#221F20;
classDef process fill:#3194F7,stroke:#1046A8,color:#FFFFFF;
class ddc,dir,conn start;
class nxt process;
```
#### URLs to allow through the firewall or proxy for PowerShell `Install-Module`
Purpose
URL
PowerShell Gallery
https://www.powershellgallery.com
NuGet provider
https://www.nuget.org
NuGet API
https://api.nuget.org
CDN for packages
https://www.powershellgallery.com/api/v2/
Alternate NuGet V2 API
https://www.nuget.org/api/v2/
Certificate revocation
http://crl.microsoft.com (normally optional; sometimes necessary)
#### Additional considerations
* If SSL inspection is enabled on your proxy, ensure it does not break the TLS handshake.
* If you're behind a proxy, set it in *Settings > Network & Internet > Proxy* while signed in as the local user account that runs the connector. The scheduled tasks cannot authenticate to a proxy, so allow connector traffic through without authentication. To install modules manually through an authenticating proxy, first run the following command in the same PowerShell window:
{% code overflow="wrap" %}
```powershell
[System.Net.WebRequest]::DefaultWebProxy.Credentials = [System.Net.CredentialCache]::DefaultNetworkCredentials
```
{% endcode %}
#### Test connectivity
You can test access using a PowerShell terminal by running the following command:
```powershell
Invoke-WebRequest https://www.powershellgallery.com
```
### Local user account for scheduled tasks
The Nexthink Connector for CVAD runs as scheduled tasks, with one runner task per CVAD environment, and needs to be able to access the Citrix APIs. To limit security concerns, Nexthink recommends using a local user account on the server where you install the connector or a regular domain user account without any special privileges at the domain level.
The following guide uses the local user account on that server.
{% stepper %}
{% step %}
Log on as an administrator to the server that will run the Nexthink Connector for CVAD.
{% endstep %}
{% step %}
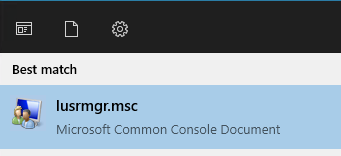
Launch the local users and groups console by running the command `lusrmgr.msc` from the start menu.
{% endstep %}
{% step %}
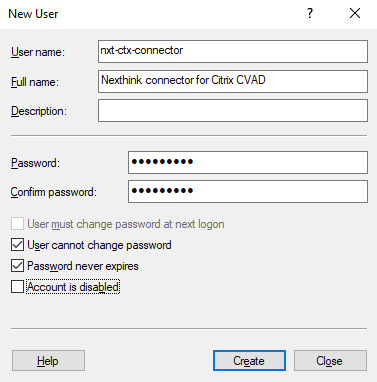
Right-click on the **Users** folder in the **Local Users and Groups (Local)** directory and select **New user…**
{% endstep %}
{% step %}
Create a user account according to your organization's naming conventions, for example `nxt-ctx-connector-user`. Make a note of the **User name** and **Password**: you need them to store credentials, to test the connector and to create the scheduled tasks.
To safeguard the functionality of the connector, select the following options:
* **User cannot change password**
* **Password never expires**
{% endstep %}
{% step %}
Click **Create**.
{% endstep %}
{% step %}
Open the local group policy editor by running `gpedit.msc` from the start menu.
{% endstep %}
{% step %}
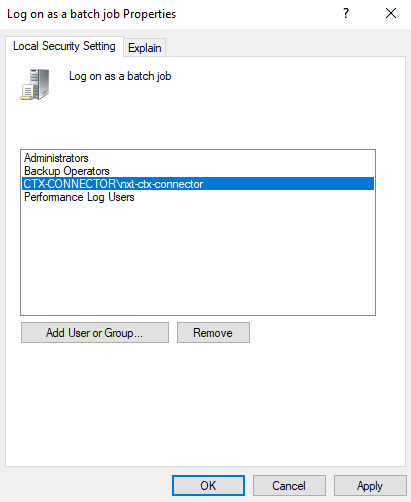
Navigate to *Computer Configuration > Windows Settings > Security Settings > Local Policies > User Rights Assignment* and open the policy **Log on as a batch job**.
{% endstep %}
{% step %}
Click **Add User or Group** and add the user you created.
{% endstep %}
{% endstepper %}
### Installing the connector
{% stepper %}
{% step %}
[Download the Nexthink Connector for CVAD](#connectorforcitrixvirtualappsanddesktops-prerequisites).
{% endstep %}
{% step %}
Extract the zip file and copy the content of its `CitrixConnector-` folder, the two scripts and the **Config** and **Logs** folders, to a folder on your system. Nexthink recommends the following folder:
`C:\Program Files\Nexthink\Connectors\Citrix`
{% endstep %}
{% step %}
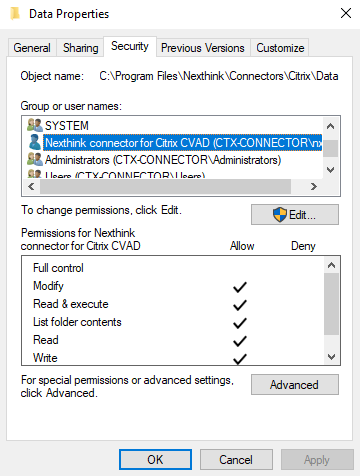
Apply **Modify** permissions on the connector folder for the local user account you created earlier. The connector creates and writes to the `Logs` and `Storage` folders inside it.
{% endstep %}
{% endstepper %}
### Nexthink API credentials
The connector needs appropriate credentials to connect to the Nexthink Enrichment API. Nexthink stores the credentials safely in the credential store of the local user account you created earlier.
{% stepper %}
{% step %}
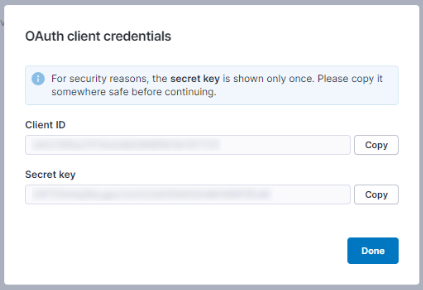
Create API credentials with the **Enrichment API** permission. Refer to the [API credentials](https://developer.nexthink.com/docs/api/api-credentials) documentation for step-by-step guidance. When you save the API credentials, a window shows the Client ID and the Secret key. Make a note of both: they are not shown again once you close the window.
{% endstep %}
{% step %}
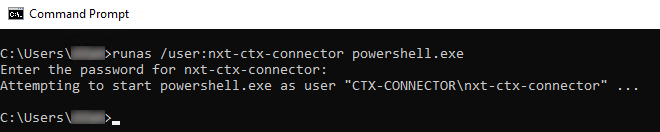
On the server that will run the Nexthink Connector for CVAD, open PowerShell as the local user account you created earlier with the `runas` command:
```powershell
runas /user:nxt-ctx-connector-user powershell.exe
```
{% endstep %}
{% step %}
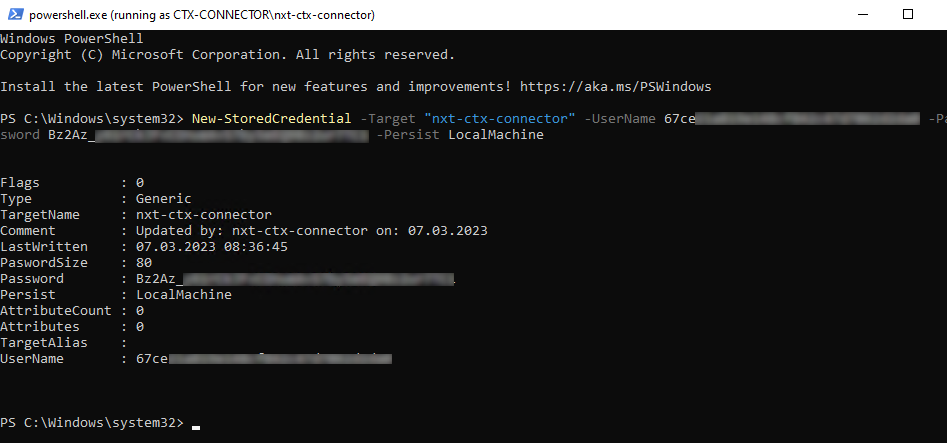
In the new PowerShell window, store the API credentials by running the following command:
{% code overflow="wrap" %}
```powershell
New-StoredCredential -Target "nxt-ctx-connector-credential" -UserName "" -Password "" -Persist LocalMachine
```
{% endcode %}
Replace `` and `` with the values you noted down. The `-Target` value names the stored credential and is separate from the local user account name. Make a note of the `TargetName` you used with `-Target`: you need it for the configuration file.
{% endstep %}
{% endstepper %}
{% hint style="info" %}
In the `config.json` [configuration file](#connectorforcitrixvirtualappsanddesktops-updatingtheconfigurationfile), these credentials are stored in `"NexthinkAPI"`.
The `TargetName` used with `-Target` is stored in `"WindowsCredentialEntry"`.
{% endhint %}
### Updating the configuration file
For the configuration file update, you need the URL of your Nexthink Cloud API instance. The URL pattern looks like this: `instance.api.region.nexthink.cloud`. See the steps listed below for more details.
{% hint style="info" %}
If you do not know your region, reach out to your Nexthink representative to obtain this information.
{% endhint %}
{% stepper %}
{% step %}
Locate the folder where you unzipped the connector.
{% endstep %}
{% step %}
Navigate to the **Config** folder and open the `config.json` file using a text editor.
{% endstep %}
{% step %}
Scroll to the `"NexthinkAPI"` section:
```json
{
"_Info": "This is the JSON based configuration for Citrix Virtual Apps and Desktops connector",
"Info": {
"Project": "copla-citrix-onprem-connector",
"ConfigVersion": "1.1.0"
},
"Logging": {
"LogRetentionDays": 7,
"LogLevel": "INFO"
},
"CitrixEnvironments": [
{
"Name": "",
"CitrixControllerFQDN": "",
"CitrixDirectorFQDN": "",
"WindowsCredentialEntry": ""
},
{
"Name": "",
"CitrixControllerFQDN": "",
"CitrixDirectorFQDN": "",
"WindowsCredentialEntry": ""
}
],
"NexthinkAPI": {
"HostFQDN": "",
"WindowsCredentialEntry": "",
"RequestBatchSize": "1000"
}
}
```
Change the following values:
* Replace the `"HostFQDN"` value with the API address of your Nexthink instance, `instance.api.region.nexthink.cloud`:
* Replace `instance` with the name of the instance.
* Replace `region` with one of the following regions:
* `us` for the United States
* `eu` for the European Union
* `pac` for Asia-Pacific
* `meta` for the Middle East, Turkey and Africa
* For example: `gwy-eu-west-3-fuji-rest.api.eu.nexthink.cloud`
* Replace the `"WindowsCredentialEntry"` value with the `TargetName` of the API credentials you stored earlier, for example `"WindowsCredentialEntry": "nxt-ctx-connector-credential",`
{% endstep %}
{% endstepper %}
{% hint style="warning" %}
To replace the `"CitrixEnvironments"` values in the configuration file and set up a connection to a CVAD environment, refer to [#connectorforcitrixvirtualappsanddesktops-updatingtheconfigurationfile.1](#connectorforcitrixvirtualappsanddesktops-updatingtheconfigurationfile.1 "mention").
{% endhint %}
## Setting up a connection to a CVAD environment
The previous section described the basic configuration of the Nexthink Connector for CVAD. This section helps you set up a connection to a CVAD environment. Repeat the procedures in this section for every CVAD environment you need to connect to.
### Citrix Delivery Controller
Nexthink Connector for CVAD connects to the Citrix Delivery Controller to retrieve data from the Monitor Service OData API of the Citrix Director and the Citrix PowerShell SDK. You need the Delivery Controller name to properly configure the connector.
Make a note of the fully qualified domain names (FQDN) of the Delivery Controller and of the server that hosts the Citrix Monitor Service API. Both can be the same server. You enter them later in `Config\config.json`, as `CitrixControllerFQDN` and `CitrixDirectorFQDN` in the entry of the environment under `CitrixEnvironments`.
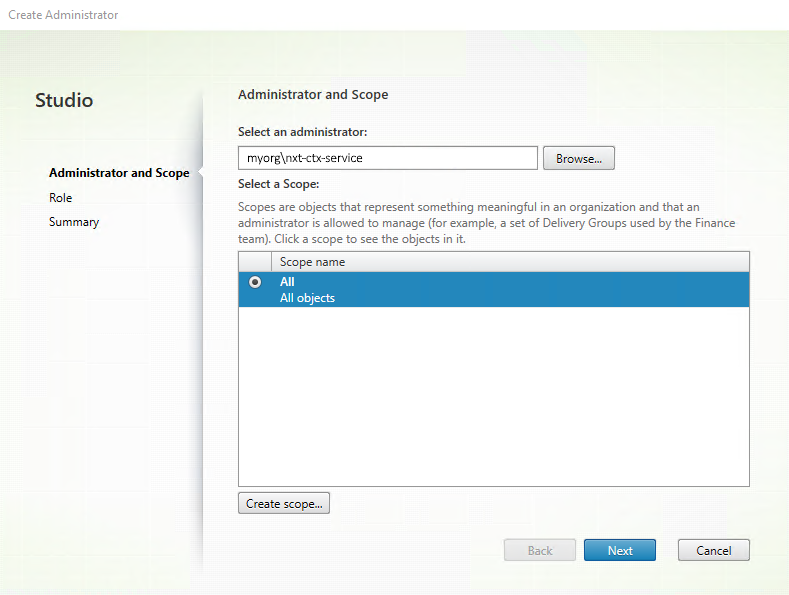
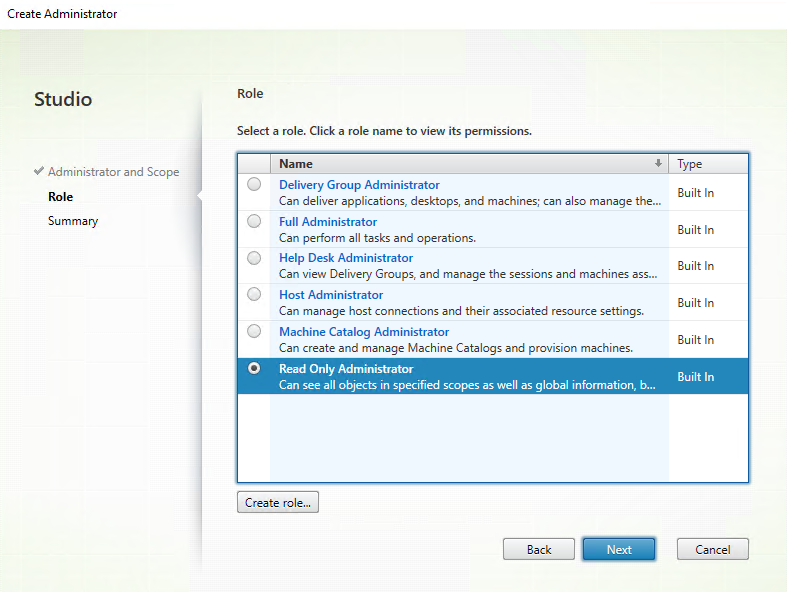
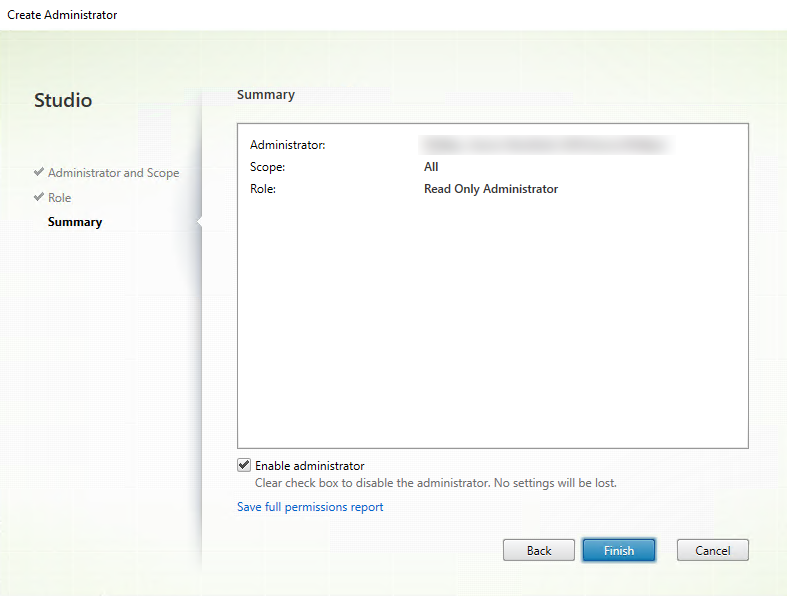
### Creating a read-only Citrix administrator
The Nexthink Connector for CVAD needs read-only access to the Citrix Director API and the Citrix PowerShell SDK. To do this, create a domain user account without any special privileges and make a note of the username and password.
{% stepper %}
{% step %}
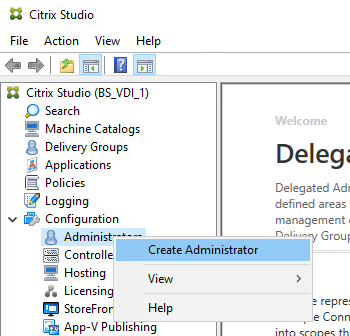
Launch the Citrix Studio console and go to *Configuration > Administration*.
{% endstep %}
{% step %}
Right-click **Administration** and select **Create Administrator**.
{% endstep %}
{% step %}
Click **Browse…** and select the domain user account you created for the connector. Set the scope to **All** and click **Next**.
{% endstep %}
{% step %}
Select the **Read Only Administrator** role and click **Next**.
{% endstep %}
{% step %}
Select **Enable administrator** and click **Finish**.
{% endstep %}
{% endstepper %}
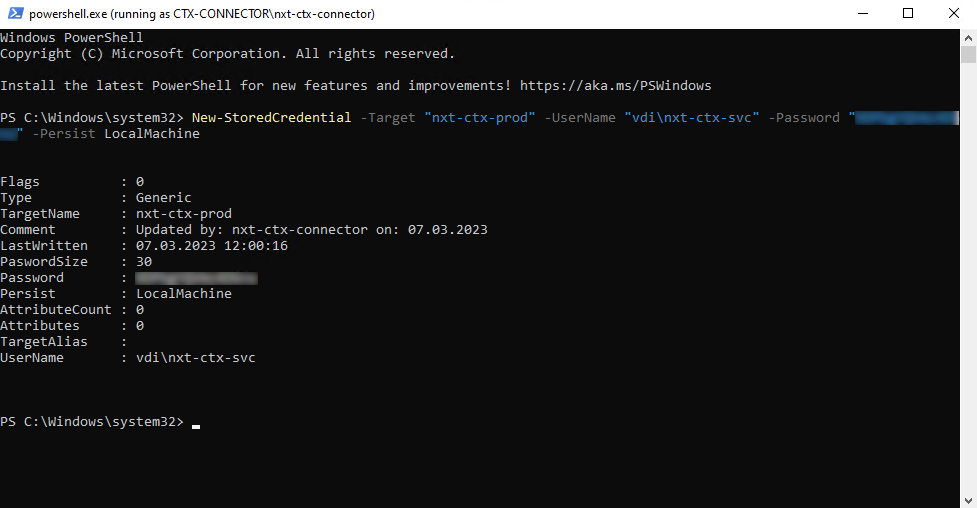
### Setting up stored credentials
{% stepper %}
{% step %}
Open PowerShell as the local user account, as described in [Nexthink API credentials](#nexthink-api-credentials).
{% endstep %}
{% step %}
In the new PowerShell window, store the credentials of the domain user account with the Citrix Read Only Administrator role by running the following command:
{% code overflow="wrap" %}
```powershell
New-StoredCredential -Target "nxt-ctx-prod" -UserName "" -Password "" -Persist LocalMachine
```
{% endcode %}
Replace `` and `` with the values of the domain user account. Make a note of the `TargetName` you used: you need it for the configuration file.
{% endstep %}
{% endstepper %}
{% hint style="info" %}
In the `config.json` [configuration file](#connectorforcitrixvirtualappsanddesktops-updatingtheconfigurationfile.1), these credentials are stored in `"CitrixEnvironments"`.
The `TargetName` used with `-Target` is stored in `"WindowsCredentialEntry"`.
{% endhint %}
### Updating the configuration file
Each CVAD environment has its own section in the configuration file. The configuration file that comes with the connector contains an example of how to configure multiple environments. If needed, create a copy of the original `config.json` file for future reference.
{% stepper %}
{% step %}
Locate the folder where you unzipped the connector.
{% endstep %}
{% step %}
Navigate to the **Config** folder and open the `config.json` file using a text editor.
{% endstep %}
{% step %}
Scroll to the `"CitrixEnvironments"` section. Keep one entry for each CVAD environment you connect to. If you connect to a single environment, remove the second entry, from `{ "Name": ""` to `"WindowsCredentialEntry": "" }`. The code should look similar to the following:
{% endstep %}
{% step %}
Change the following values in the entry:
* Replace `` with a name for this CVAD environment, for example `Citrix Prod`. You pass this name, in quotes, to the connector with `-CitrixEnvironment`.
* Replace `` with the FQDN of the Delivery Controller.
* Replace `` with the FQDN of the Citrix Director.
* Replace `` with the `TargetName` of the stored credentials you created earlier, for example `nxt-ctx-prod`.
{% endstep %}
{% endstepper %}
### Testing the connector
{% stepper %}
{% step %}
Open PowerShell as the local user account, as described in [Nexthink API credentials](#nexthink-api-credentials).
{% endstep %}
{% step %}
Change to the directory where you installed the connector, for example:
```powershell
cd 'C:\Program Files\Nexthink\Connectors\Citrix\'
```
{% endstep %}
{% step %}
Run the Auto-Updater, which installs the connector module for the local user account:
```powershell
.\Citrix-Connector-Auto-Updater.ps1
```
{% endstep %}
{% step %}
Run the Runner for the environment:
```powershell
.\Citrix-Connector-Runner.ps1 -CitrixEnvironment ""
```
Replace `` with the `Name` value of the environment in `config.json`, for example `Citrix Prod`.
{% endstep %}
{% endstepper %}
The expected output for the Runner is `0`, similar to the following figure:
Correct execution should provide a log such as the following:
The Runner writes the result of the test to `Logs\\CitrixConnector-.log` in the connector folder, for example `C:\Program Files\Nexthink\Connectors\Citrix\Logs\Citrix Prod\`.
### Setting up the scheduled tasks
Create one scheduled task for the Runner of each CVAD environment, and one for the Auto-Updater.
{% stepper %}
{% step %}
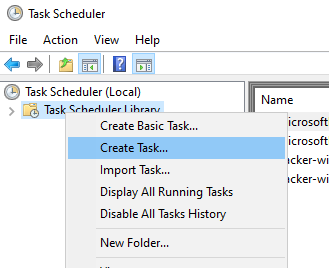
Open the task scheduler and select **Create task…**
{% endstep %}
{% step %}
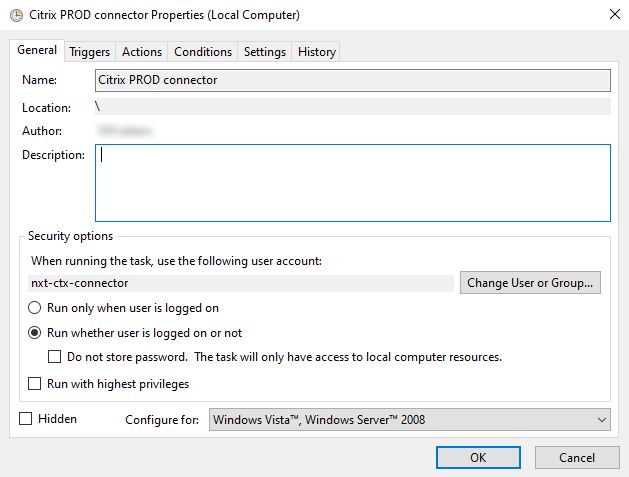
In the **General** tab, name the task, for example `Nexthink CVAD connector - Citrix Prod`, and change the user to the local user account you created earlier, for example `nxt-ctx-connector-user`. Select **Run whether user is logged on or not**.
{% endstep %}
{% step %}
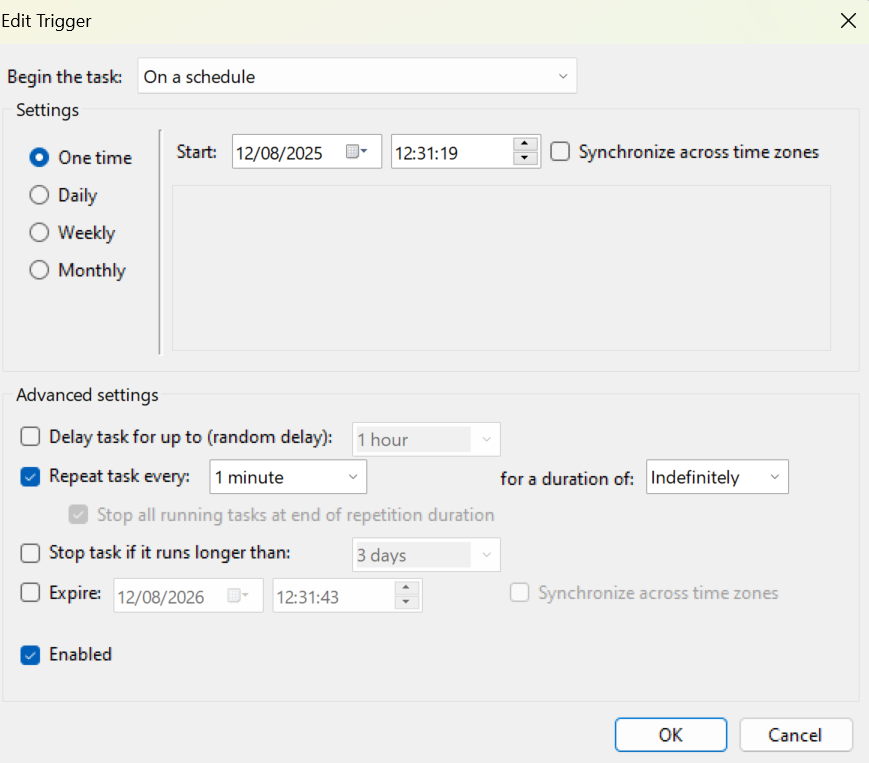
In the **Triggers** tab, click **New…**. Under *Advanced settings > Repeat task every*, select **1 minute** and set **for a duration of** to **Indefinitely**. Click **OK**. Each run sends only the machines powered on since the previous run and refreshes everything once an hour. A run is light, and the task must run at least hourly.
{% endstep %}
{% step %}
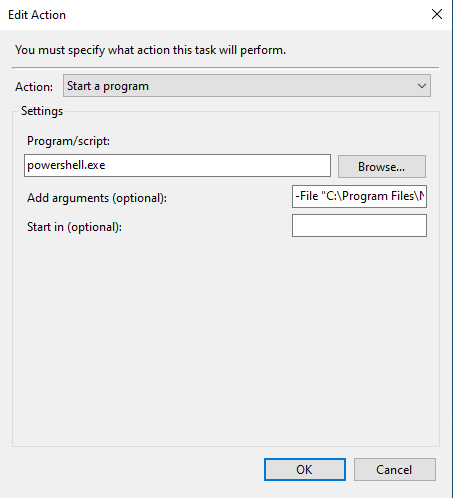
In the **Actions** tab, click **New…** and enter the following values. Click **OK**.
* **Program/script**: `powershell.exe`
* **Add arguments (optional)**: `-ExecutionPolicy Bypass -File "C:\Program Files\Nexthink\Connectors\Citrix\Citrix-Connector-Runner.ps1" -CitrixEnvironment "Citrix Prod"`, with the environment name from `config.json`
* **Start in (optional)**: the connector folder, for example `C:\Program Files\Nexthink\Connectors\Citrix`
{% endstep %}
{% step %}
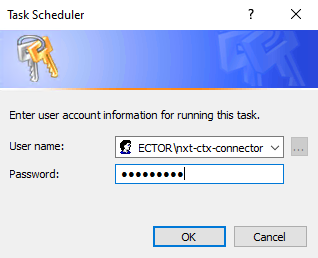
Click **OK** to save the task. When prompted, enter the password of the local user account and click **OK**.
{% endstep %}
{% step %}
Repeat these steps for each other CVAD environment, changing only the task name and the `-CitrixEnvironment` value.
{% endstep %}
{% step %}
Repeat these steps once for the Auto-Updater, with these differences:
* Task name: for example `Nexthink CVAD connector - Auto-Updater`
* Trigger: the same as the Runner, repeated every 15 minutes, so a new connector version is in use within 15 minutes.
* **Add arguments (optional)**: `-ExecutionPolicy Bypass -File "C:\Program Files\Nexthink\Connectors\Citrix\Citrix-Connector-Auto-Updater.ps1"`
{% endstep %}
{% endstepper %}
## Verifying the data in Nexthink
After the first scheduled run of the Runner, open **Investigations** in Nexthink and run the query below. Each row is a virtual machine the connector enriched, with the environment that delivered it.
```
devices
| where device.virtualization.desktop_broker == citrix_cvad
| list device.name, device.virtualization.environment_name, device.virtualization.desktop_pool, device.virtualization.type, device.virtualization.hostname, device.virtualization.hypervisor_name, device.virtualization.disk_image
```
## Where to go next
* [VDI Experience](https://docs.nexthink.com/user-guide/vdi-experience.md): the module Nexthink monitors virtual desktops with. The library pack below requires it.
* [Citrix CVAD essentials](https://docs.nexthink.com/library-packs/vdi/citrix/citrix-cvad-essentials.md): a library pack to install from the Nexthink Library. Its dashboards track VM status, reboot health and Virtual Delivery Agent (VDA) registration. They also track the state of Delivery Controllers, license servers and StoreFront servers.
***
RELATED TOPIC
* [API Credentials](https://developer.nexthink.com/docs/api/api-credentials)
* [Configuring and deploying Collector for VMs](https://docs.nexthink.com/configuring_nexthink/bringing-data-into-your-nexthink-instance/deploying-nexthink-in-non-vdi-environment/installing-collector/installing-collector-on-windows/configuring-and-deploying-collector-for-vms.md)
* [VDI Experience](https://docs.nexthink.com/user-guide/vdi-experience.md)
* [Citrix CVAD essentials](https://docs.nexthink.com/library-packs/vdi/citrix/citrix-cvad-essentials.md)
[^1]: This value must match the parameter for `New-StoredCredential -Target`.
---
# Agent Instructions
This documentation is published with GitBook. GitBook is the documentation platform designed so that both humans and AI agents can read, navigate, and reason over technical content effectively. Learn more at gitbook.com.
## Querying This Documentation
If you need additional information that is not directly available in this page, you can query the documentation by asking a question.
Perform an HTTP GET request on the following URL with the `ask` and `goal` query parameters:
```
GET https://docs.nexthink.com/configuring_nexthink/bringing-data-into-your-nexthink-instance/integrating-nexthink-with-third-party-tools/inbound-connectors/connector-for-citrix-virtual-apps-and-desktops.md?ask=&goal=
```
`ask` is the immediate question: it should be specific, self-contained, and written in natural language.
`goal` is what the user is ultimately trying to achieve, the reason they need the answer. Sharing it helps GitBook give you a better, more relevant answer. A goal is most helpful when it describes the outcome the user wants rather than restating the question. For example, with `ask=how do I create an API token`, a goal like `automate deployments from our CI pipeline` lets GitBook tailor the answer to that use case.
The response will contain a direct answer to the question and relevant excerpts and sources from the documentation.
Use this mechanism when the answer is not explicitly present in the current page, you need clarification or additional context, or you want to retrieve related documentation sections.